RoboForm V9 Manual (Windows)
Table Of Contents
- Chapter 1: Installation and Account Setup
- Chapter 2: Key RoboForm Terms
- Chapter 3: Browser Integration
- Chapter 4: Logins
- Chapter 5: Bookmarks
- Chapter 6: Safenotes
- Chapter 7: Identities
- Chapter 8: RoboForm Editor
- Accessing the Editor
- Editor Overview
- Logins in the Editor
- Bookmarks in the Editor
- Applications in the Editor
- Identities in the Editor
- Filling Forms from RoboForm Editor
- Contacts in Editor
- Safenotes in Editor
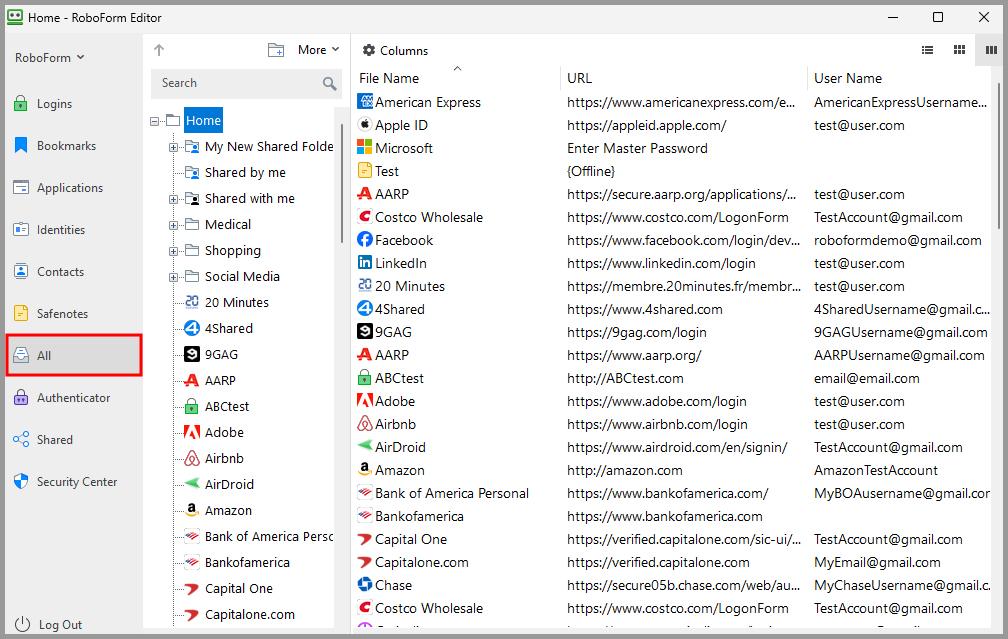
- The All Tab in the Editor
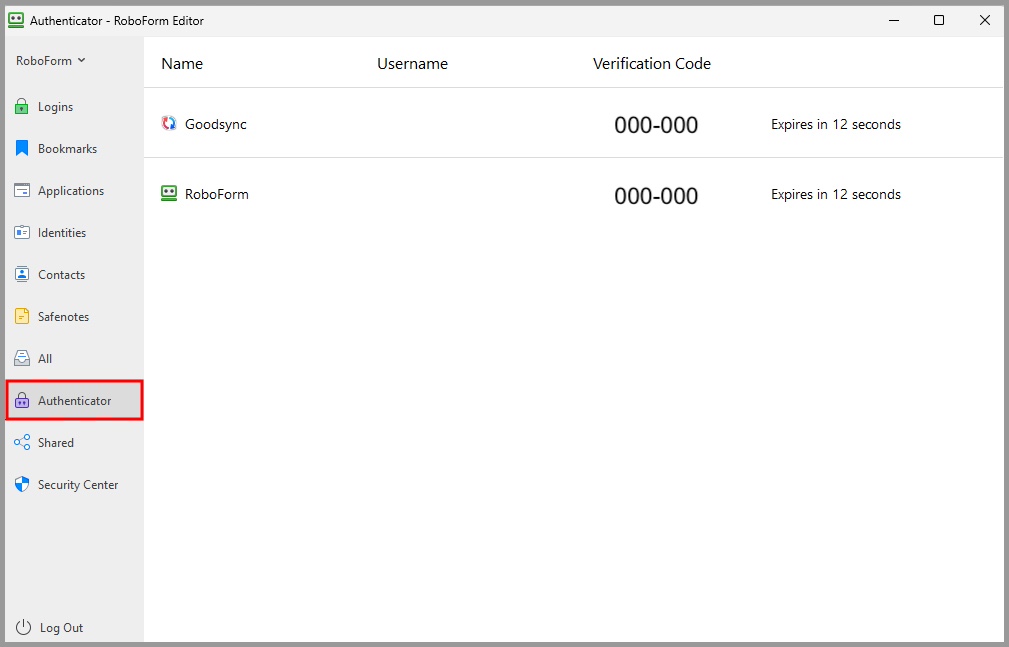
- The Authenticator Tab in the Editor
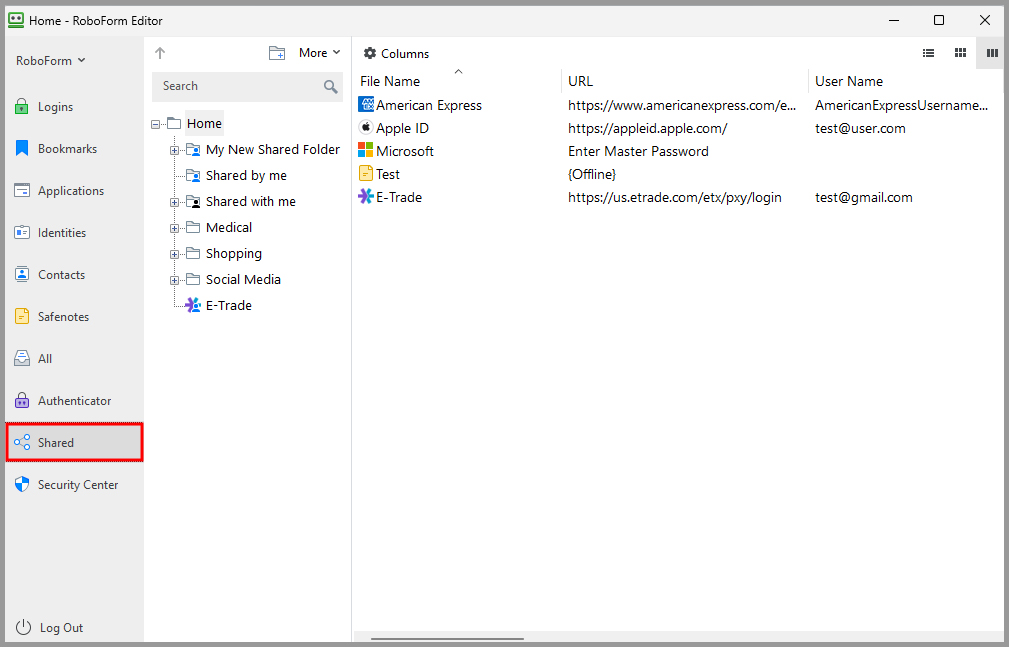
- The Shared Tab in the Editor
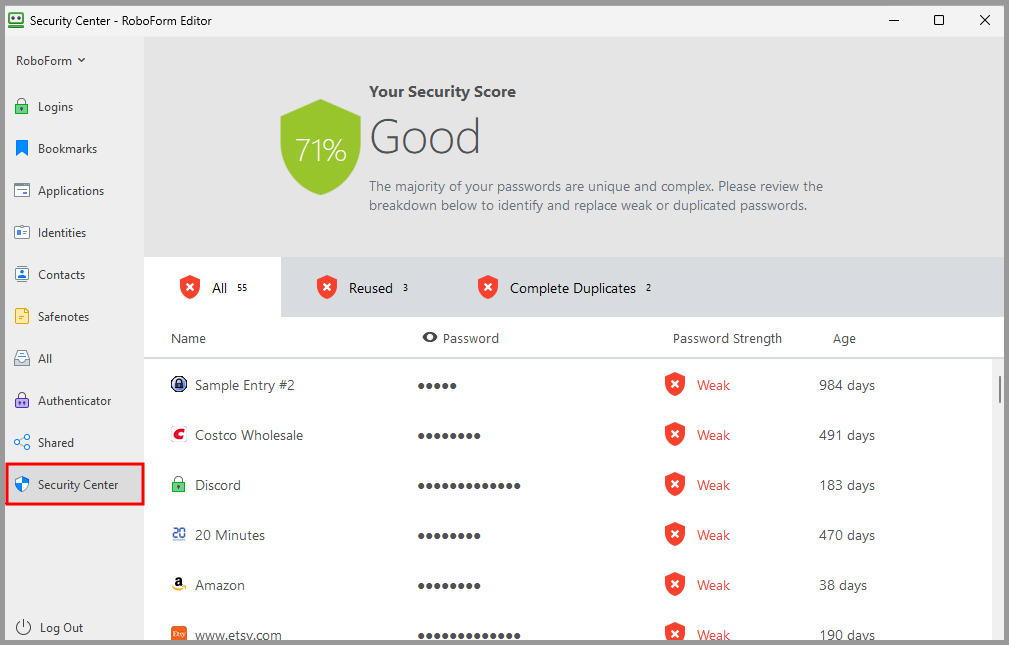
- The Security Center in the Editor
- Chapter 9: Taskbar Icon
- Chapter 10: AutoFill Dialog
- Chapter 11: Password Generator
- Chapter 12: Authenticator
- Chapter 13: Sharing and Sending
- Chapter 14: Emergency Access
- Chapter 15: Security Center
- Chapter 16: RoboForm Online
- Chapter 17: RoboForm Start Page
- Chapter 18: Options and Settings
- Chapter 19: RoboForm Security
Chapter 1: Installation and Account Setup
-
Go to the RoboForm Download page here:https://www.roboform.com/download.
To the right of your recommended download, click the green "Install" button.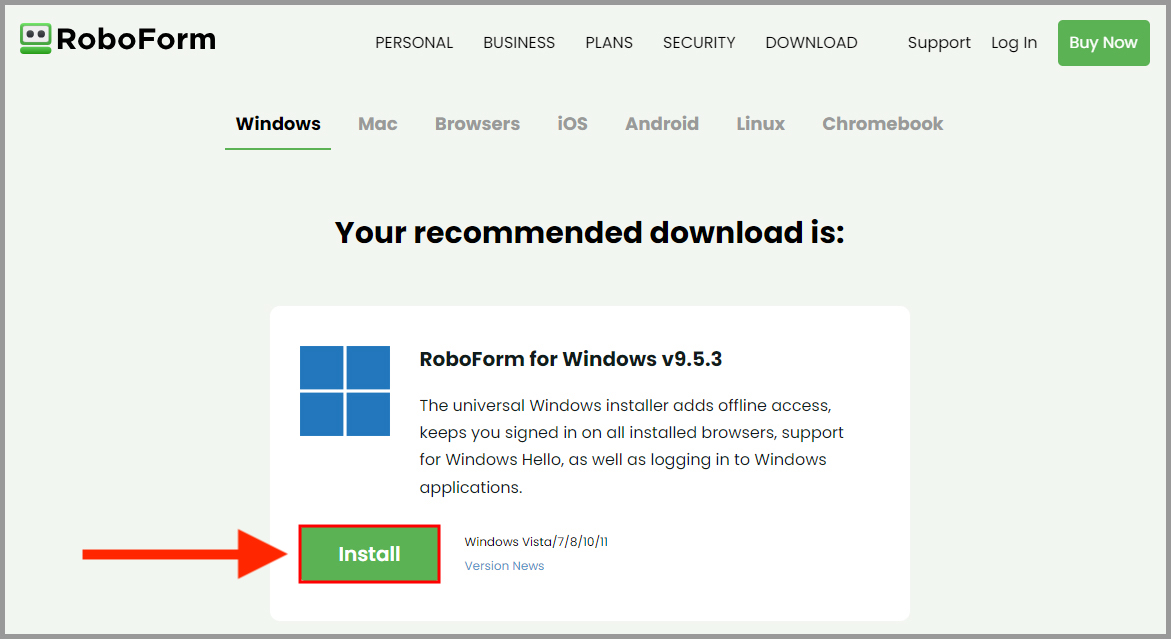
-
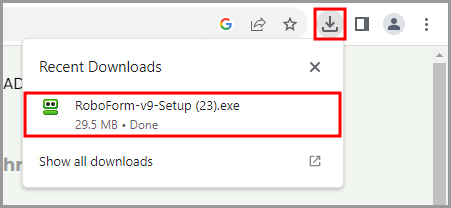
Once the Setup file is downloaded, a link to it displays in the Downloads menu at the top right corner of your browser window. Click it to begin the setup process.
-
You will be prompted to install the RoboForm browser extension. For help with installing the RoboForm browser extension, click here .
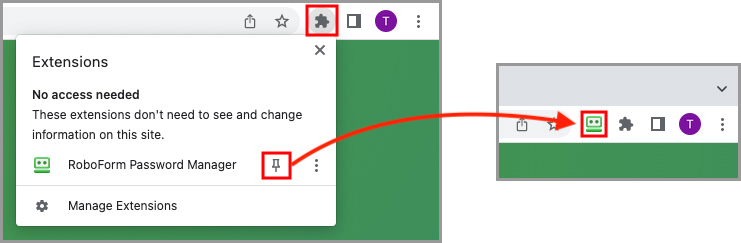
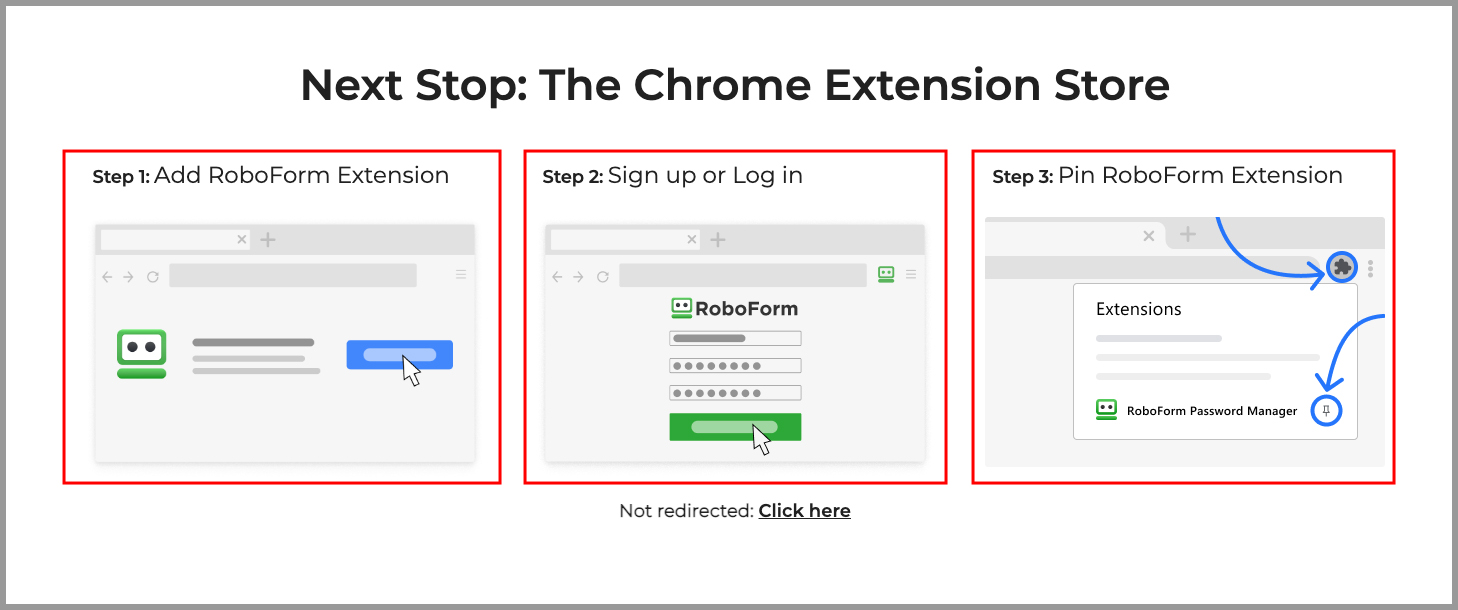 NOTE: Be sure to Pin the extension once you have finished adding it to your browser.
-
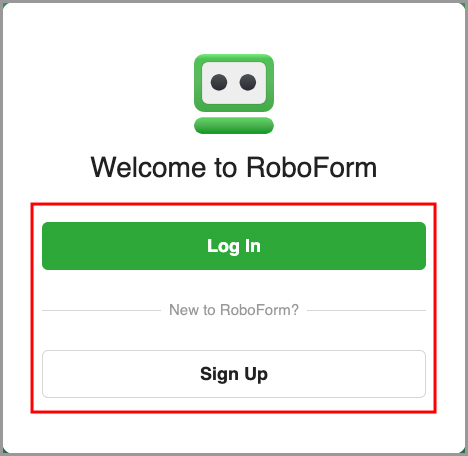
You will be brought to the RoboForm Start Page where you will see options to either create your RoboForm account or to log in to an existing account.
If you already have an account, choose the "Log In" option and enter your login credentials. Once you are logged in, you are ready to begin using RoboForm.
If you do not have an account yet, choose the "Create New Account" option and steps 7 and 8 will walk you through the account creation process
-
After selecting "Create New Account," you will be on the "Create Account" window. Enter the email address you would like to use with your account, and a secure Master Password that you will be able to remember.
NOTE: If you forget your Master Password, you may be able to reset it through the RoboForm mobile app without losing your data.
Click here for our tutorial on enabling the Master Password Restore feature on iOS.
Click here for our tutorial on enabling the Master Password Restore feature on Android.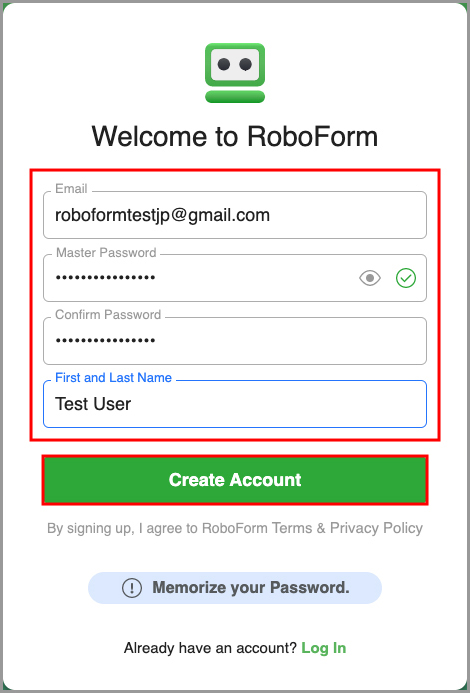
-
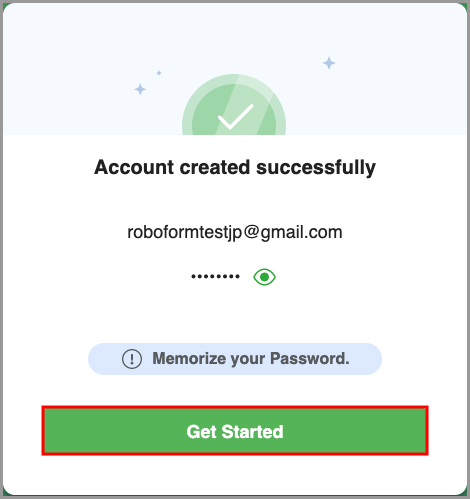
Your RoboForm account has been successfully created. Click "Get Started" and your installation will be complete.
Chapter 2: Key RoboForm Terms
Login - RoboForm saves online passwords into what we call a Login. Logins allow you to log in to a site with only one click. After saving a Login, RoboForm will offer to fill your Login details automatically when you visit the sign-in page for the site again.
Bookmarks - Bookmarks are websites and web pages you can save to RoboForm, similar to a Bookmark on your browser. Creating a Bookmark leaves you one click away from your favorite web pages.
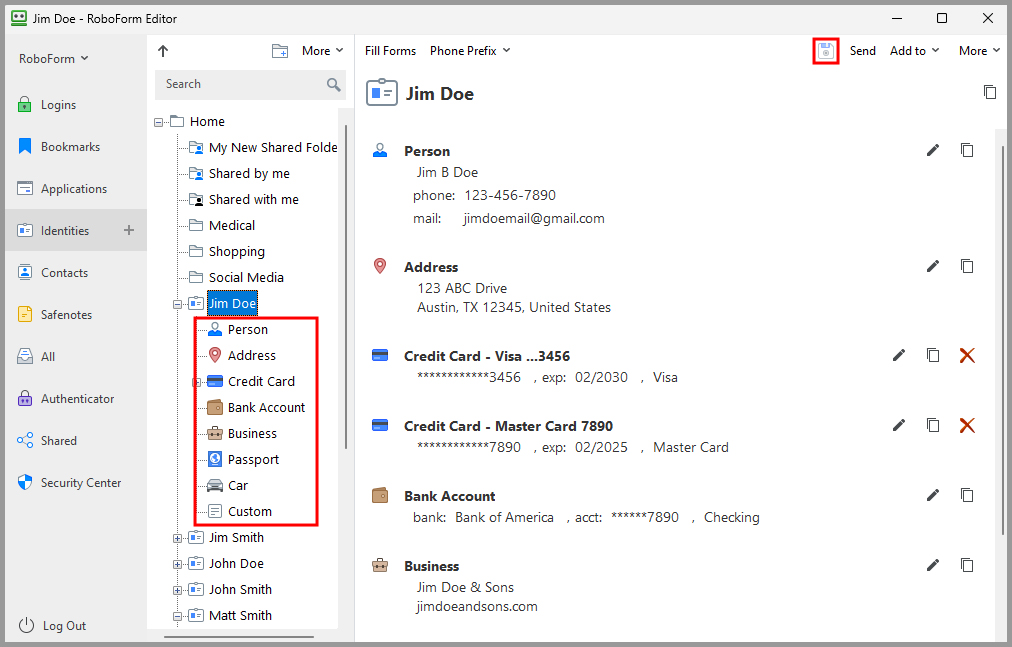
Identity - Your Identity is your personal profile. RoboForm can use Identities to automatically fill in web forms, such as an online checkout. Identities consist of the following categories: Person, Address, Credit Card, Bank Account, Business, Passport, and Car.
Contact - This is your Address Book. Each entry in this Address Book is called a Contact. A Contact is like an Identity but is not used for form filling. Instead, it is used to lookup other people’s personal data such as their name, phone number, address, etc.
Safenote - You can store frequently-used text into what we call a Safenote. Safenotes provide storage for important information that is not automatically stored in Logins or Identity such as lock key combinations, secret family recipes, and software activation codes.
RoboForm Data - All of your RoboForm items - your Logins, Bookmarks, Identities, Contacts, and Safenotes - make up your RoboForm Data.
Folder - All of your RoboForm items can be categorized in Folders, similar to Windows Folders. Any item of RoboForm Data be organized into Folders - including other Folders!
Master Password - This is the main password that unlocks all of your RoboForm Data for use. Do not forget your Master Password! We do not store it and will not be able to recover it for you if you lose it.
NOTE: If you forget your Master Password, you may be able to reset it through the RoboForm mobile app without losing your data
Click here for our tutorial on enabling the Master Password Restore feature on iOS.Click here for our tutorial on enabling the Master Password Restore feature on Android.
RoboForm Extension - This is the main vertical or horizontal RoboForm Browser application. The RoboForm Extension is the term that will be used to characterize both Extensions and Toolbars.
- In Google Chrome, Mozilla Firefox, Opera, and Microsoft Edge, Roboform is seen as an Extension that is located in the top right corner next to the address bar.
- In Safari, the RoboForm Extension is located on the left side of the address bar
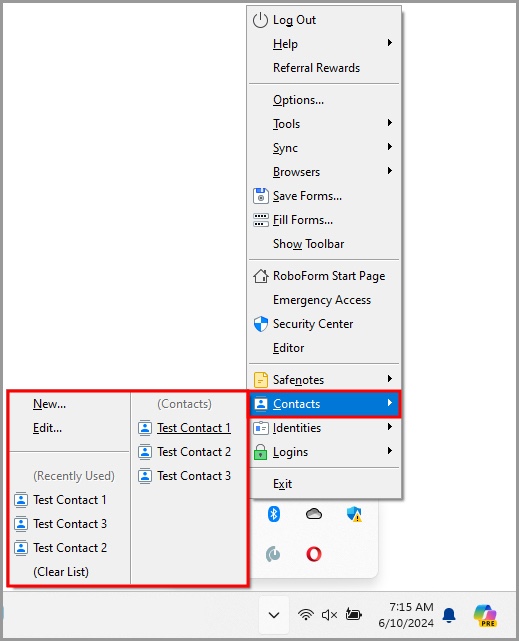
RoboForm Taskbar Icon - This button initiates the RoboForm menu that is located next to your computer’s date and time. The Task Bar Icon allows you to access RoboForm outside of your browser.
RoboForm Editor - This is an application within RoboForm. You can edit, create, and access RoboForm Data in the RoboForm Editor
RoboForm Start Page - This is a web page located at https://start.roboform.com that allows you to view and access your local RoboForm Data on Windows or Mac (but not with the standalone extensions). The Start Page cannot be accessed without RoboForm being installed
RoboForm Online - This is a site located here which is now identical to the Start Page.
Logins Menu - All of your Logins are organized in the Logins Menu. This menu can be found in the RoboForm Extension, Start Page, Menu Bar Icon, and the RoboForm Editor.
Bookmarks Menu - All of your Bookmarks are organized in the Bookmarks Menu. This menu can be found in the RoboForm Extension,Start Page, Menu Bar Icon, and the RoboForm Editor
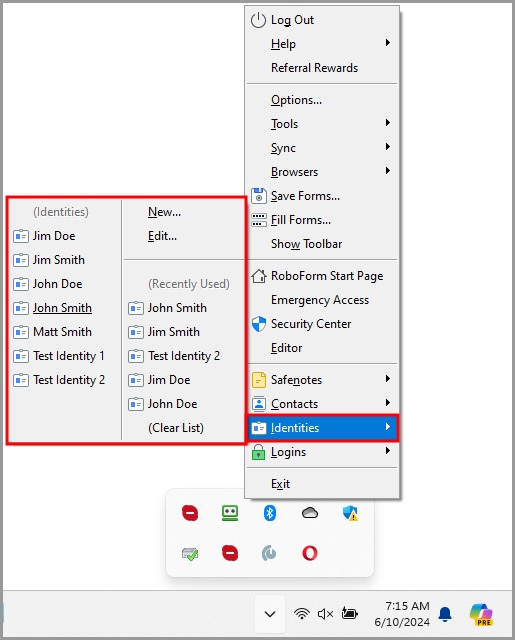
Identities Menu - All of your Identities are organized alphabetically in the Identities Menu. This menu can be found in the RoboForm Extension, Start Page, Menu Bar Icon, and the RoboForm Editor.
Safenotes Menu - All of your Safenotes are organized alphabetically in the Safenotes Menu. This menu can be found in the RoboForm Extension, Start Page, Menu Bar Icon, and the RoboForm Editor.
Fill Logins Tab - In the RoboForm Extension, the Fill Logins tab finds which Login is the best fit for the web page you are visiting
Identity Tab - In the Extension, the Identity Tab shows Identities that can fill the form on the web page.
Help Menu - This menu has all the resources that will help you understand how to use RoboForm, including links to this manual, FAQs, the RoboForm website, Customer Support, and more.
AutoSave Dialog - When AutoSave is enabled, this tool automatically pops up and offers to save Logins or Bookmarks for a web page.
RoboForm Password Generator - A tool which allows you to generate a random and secure password. It has customizable parameters to ensure that, no matter what the password requirements of a website are, you will be able to generate a password which complies.
RoboForm Authenticator - The RoboForm Authenticator allows you to use RoboForm as a two-factor authenticator for other sites and apps
Sharing Center - The Sharing Center provides a simple way to securely share or send RoboForm data items (Logins, Identities, or Safenotes) to another RoboForm user
Security Center - The Security Center is a tool that allows you to evaluate the strength of your passwords.
Your Security Score is calculated based on the following factors:
- Number of Compromised or Weak passwords
- Number of Duplicated Logins (username and password combinations)
- Number of Unique passwords
- Strength of individual passwords
Emergency Access - Emergency Access allows you to select a trusted contact to securely obtain access to your RoboForm Data in the event of death, incapacitation, or simply as a method of account recovery. More than one Emergency Contact can be selected, with the option to vary the waiting period before providing access. Emergency Access can be revoked at any time.
Chapter 3: Browser Integration
RoboForm Data is accessible from your browser(s) by using the RoboForm Extension and Start Page
RoboForm Extension
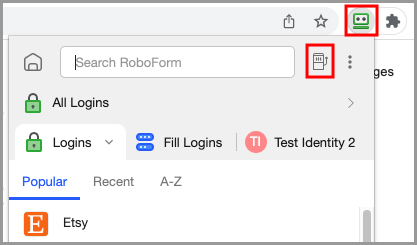
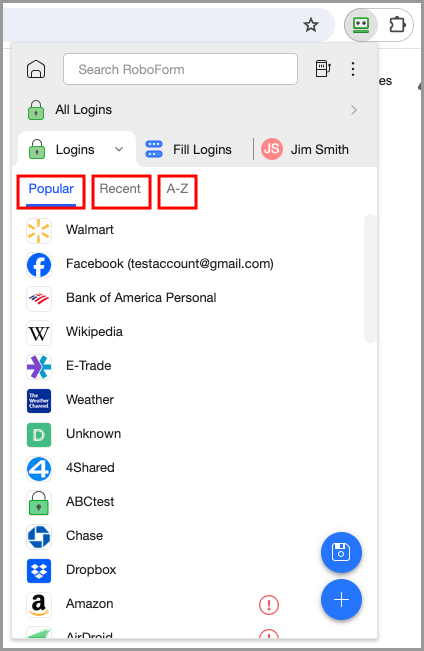
With Version 9, when you initially open the RoboForm Extension, you will be on the Logins tab.
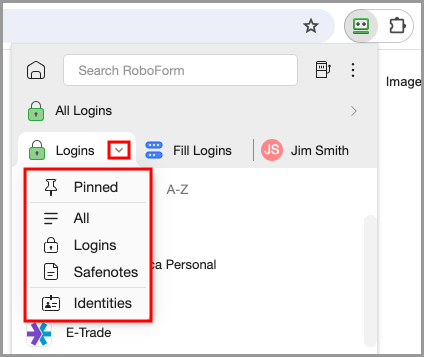
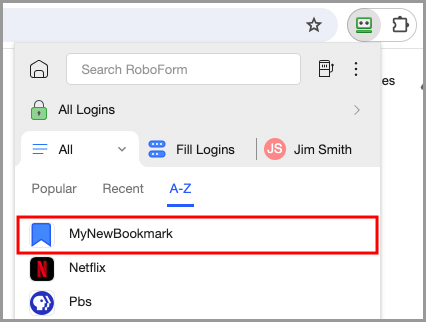
This tab has different filters for your Popular (most used) Logins, your Recent (most recently used) Logins, an A-Z (alphabetical) list of your Logins, and an All filter, where you can view all of your logins in one place
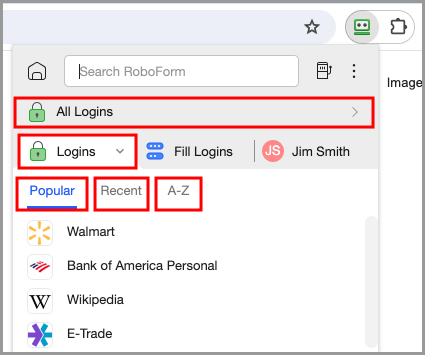
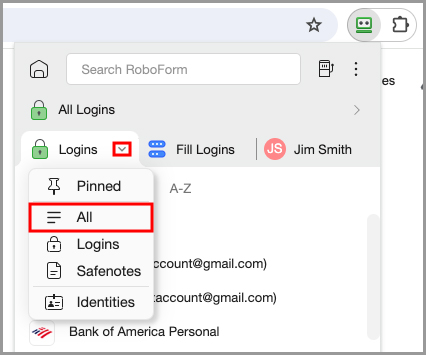
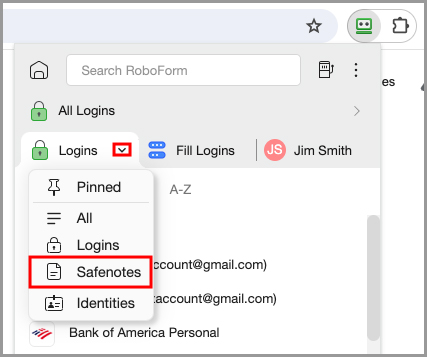
If you click the [ v ] button on the right side of the Logins button, you will receive a dropdown menu which contains options to view your Pinned Logins, All, Logins, Safenotes, and Identities.
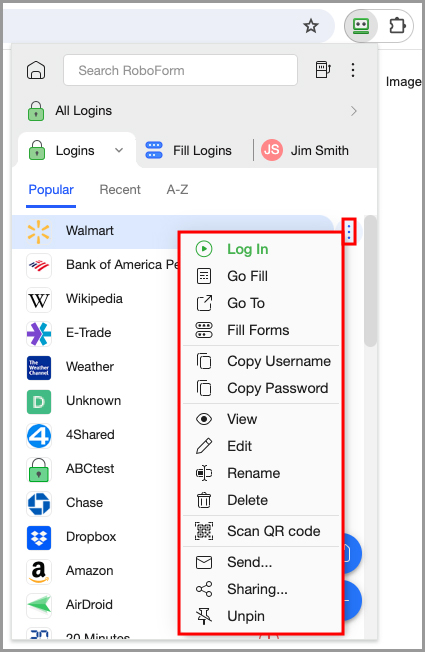
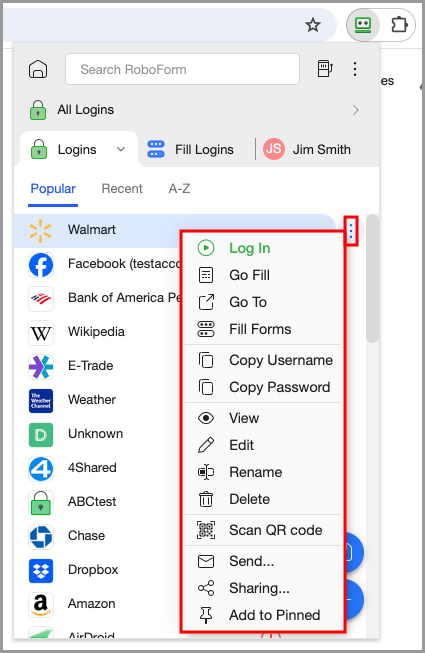
While viewing your Logins, you can click the 3 dots on the right of each Login to display a dropdown menu. Within this menu, you will see options to:
- Log In - Logs you in with one click.
- Go Fill - Takes you to the page for the Login and fill the fields without submitting.
- Go To - Takes you to the site attached to that Login without filling any fields.
- Fill Forms - Takes you to the site and fills its forms with that Login.
As well as options to view, edit, rename, delete, scan a QR code, send, share, and add or remove a Login from your Pinned list.
There are also options to copy the username and password for that Login to your clipboard. These options are useful for when you are visiting sites which our autofill is not able to recognize, and need to manually paste your login credentials into their respective fields.
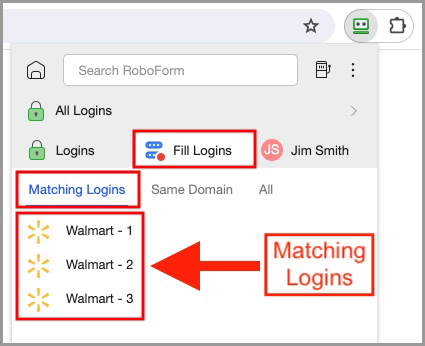
With the RoboForm extension, RoboForm changes its behavior based on the type of page you are on. If you visit a site which you have multiple Logins for, RoboForm will now open to the Fill Logins tab and show matching logins when you click the extension while on that site.
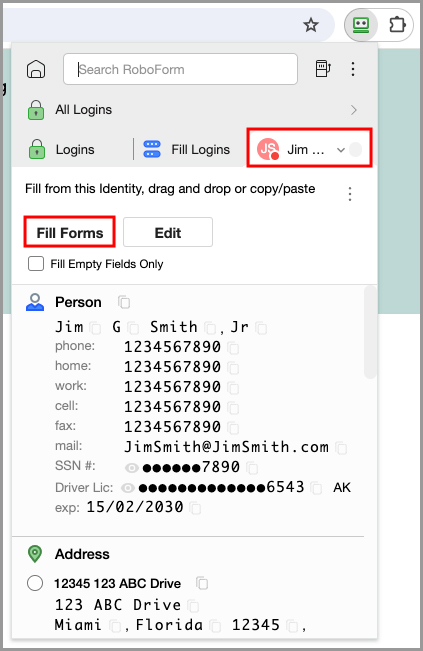
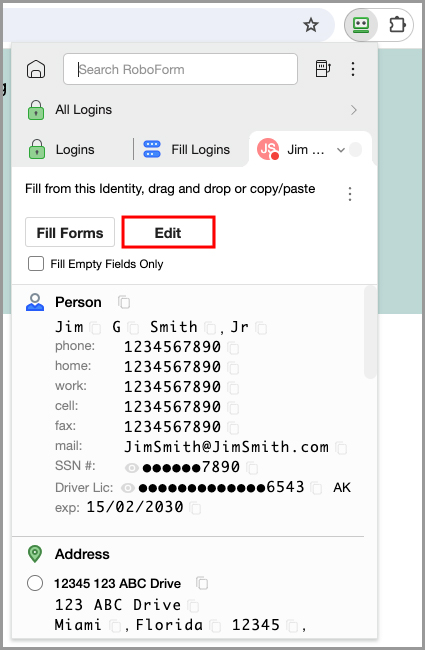
If you are on a page which contains a form to fill out, the extension will open up to the Identities tab automatically when clicked, and allows for fast form filling in one click by clicking the "Fill Forms" button
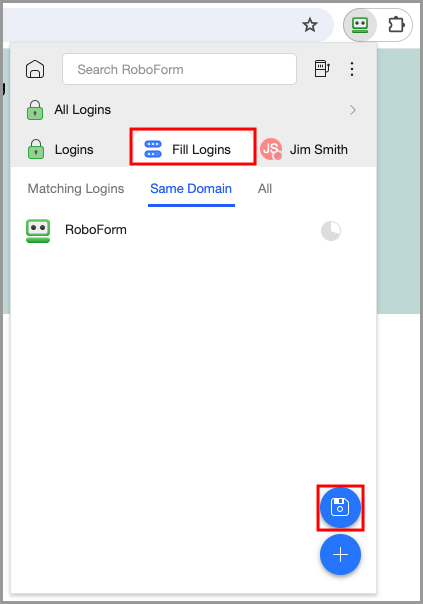
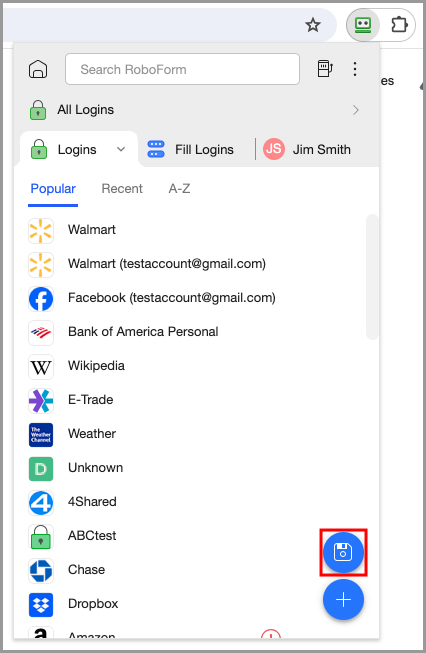
If you would like to save a page as a pre-filled form, a Login, or a Bookmark, you can do so by selecting the Fill Logins tab and clicking the blue “Floppy Disk” icon in the lower right
You can edit your Identities by clicking the "Edit" button next to the "Fill Forms" button.
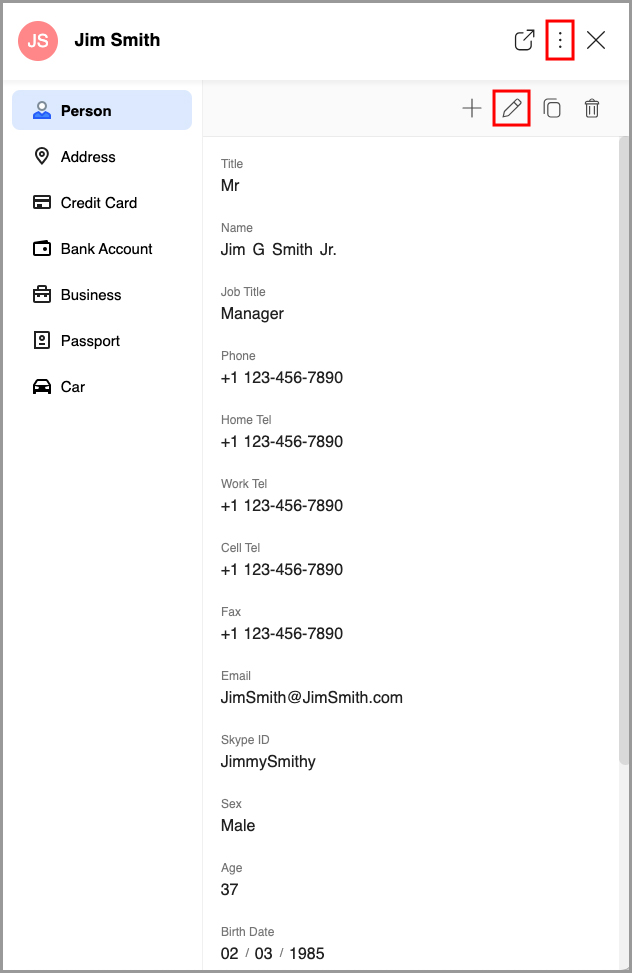
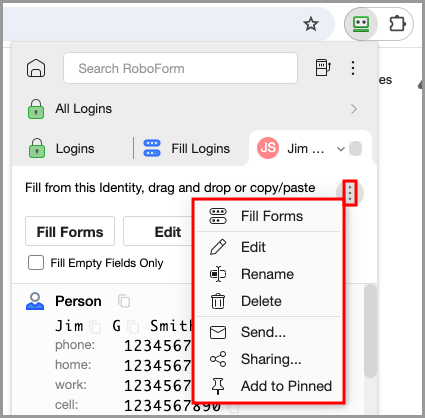
This will bring you to a window where you can edit the information stored in the selected Identity by clicking the "Pencil" icon in the upper right of the Identity. If you click the 3 dots in the upper right hand corner of this page, you will be presented with options to Share, Send, Print, Rename, Move, Clone, Copy All Fields, Delete, and Add to Pinned.
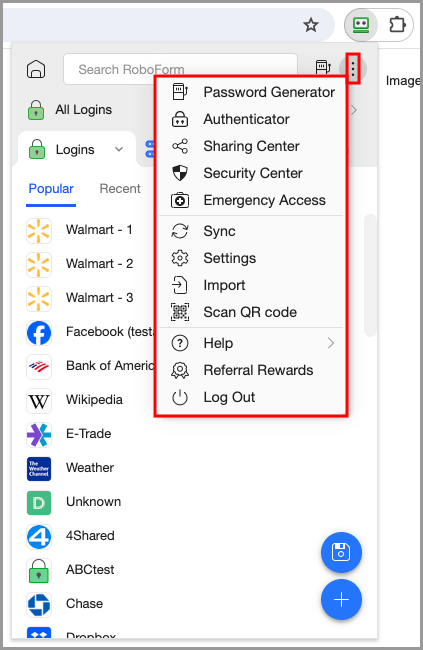
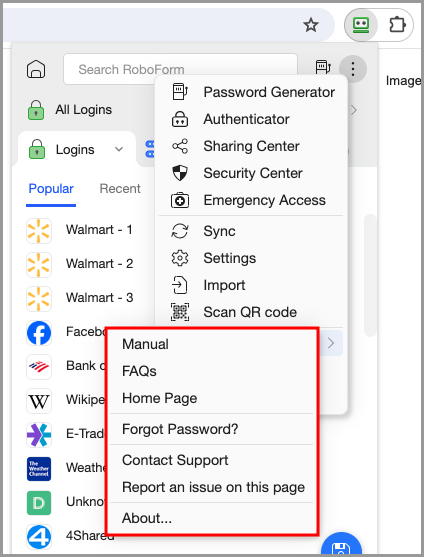
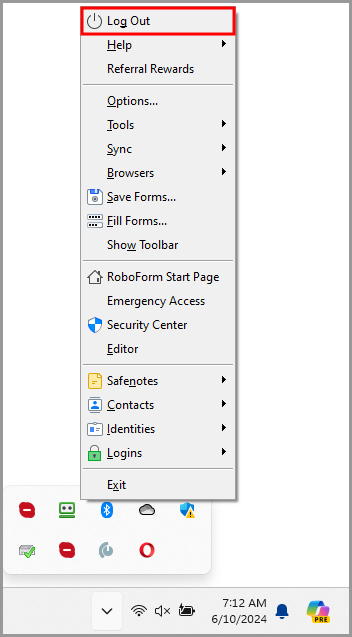
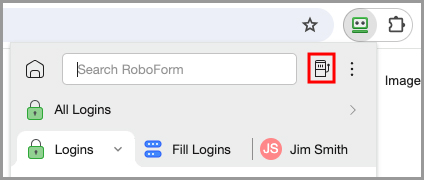
You can open the RoboForm Tools and Settings menu by clicking the 3 dots in the upper right corner of the RoboForm Extension. This menu contains the Password Generator, links to the Authenticator, Sharing Center, Security Center, and Emergency Access page, a Sync button, the Settings page, an Import option, an option to Scan a QR code, our Help menu, information about Referral Rewards, and offers the ability to Log Out.
The Password Generator offers powerful customization options to ensure that no matter what the password requirements of a website are, you will be able to generate a password which complies
The Help menu offers links to our Manual, FAQs, and Home Page, information for what to do if you forget your password, the option to Contact Support, the ability to report an issue on a page, and an About page which gives you information about your version of RoboForm.
If you would like to view or edit your logins from the RoboForm Start Page, there is a convenient link (House Icon) in the upper left corner which will take you there.

Chapter 4: Logins
Use Logins to store data that is specific to a web site; data such as Usernames, Passwords, Survey fields, Win32 applications logins (E.g. Skype), etc. Essentially, you can save any form data to Logins and use it to automatically fill any form later.
Saving Logins
AutoSave Dialog
When you manually enter login data to a login page and click the Login/Submit button, RoboForm will offer to save this login info by displaying the AutoSave dialog.
When you manually enter login data to a login page and click the Login/Submit button, RoboForm will offer to save this login info by displaying the AutoSave dialog.

How to AutoSave a Login
-
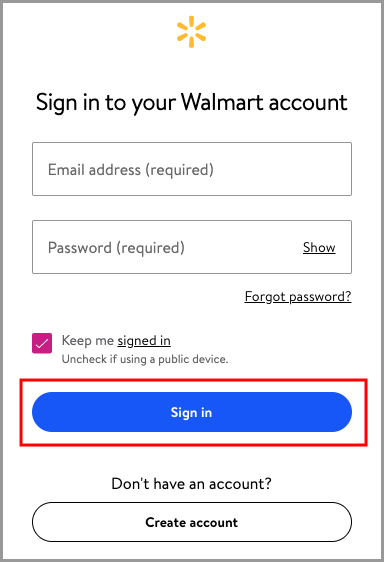
After ensuring that you have installed the RoboForm Browser Extension into your supported browser of choice, and have logged in, navigate to the site you would like to save your login information for. For this example, we will use Walmart.com.
Enter your login information, and click the “Sign In” button. Or, if you are creating a new account, enter your new account information and click the “Create Account” button.
-
After creating or entering your account credentials, a window will appear prompting you to save your login credentials into RoboForm. While on this window, you also have the ability to edit the name of your login, place that login into an existing folder, or create a new folder for the login.
After adjusting the name and folder placement to your specifications, click the “Save” button on the RoboForm prompt. RoboForm will confirm that your credentials have been saved.


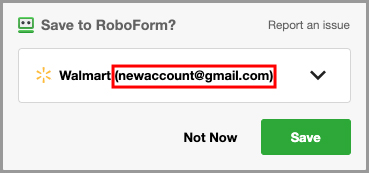
NOTE: Clicking Never for this site will disable RoboForm AutoSave from popping up on the website you are on. The AutoSave dialog pops up only if the Login data you entered is New, Different, or Updated. It will not prompt you if the exact same data (E.g. Username & Password) is already saved to RoboForm. If you have multiple accounts for the same website, RoboForm will suggest to label your new login with the username in parentheses after the name
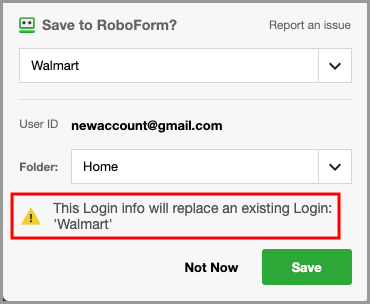
If you try to save a Login that has the same name as an existing Login, you will be shown a warning that says saving the Login will overwrite the data of your existing Login.
Password Change Detection
This also works with changing your Password on an existing account; RoboForm will offer to save your new password and overwrite your old password in Logins. The RoboForm Editor notes the date the password was changed (e.g. 5/26/2017: password changed from 'xxx' to 'yyy').
Updated Website
You might have to do a Resave or Manual Save of a Login if the website’s login page has been changed or updated. Simply manually login, and in the AutoSave dialog will simply overwrite and save the original Login.
Forcing AutoSave
This is a tool to “Force” an AutoSave for non-standard forms such as:
- Pages that have no password fields
- Non-login forms, which we typically classify as Identities
How to Use Force AutoSave:
Hold the ALT key and click the Login/Submit button on a web page.
If holding the ALT key and clicking on the Login/Submit button does not cause RoboForm to Force AutoSave, follow these steps to enable the Force AutoSave keyboard shortcut:
-
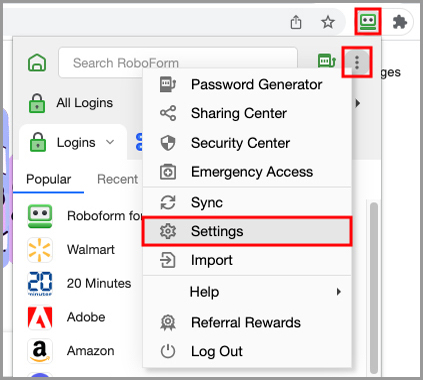
Open your browser and click the RoboForm extension. Click the 3 dots in the upper right corner. Then, click the “Settings” option.
-
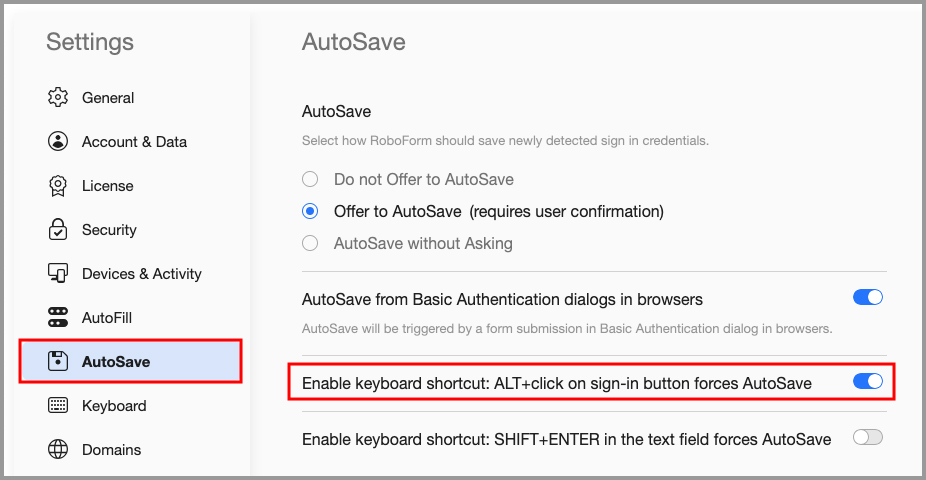
Select “AutoSave” from the column on the left. Then, enable the “Enable keyboard shortcut: ALT + click on sign-in button forces AutoSave” option.
Saving a Login Manually
-
Go to the RoboForm Start Page.
To begin creating a Login manually click the blue [ + ] button in the lower right hand corner
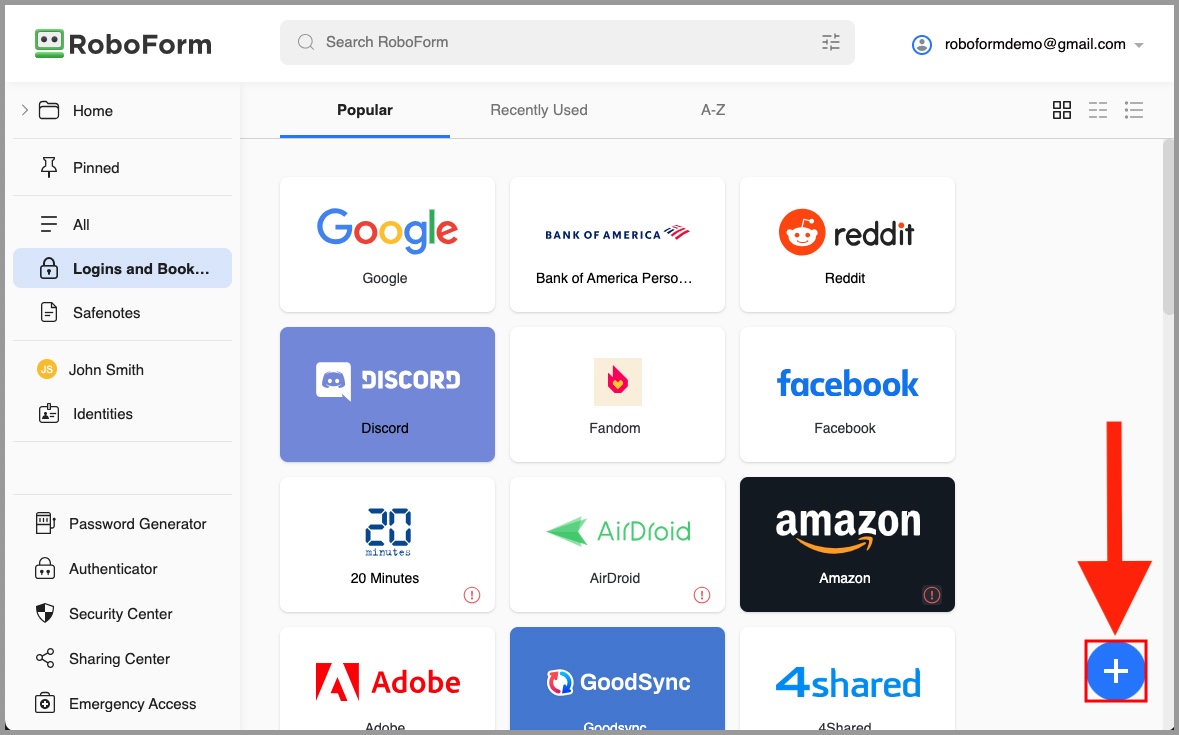
-
This will bring you to the “Add New Login” window where you can view and select from RoboForm’s Login list. Use the search bar at the top of the window to search for the web page you would like to create a new Login for.
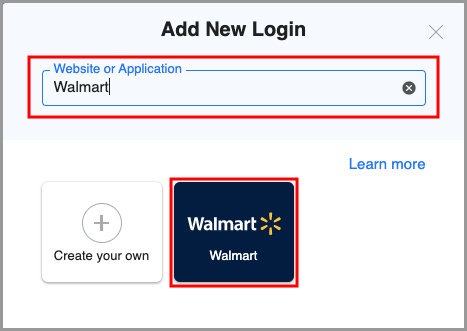 Or, if the webpage you would like to create a Login for is not listed, click the “Create your own” button.

-
If the website was selected from the list of RoboForm Logins, enter the name for the Login, the email, and the password. Then, choose a folder to store it in, select whether you would like for it to be added to your Pinned list, and add any notes you wish to include with the Login.
Once you are finished, click the “Save” button.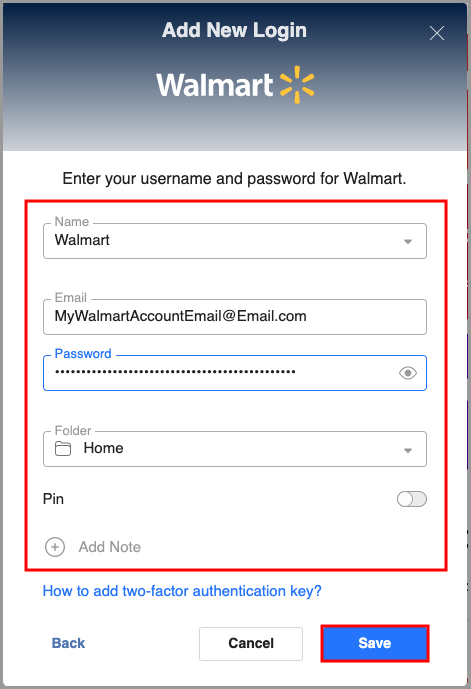 If you used the “Create your own” button, you will additionally need to enter the URL of the sign-in page for the website. Enter the name for the Login, the URL of the sign-in page, the email, and the password. Then, choose a folder to store it in, select whether you would like for it to be added to your Pinned list, and add any notes you wish to include with the Login.
After successfully entering the information, click the “Save” button
Captcha Fields
Some sites require you to fill in a Captcha field on login or signup. Captcha fields cannot be AutoSaved since they change on every login; users are manually required to enter this information according to website directions - don’t save the Captcha to RoboForm.
You can, however, create a Login Tip to prevent RoboForm from attempting to fill and submit a Captcha form
How to Create a Login Tip
-
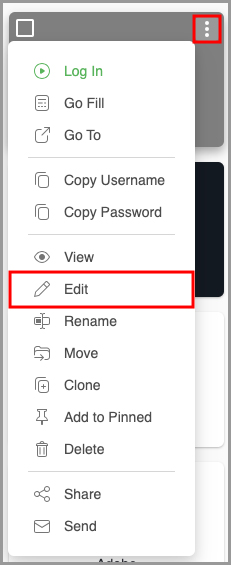
Go to the RoboForm Start Page. Hover your mouse over the Login you would like to add a Login Tip to and click the 3 dots in the upper right corner. Then, select "Edit" from the menu.
-
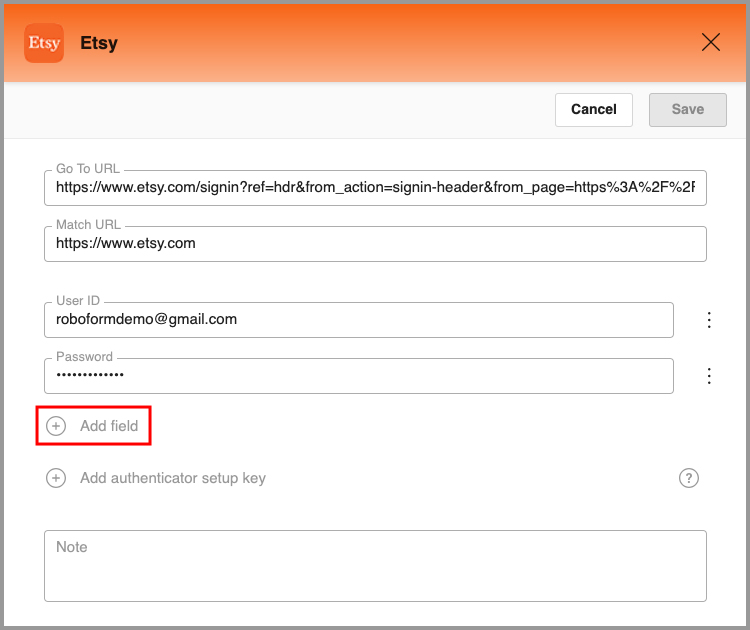
In the Edit window, click the "Add field" button
-
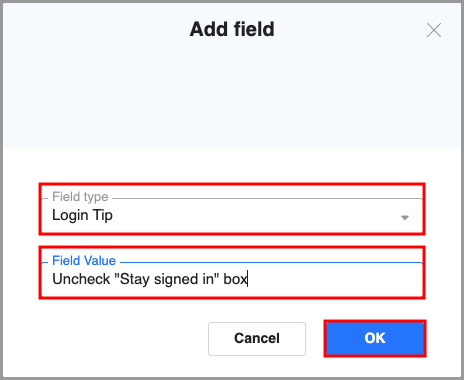
Select Login Tip as the field type and fill the "Field Value" with the text you would like your Login Tip to display. Then, click the blue "OK" button.
-
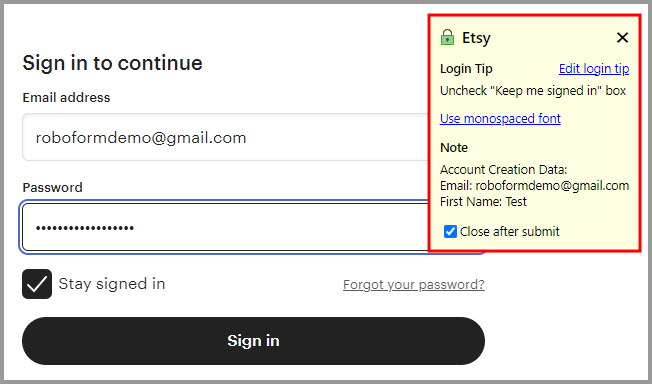
The Login Tip will be added to the Login. Click the blue "Save" button in the upper right

How to Use a Login Tip
From now on, when you attempt to log in to the site you added a Login Tip for using RoboForm, RoboForm will pause before submitting your credentials and present you with the text you input in step 8.
Using Logins
One-Click Login RoboForm will complete the entire Login sequence for you, just by clicking a Login in the RoboForm Extension or RoboForm Menu Bar Icon, or by selecting the Login in the RoboForm Editor and clicking “Log In” at the top of the page.

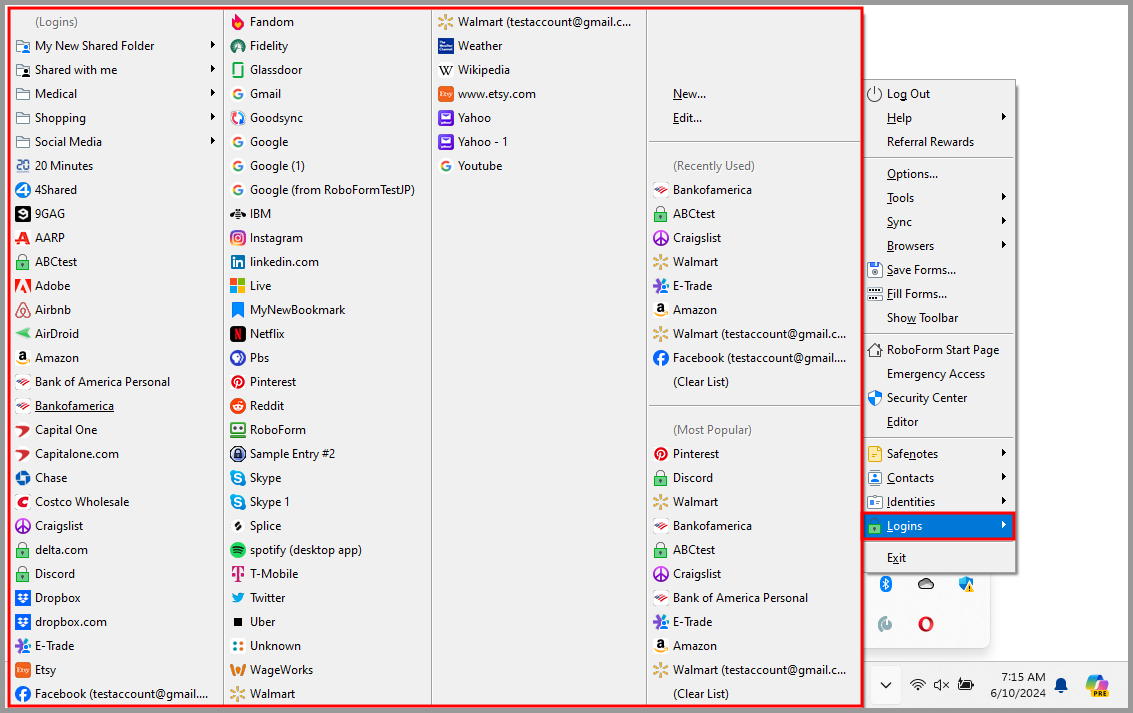
Logins Menu
This menu in the RoboForm Extension allows you to view all of your Logins. It has options to sort your Logins by popularity (“Popular”), recently used (“Recent”), and alphabetically (“A-Z”).
Along with your Logins, it has the following functions:
- The blue “Floppy Disk” icon allows you to save forms for the current page for easy filling in the future.
-
The blue [ + ] button takes you to the Start Page to create a New Login in RoboForm.
- Hovering your mouse over a login and clicking the 3 dots on the right presents you with a menu with options to:
- Log In - Logs you in with one click.
- Go Fill - Takes you to the page for the Login and fills the fields without submitting.
- Go To - Takes you to the site attached to that Login without filling any fields.
- Fill Forms - Takes you to the site and fills its forms with that Login.
- Copy Username - Copies the username of the Login to your clipboard.
- Copy Password - Copies the password of the Login to your clipboard.
- View - Opens the Login on the Start Page or in the Desktop Editor for you to view.
- Edit - Opens the Login on the Start Page or in the Desktop Editor for you to edit.
- Rename - Allows you to rename the Login.
- Delete - Allows you to delete the Login.
- Scan QR Code - Allows you to scan a QR code on your screen.
- Send - Allows you to send the Login to another RoboForm user.
- Sharing… - Allows you to share the Login with another RoboForm user.
- Add to Pinned - Adds the Login to your “Pinned” list. You can remove the Login from your Pinned list by clicking the 3 dots menu and selecting the “Unpin” option.
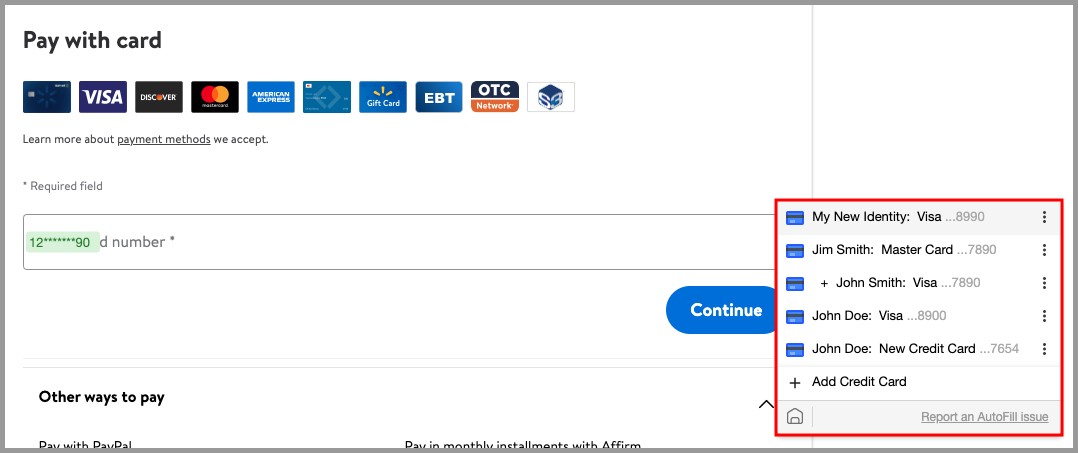
Matching Logins
When you visit a website with one of your saved Logins, the RoboForm Extension will show the Login that best matches your website in the “Fill Logins” tab of the extension.
Click the Matching Login to log in to the website. RoboForm will automatically fill and submit the form.
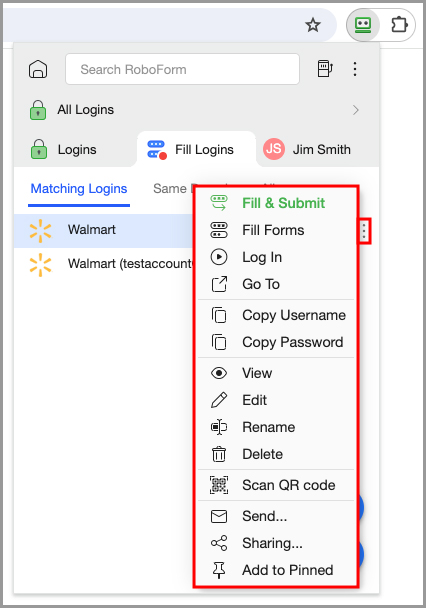
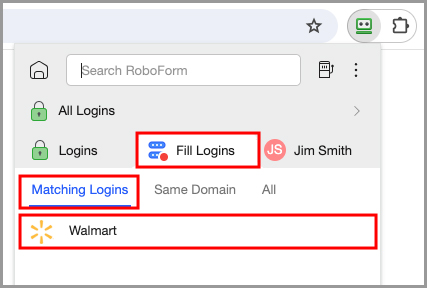 There are more form filling options in the dialog of the Matching Dialog button. Click the three dots on the right-side of a Matching Login in the Fill Logins tab and you will see options to:
- Fill and Submit - Fills your credentials into the appropriate fields and submits them for you.
- Fill Forms - Fills your credentials into the appropriate fields.
- Log in - Logs you in with one click.
- Go To - Takes you to the site attached to that Login without filling any fields
- Copy Username - Copies the username of the Login to your clipboard.
- Copy Password - Copies the password of the Login to your clipboard.
- View - Opens the Login on the Start Page or in the Desktop Editor for you to view.
- Edit - Opens the Login on the Start Page or in the Desktop Editor for you to edit.
- Rename - Allows you to rename the Login.
- Delete - Allows you to delete the Login.
- Scan QR Code - Allows you to scan a QR code on your screen.
- Send - Allows you to send the Login to another RoboForm user.
- Sharing… - Allows you to share the Login with another RoboForm user.
- Add to Pinned - Adds the Login to your “Pinned” list. You can remove the Login from your Pinned list by clicking the 3 dots menu and selecting the “Unpin” option
If there are multiple matching Logins, they will all be listed in the Fill Logins tab.
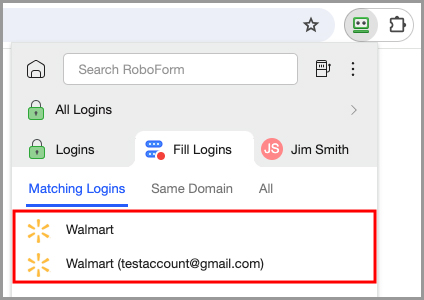
In order to log in to the account you want to use, simply select that Login out of the list and select one of the Login actions that are detailed in the section above.
A search bar will appear in the Matching Logins tab if you have 9 or more Logins to the same Website.
Login Order If you have more than one Matching Login for a web site, RoboForm arranges Matching Logins by how well the Login URL matches the Web Page URL:
- Login URLs that exactly match the URL of the web page will appear on top.
- Logins that match the web page URL partially will appear next.
- Logins that only match the domain will appear last.
- Domains will match with the suffixes of the URL. For example: www.roboform.com matches online.roboform.com, but will not match www.roboform.net.
- Some sites have multiple steps or web pages to Login (E.g. Bank of America SiteKey). Currently RoboForm cannot run the entire sequence in one click, but it can do it in two clicks.
Chapter 5: Bookmarks
Use Bookmarks to store web addresses (URLs) in order to be one click away from your favorite pages and articles.
Saving Bookmarks
How to Save Bookmarks
-
Go to the web page that you would like to save a Bookmark for. Then, click the RoboForm Extension icon and select the “Floppy Disk” icon in the bottom right.
-
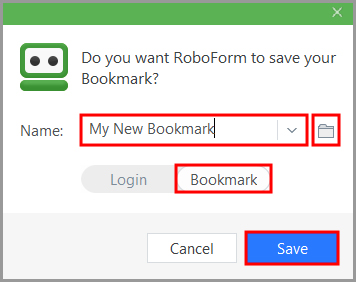
Name your Bookmark and select which Folder you would like your Bookmark to be in. Then, click the blue “Save” button
You can find your saved Bookmarks in the RoboForm Extension, the Start Page, the RoboForm Taskbar Icon, or the RoboForm Editor.
Using Bookmarks
RoboForm Extension
In the RoboForm Extension, Bookmarks are stored in the “All” menu. Click the dropdown arrow next to “Logins” and select “All” from the menu.
NOTE: You may need to sort by A-Z to see your Bookmark if it is not a popular or recently used item.
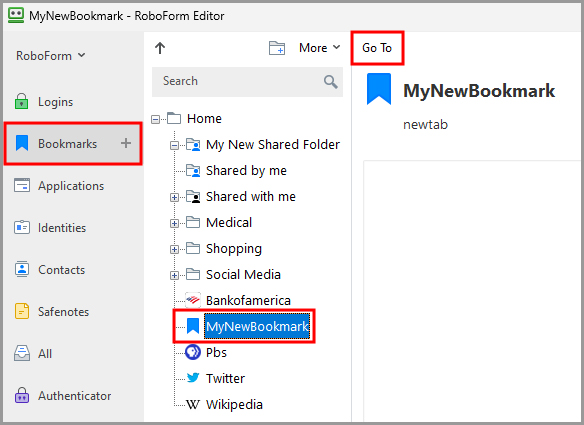
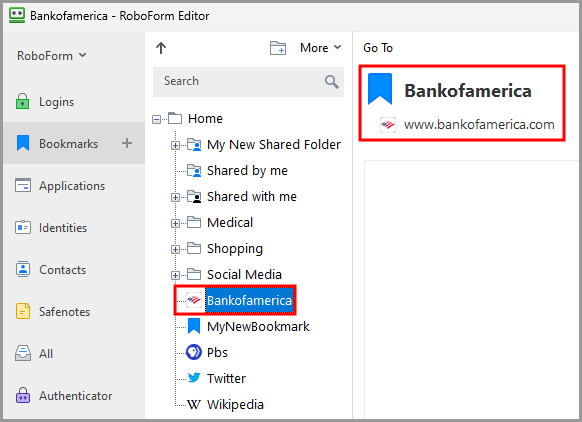
RoboForm Editor
Open Bookmarks in the Editor, select your desired Bookmark, and click the “Go To” button in the Editor’s details toolbar. RoboForm will open that address in a new window.
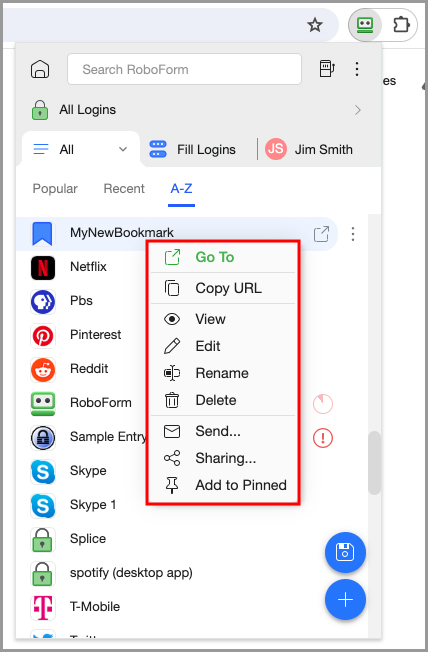
Right Clicking or clicking the 3 dots on an individual Bookmark in the extension will give you the following options:
- Go To - Opens the web page in a new tab.
- Copy URL - Copies the URL of the Bookmark to your clipboard.
- View - Opens the Bookmark on the Start Page for you to view.
- Edit - Opens the Bookmark on the Start Page for you to edit.
- Rename - Allows you to rename the Bookmark.
- Delete - Deletes the Bookmark.
- Send… - Allows you to send the Bookmark to another RoboForm user.
- Sharing… - Allows you to share the Bookmark with another RoboForm user.
- Add to Pinned - Adds the Bookmark to your Pinned list.
There are additional Bookmark Options in the RoboForm Editor which are detailed in Chapter 8: Roboform Editor.
Chapter 6: Safenotes
Use Safenotes to store any text data or anything that RoboForm could not save into Logins. Some example Safenotes could include:
- Safe lock combinations.
- WiFi router Passwords.
- Software activation codes.
- Secret family recipes.
How to Create a New Safenote
RoboForm Extension
In the RoboForm Extension, click the dropdown arrow next to “Logins” and select “Safenotes” from the menu.
Click the blue [ + ] button in the bottom right corner of the Safenotes menu
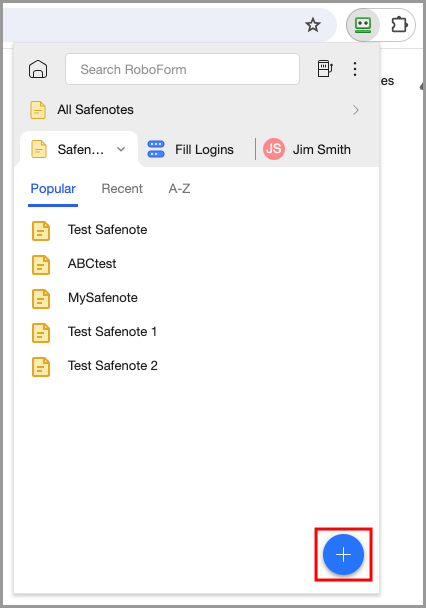
You will be brought to the Start Page to create your Safenote. The "New Safenote" window will appear.
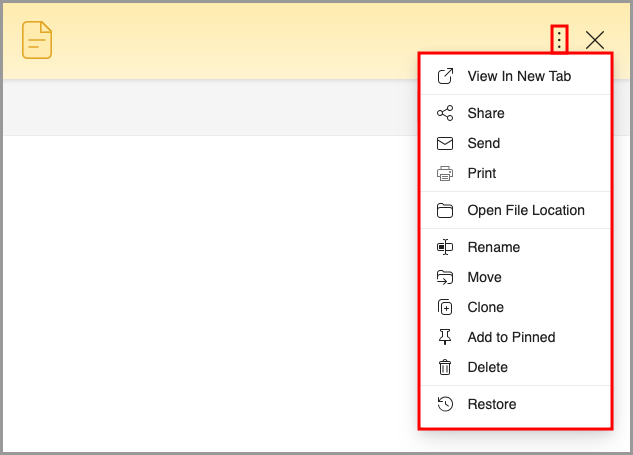
If you click the 3 dots in the upper right corner of this window, you will see a menu with options to Share, Send, Print, Rename, Move, Clone, and Delete your Safenote.
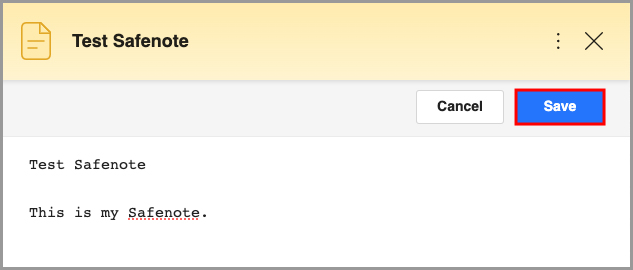
When you begin filling in the text of your Safenote, the title will automatically populate with the initial few words you write. Once you are finished filling out the text of your Safenote, click the blue "Save" button in the upper right to save your changes.
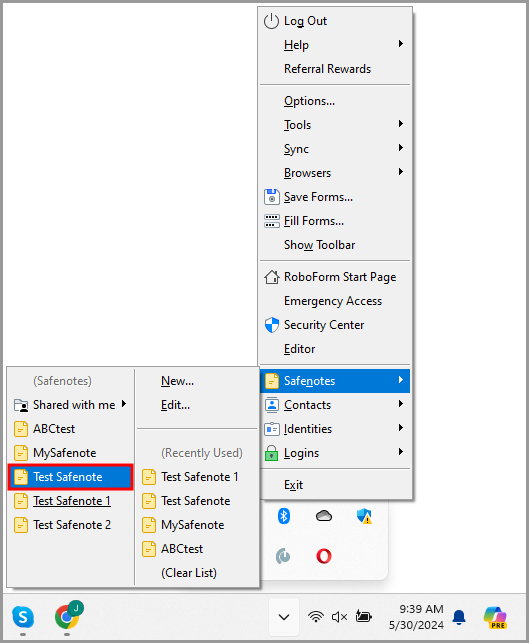
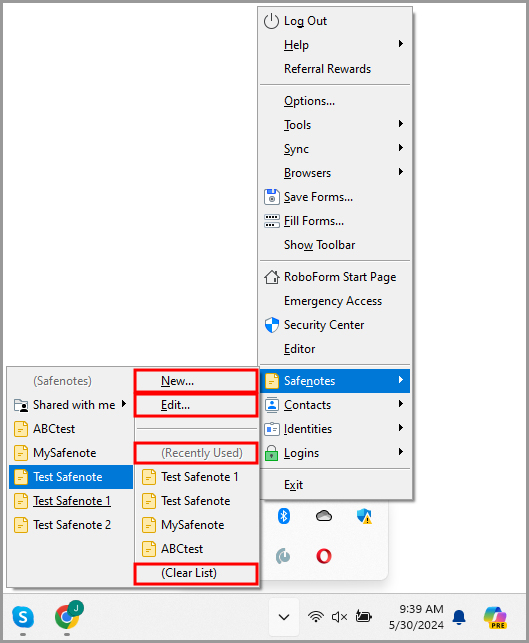
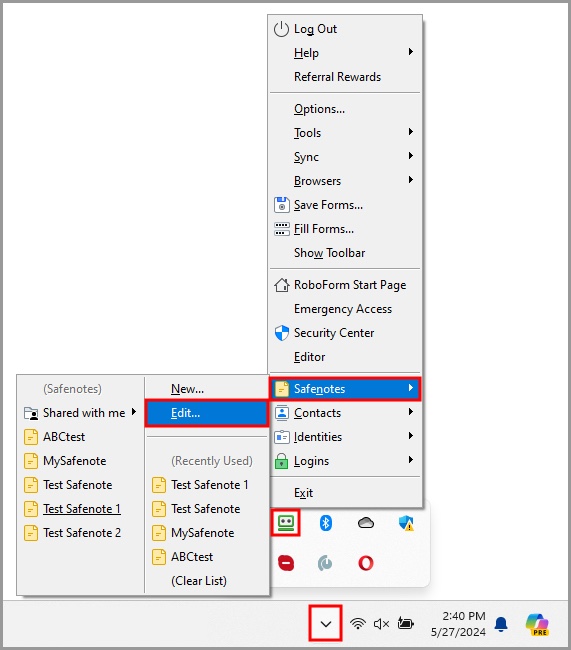
RoboForm Taskbar Icon
Click the [ ^ ] button (show hidden icons) in the lower right corner. Click the RoboForm icon. Select "Safenotes" from the menu, and then click the "New" option.
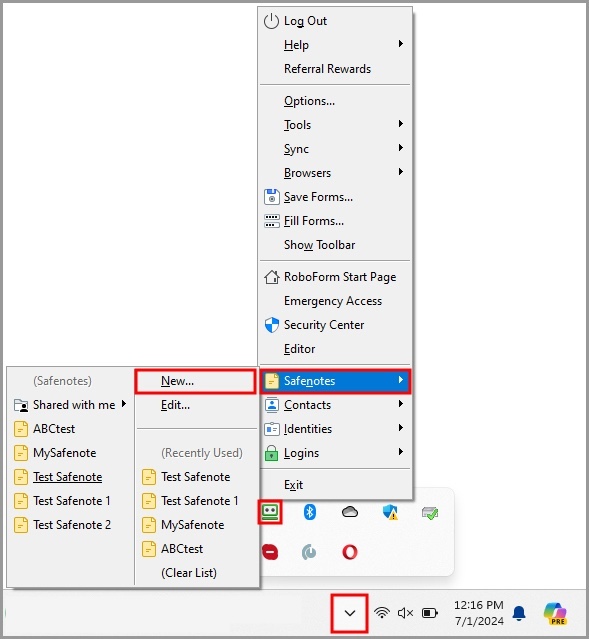
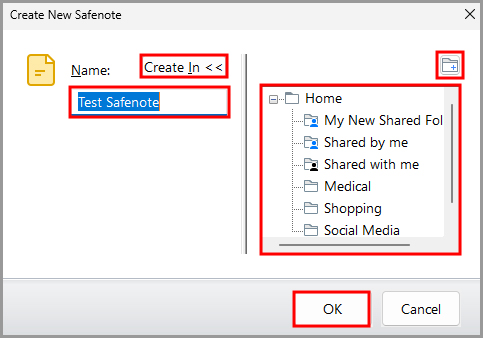
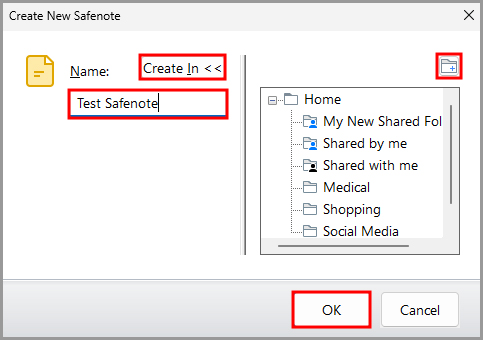
The "Create New Safenote" window will appear. In this window, you can choose a folder for the Safenote by clicking "Create In" and name it by filling out the "Name" field. When you are finished, click the "OK" button.
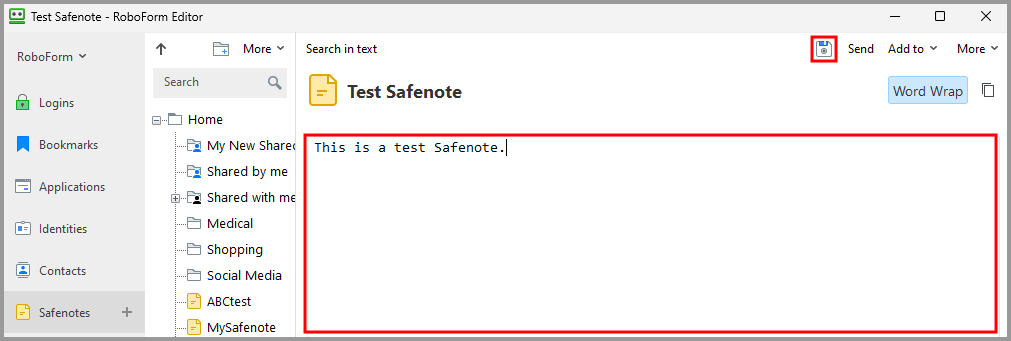
You will be brought to the Editor where you can view and edit your new Safenote. Fill out the Safenote as you wish, and then click the "Floppy Disk" icon in the upper right to save your changes.

RoboForm Editor
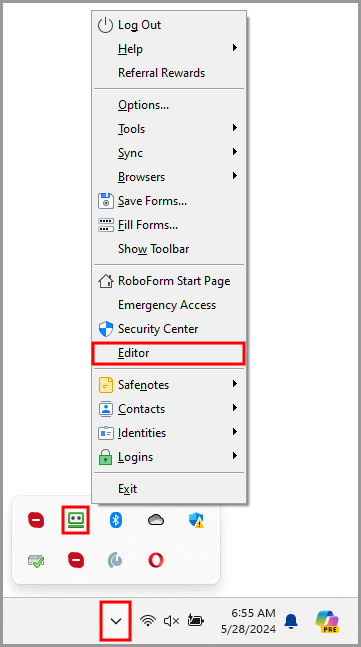
Click the [ ^ ] button (show hidden icons) in the lower right corner. Click the RoboForm icon. Select "Editor" from the menu.
Select “Safenotes” from the column on the left and click the [ + ] icon on the right.
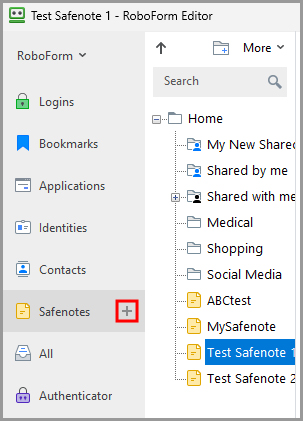
Name your Safenote and click the “OK” button.
Fill out the Safenote as you wish, and then click the "Floppy Disk" icon in the upper right to save your changes.
How to View Safenotes
RoboFormExtension
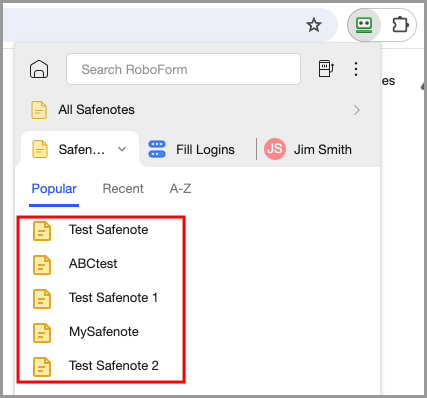
Select the Safenote in the Extension’s Safenote menu.
RoboForm Taskbar Icon
Select the Safenote in the Safenote menu.
It will open in the RoboForm Editor
RoboForm Editor
Select the Safenote in the Safenote menu. It will appear in the Details Pane of the RoboForm Editor.
Safenotes Menu
This menu in the RoboForm Extension and RoboForm Taskbar Icon allows you to view all of your Safenotes.
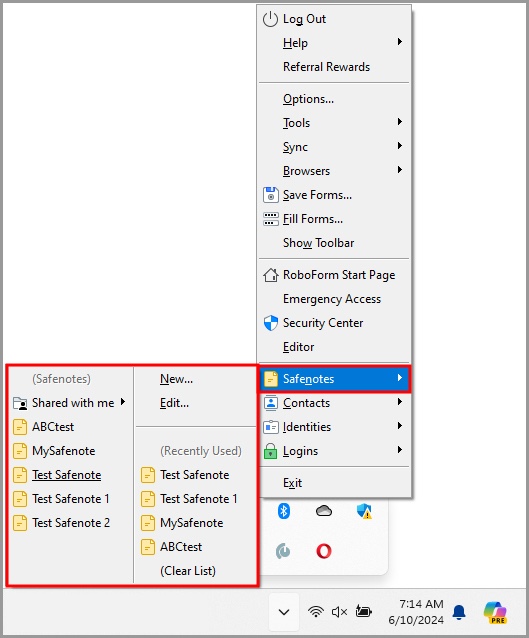
In the RoboForm Taskbar Icon, the Safenotes Menu has the following functions:
- New - Creates a New Safenote in RoboForm.
- Edit - Opens up the RoboForm Editor which is detailed in Chapter 8: Roboform Editor.
- Recently Used - This is a list of the most recently used Safenotes in a reverse chronological order.
- Clear List - Clears the Recently Used Safenotes list.
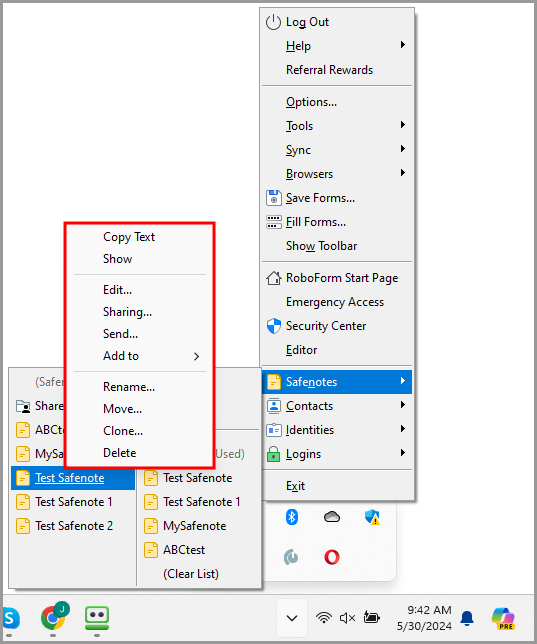
Right Clicking the Safenote in the taskbar Safenotes Menu will provide you with the following options:
- Copy Text - Copies the Safenote text to your clipboard.
- Show - Opens the Safenote in a pop-up window.
- Edit - Opens the Safenote in the RoboForm Editor.
- Sharing - Opens the RoboForm Sharing feature that allows you to securely share your Safenote to other RoboForm users.
- Sending - Opens the RoboForm Sending feature that allows you to securely send your Safenote to other RoboForm users. Read More in Chapter 13: Sharing and Sending.
- Add To - Allows you to add a shortcut to your Safenote on the Most Popular/Start Page, in your Browser’s RoboForm Extension.
- Rename - Changes the name of the Safenote.
- Move - Allows you to move the location of a Safenote to another Folder in RoboForm.
- Clone - Duplicates the Safenote in the Safenote Menu.
- Delete - Erases the Safenote.
In the RoboForm Extension, there are options to sort your Safenotes by Popular (popularity), Recent (recently used), and A-Z (alphabetical).
Clicking the 3 dots on the right of an individual Safenote in the Extension’s Bookmarks Menu will give you the following options:
- View - Opens the web page in a new tab.
- Copy Text - Copies the URL of the Bookmark to your clipboard.
- Rename - Allows you to rename the Bookmark.
- Delete - Deletes the Bookmark.
- Send… - Allows you to send the Bookmark to another RoboForm user.
- Sharing… - Allows you to share the Bookmark with another RoboForm user.
- Add to Pinned - Adds the Bookmark to your Pinned list.
There are additional Safenote Options in the RoboForm Editor which are detailed in Chapter 8: Roboform Editor.
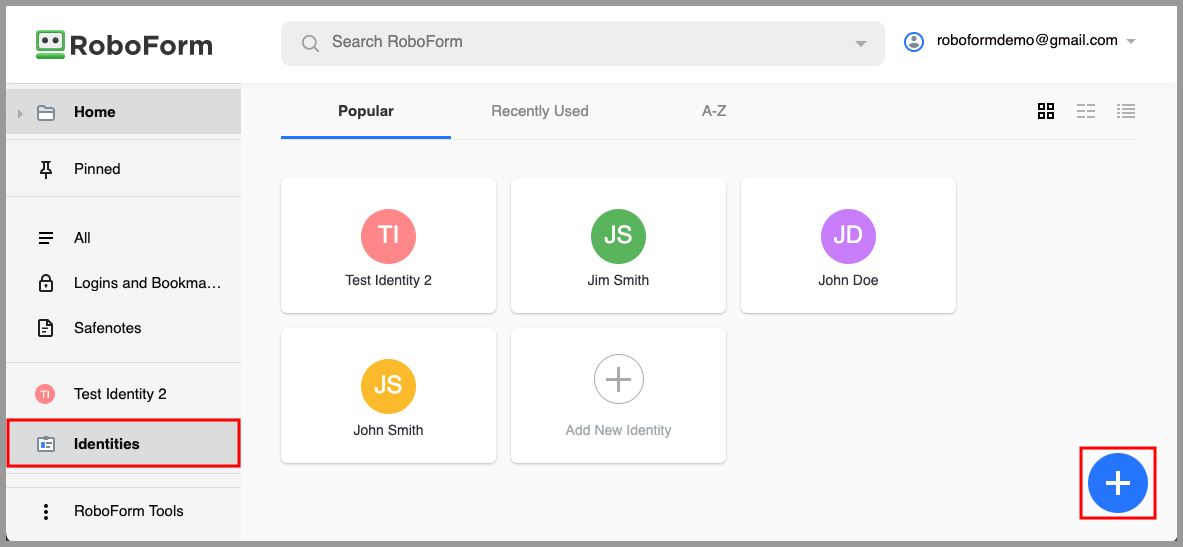
Chapter 7: Identities
Identities are profiles containing personal data which you can save within RoboForm. RoboForm can automatically fill non-password forms (E.g. Online Shopping Checkouts, Sign Up Forms) with information from your saved Identities
Creating an Identity
Creating an Identity through the RoboForm Extension:
-
Open your browser and click the RoboForm extension icon. Then, click the house icon in the upper left corner of the extension’s menu.

-
You will now be on the Start Page. Select the "Identities" tab from the column on the left, and then click the blue [ + ] button in the bottom right corner.
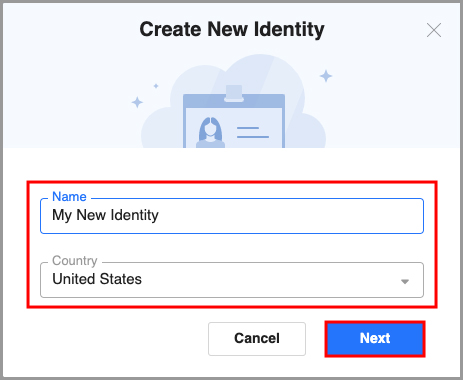
-
The Create New Identity window will appear. Within this window, you can name your identity and select the country applicable to it. After inputting this information, click the blue “Next” button
-
Click the "Save" button when you have entered your information.
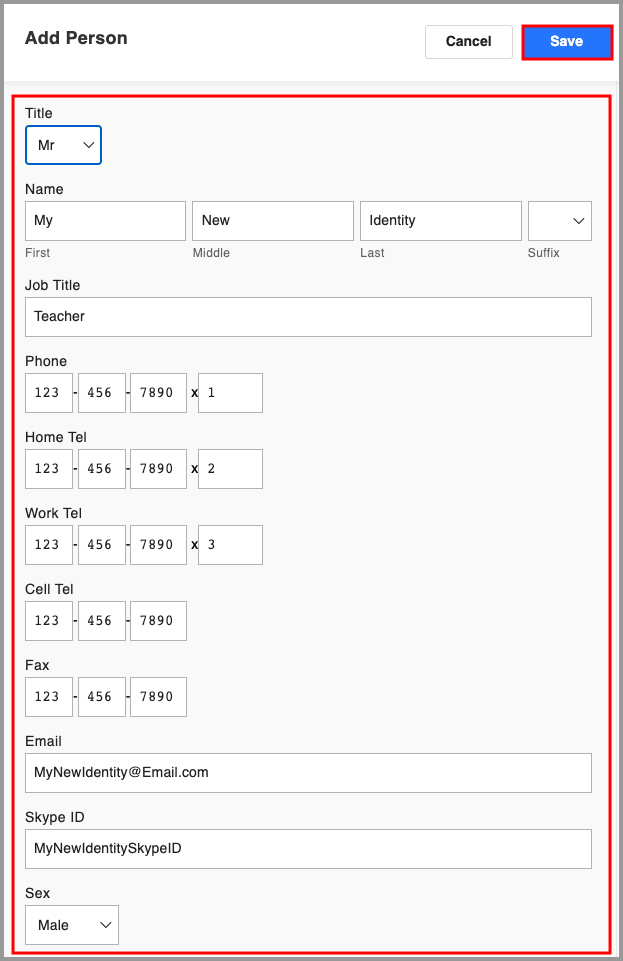
- Within your Identity, you can include the following categories of information:
- Person - Personal information for the Identity,
- Business - Workplace information for the Identity
- Passport - Passport details for the Identity
- Address - Address for the Identity
- Credit Card - Credit card details for the identity
- Bank Account - Banking information for the identity
- Car - Vehicle details for the identity
Creating an Identity through the RoboForm Editor:
-
Click the [ ^ ] button (show hidden icons) in the lower right corner. Click the RoboForm icon. Select "Editor" from the menu.
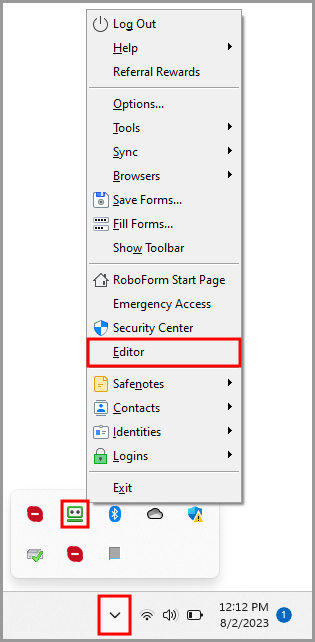
-
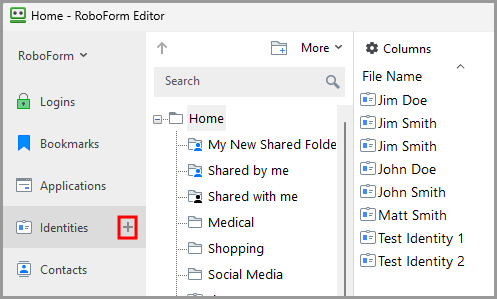
In the RoboForm Editor, click the “+” next to the Identities tab in the column on the left.
-
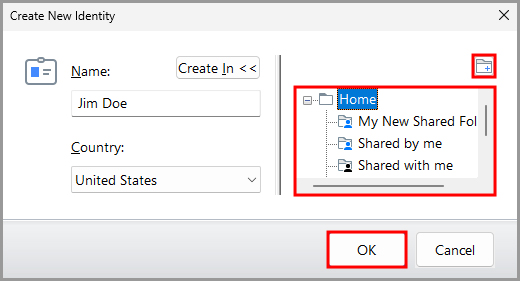
The Create New Identity dialog will appear. Name the Identity, and select the appropriate Country. The “Create In” button allows you to select or create a Folder for your identity.
Click the “Ok” button once you are done.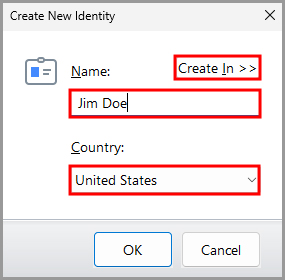
 NOTE: RoboForm asks for Country in order to localize accordingly.
-
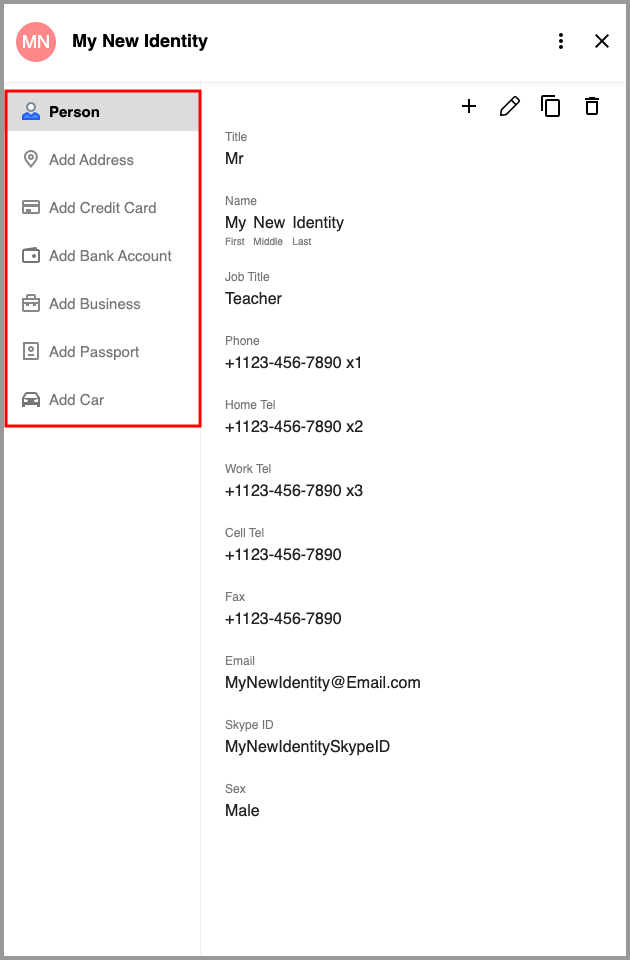
Within your Identity, the following Identity Elements provide you with organized storage of the Identity’s information:
Person - Personal information for the Identity,
Business - Workplace information for the Identity
Passport - Passport details for the Identity
Address - Address for the Identity
Credit Card - Credit card details for the Identity
Bank Account - Banking information for the Identity
Car - Vehicle details for the Identity
Custom - Custom fields for the Identity. These will be gone over in more detail in the next section titled “Custom Fields”. -
Click the "Save" button (Floppy Disk Icon) when you have entered your information.
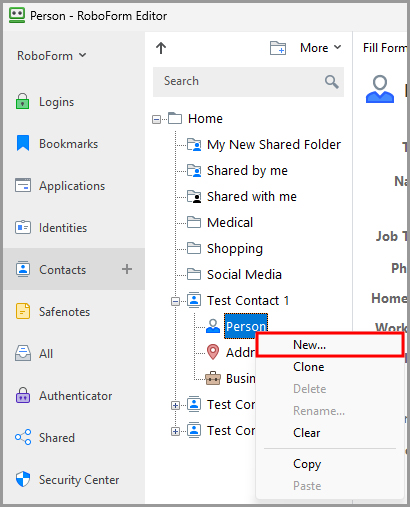
How to Add another Element
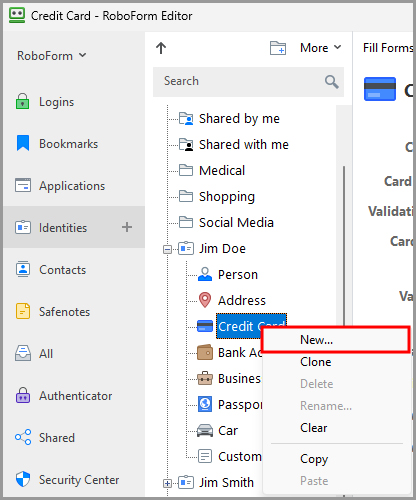
If you have more than one Address, Credit Card, Bank Account, etc. for an Identity, you can create Multiple Contact Elements.
-
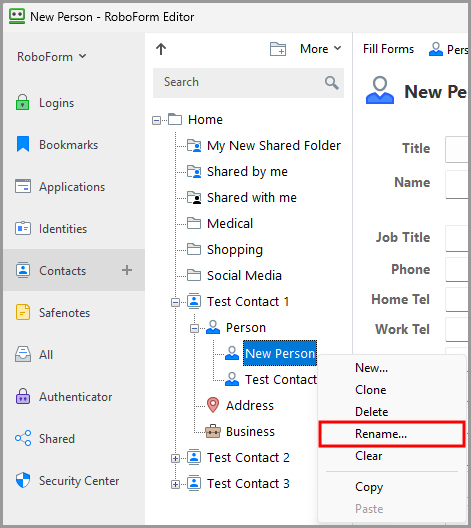
Right click the Element and select “New” from the menu.
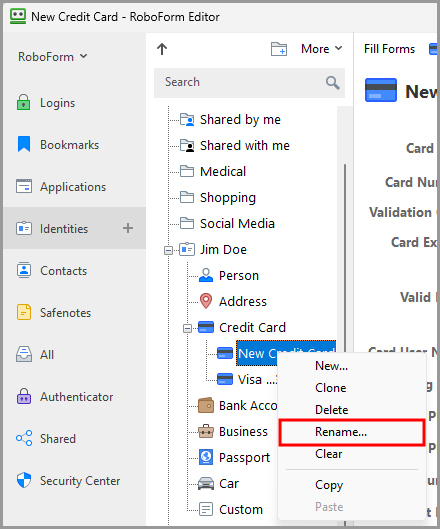
-
Rename the new element by right clicking it and selecting “Rename” from the menu.
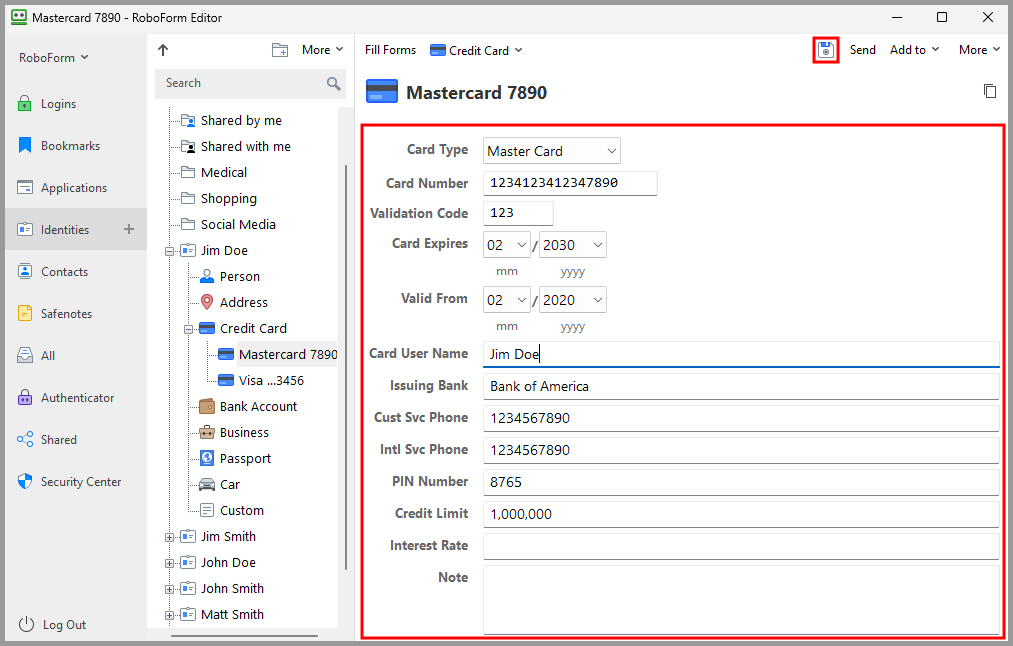
-
Then, select the New Element and you will be able to fill the Contact Fields of the new Element in the Editor. Once you have filled them out as you wish, click the Save button (Floppy Disk icon) in the upper right.
Custom Fields
Custom is for any other fields that are not covered in RoboForm.
How to Use Custom Fields
- Fill the Field Name with the question of the field (E.g. Username).
- Fill the Field Value with your response to the question of the field (E.g. JohnSmith).
- Other Matching Strings is for an additional Field Name that RoboForm should also detect (E.g. Field Name: Username...Other Matching Strings: User ID). When RoboForm detects an Other Matching String term, it will fill it with the Field Value.
-
Click the Save button (Floppy Disk icon) at the top of the Editor to Save your Custom Form.
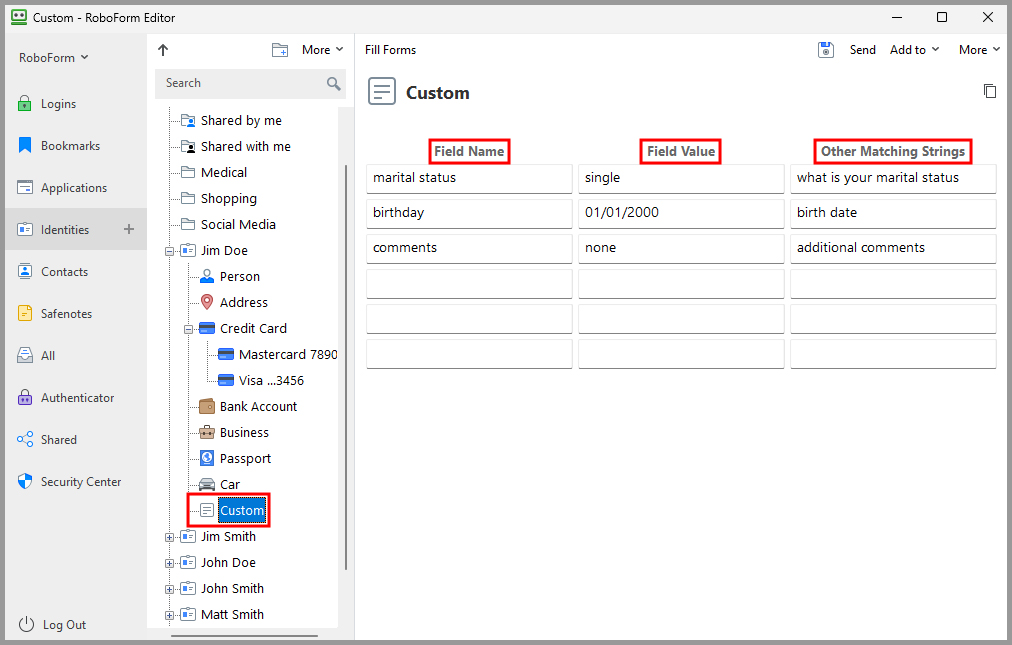
More important notes about using Custom fields:
- RoboForm will remove all punctuation (, . - ! ?) in your custom fields when it fills forms.
- For a Field Value with a checkmark (E.g. Are you over 18?...✓), fill in the Field Name with the question (Are you over 18?), and the Field Value with an asterisk, or *.
- Radio Buttons allow you to only select one option out of a list (E.g. Married, Single, etc.). To create a custom field for radio buttons, simply fill your Field Value with the question (E.g. Marital status) and the field name with your answer (E.g. Single).
NOTE: You don’t have to enter any dashes or spaces for Identity Fields with numbers (E.g. phone numbers, driver license number).
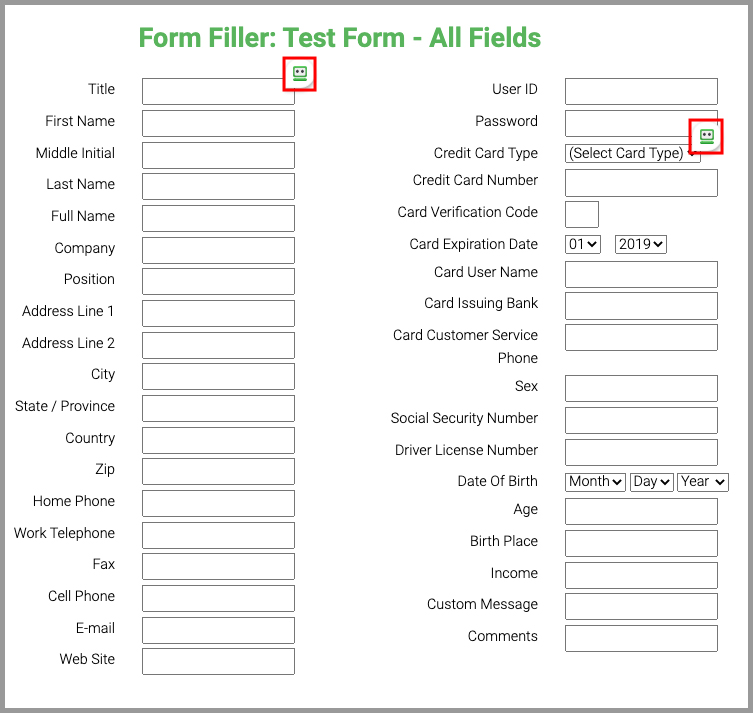
Using an Identity
Having your information stored in an Identity can be useful for a number of reasons, such as filling out shipping and billing information, filling out medical forms, and even entering sweepstakes.
To use your completed Identity, follow these steps:
Having your information stored in an Identity can be useful for a number of reasons, such as filling out shipping and billing information, filling out medical forms, and even entering sweepstakes.
To use your completed Identity, follow these steps:
-
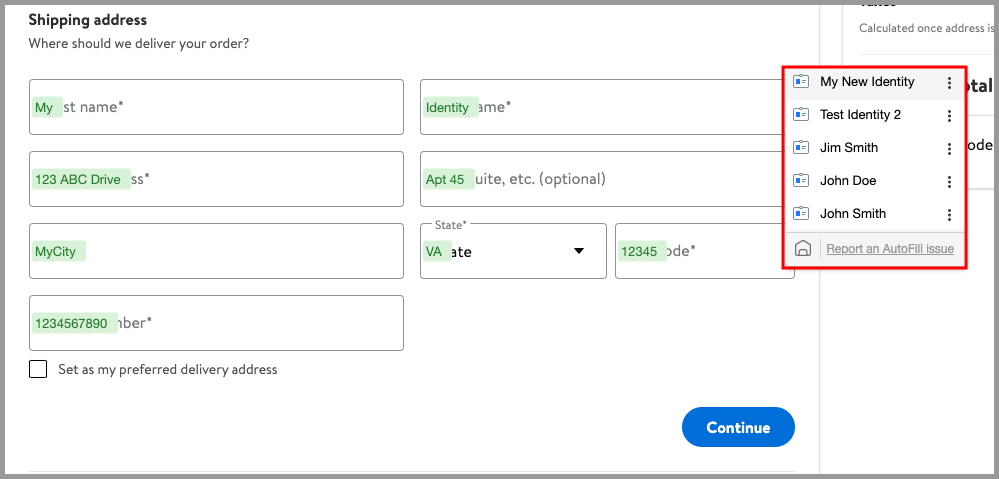
Navigate to a website which contains forms you need to fill out, and click the RoboForm autofill icon. Then, select the identity you wish to fill from and click the "Fill" button
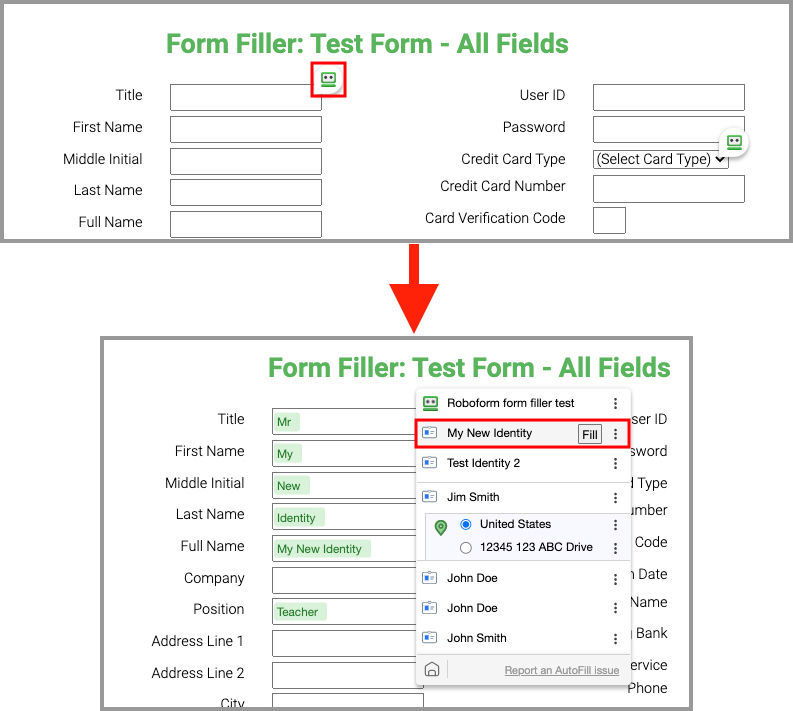
-
The information saved within that Identity will automatically be filled into the appropriate lines within the form.
NOTE: In many instances, you will need to fill forms across multiple pages. One example of this is Walmart's checkout process. If the checkout process is done across multiple pages, continue to fill from the appropriate Identity whenever a blank form is present. RoboForm will automatically fill in the appropriate information.
You can use Selective Form Filling if you would like to fill a select amount of fields on a web page (not all of them). You can do this by selecting (highlight with your mouse) the part of the web page that you want to be filled and clicking Fill Forms. RoboForm will only fill the fields that you have selected.
Clicking the 3 dots on the right of an Identity in the Extension’s Identity menu will give you the following options
- Fill Forms - Fills the forms on the current page.
- Edit - Allows you to edit the Identity on the Start Page.
- Rename - Allows you to rename the Identity.
- Delete - Allows you to delete the Identity.
- Send… - Allows you to send the Identity to another RoboForm user.
- Sharing… - Allows you to share the Identity with another RoboForm user.
- Add to Pinned - Allows you to add the Identity to your Pinned list.
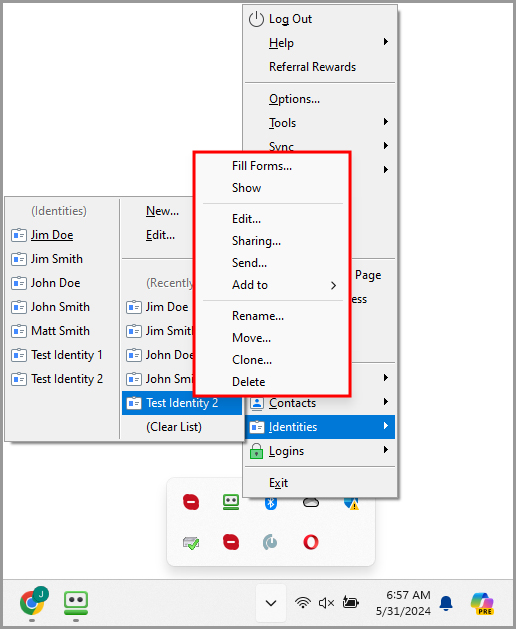
Clicking the 3 dots on the right of an Identity in the Taskbar Icon’s Identity menu will give you the following options:
- Fill Forms… - Allows you to fill forms with the information stored in the Identity.
- Show - Shows you the Identity in the Editor.
- Edit - Allows you to edit the Identity in the Editor.
- Sharing… - Allows you to share the Identity with another RoboForm user.
- Send… - Allows you to send the Identity to another RoboForm user.
-
Add to:
- Desktop - Creates a RoboForm shortcut on your desktop.
- IE Favorites Bar - Creates a RoboForm shortcut in the IE Favorites Bar.
- Rename - Allows you to rename the Identity.
- Move - Allows you to change the folder that the Identity is stored in.
- Clone - Allows you to duplicate the Identity.
- Delete - Allows you to delete the Identity.
Chapter 8: RoboForm Editor
The RoboForm Editor is the main tool to organize your RoboForm Data. Editor allows you to view, edit, and create individual RoboForm items and organize them into folders. The RoboForm Editor is not available on any Standalone Extensions.
Accessing the Editor
The Editor can easily be found by one of these ways:
-
Opening the RoboForm Taskbar and selecting Editor.
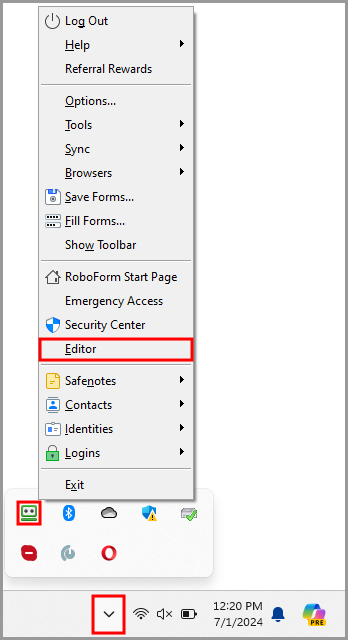
-
the option to open the RoboForm editor from the RoboForm taskbar icon’s menu
-
Searching for the RoboForm Editor in your Windows Files.
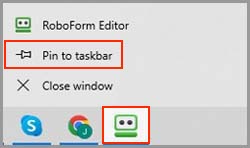
To have quick access, right click the RoboForm Editor and add it to your Taskbar.
Editor Overview
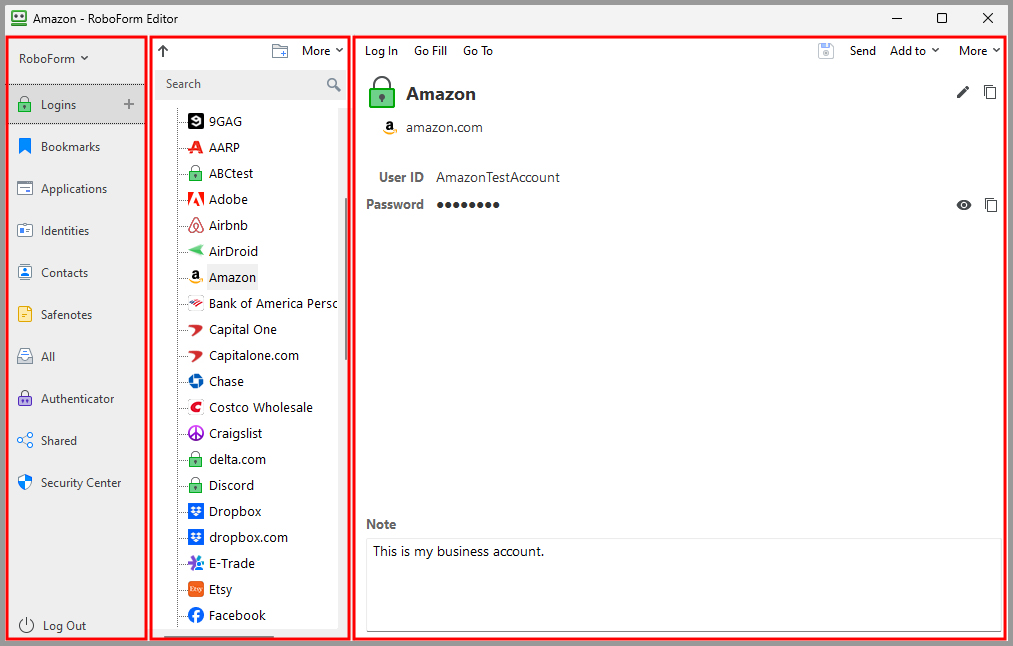
There are three sections in the RoboForm Editor
- The Left Panel shows the RoboForm Menu button at the top, the Logins, Bookmarks, Applications, Identities, Contacts, Safenotes, All, and Shared tabs in the middle, and lastly the Security Center.
- The Navigation Pane in the middle has multi-level navigation of the selected tab’s folders and items.
-
The Details Pane on the right shows the contents or the details of the selected item or folder from the Navigation Pane.
We will go through the details of the RoboForm Menu Button and the other tabs in the Left Panel of the Editor below.
RoboForm Menu Button
This button is at the top of the Left Panel and is labeled RoboForm.
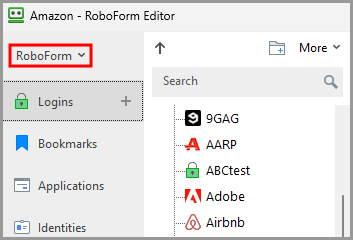
Clicking it will open the following functions:
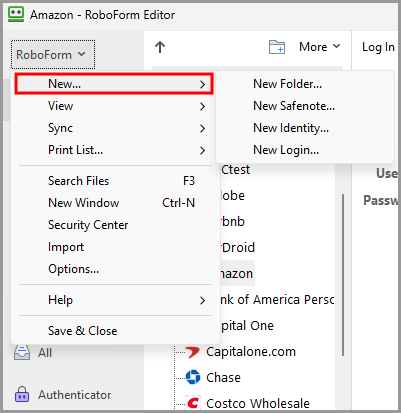
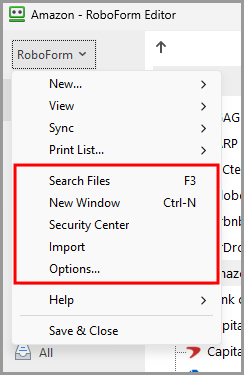
-
New - Allows you to create a new Folder, Safenote, Identity, or Login.
- New Folder… - Opens the folder creation dialogue.
- New Safenote… - Opens the Safenote creation dialogue.
- New Identity… - Opens the Identity creation dialogue
- New Login… - Opens the Login creation dialogue.
-
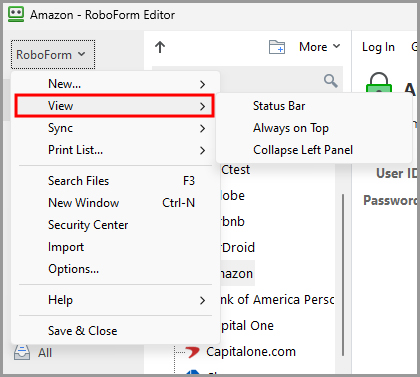
View - Allows you to change the visibility settings of the Editor:
- Status Bar - Attaches a status bar to the bottom of the Editor. This includes a timestamp for when the item or the folder was last edited.
- Always on Top - Places the RoboForm Editor on top of all other open windows on your compute
-
Collapse Left Panel - Removes the left column from view.
-
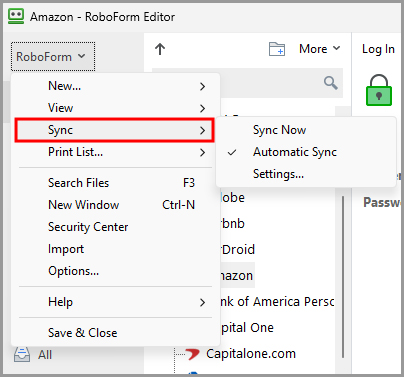
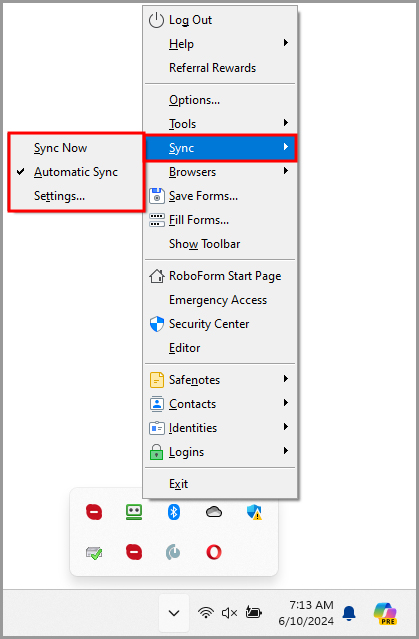
Sync - Allows you to change your Sync settings:
- Sync Now - RoboForm manually syncs your device and your RoboForm account.
- Automatic Sync - Does an automatic sync of your RoboForm data.
- Settings - Opens the options for sync in a new window, click the arrows next to Proxy Settings to open the advanced settings.
- Restore Deleted Data - Can restore the last 30 days of deleted data.
-
Clean up Recycled Files (from server only) - Removes cached files from the RoboForm server.
-
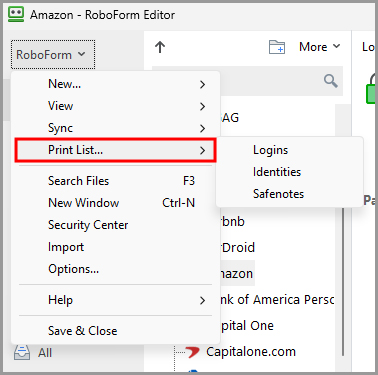
Print List - Creates a printable list of your Logins, Identities, or Safenotes. A dialog appears that previews the printed list you selected. You may click the Print button to print what you see or click Save to save it to an HTML file.
- Search Files - Opens a dialog window to search any item of RoboForm Data.
- New Window - Opens the RoboForm Editor in a new window.
- Security Center - Opens the Security Center. Read more in Chapter 15: Security Center.
- Import - Allows you to import any data from browsers or other password managers to RoboForm. For browsers, click the Import button next to the browser name. For other password managers, click Import from File and follow the directions on the page.
-
Options - Opens the settings for RoboForm in a new window.
-
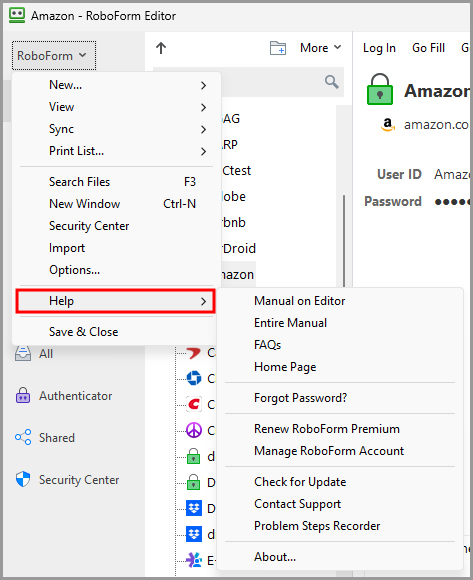
The Help Menu - Provides helpful resources about RoboForm.
- Manual on Editor - Opens the RoboForm manual for the Editor in a new web page.
- Entire Manual - Opens the RoboForm manual in a new web page.
- FAQs - Opens frequently asked questions for RoboForm in a new web page.
- Home Page - Opens the RoboForm website in a new web page.
- Forgot Password? - Brings you to our Help Center article on what to do if you forget your Master Password.
- Renew RoboForm Everywhere - Brings you to our Renewal purchase page.
- Manage RoboForm Account - Logs you in to RoboForm Online where you can manage your RoboForm Account.
- Buy RoboForm - Opens a Purchase RoboForm Everywhere web page.
- Check for Update - Checks what software version you have and whether it’s time to update RoboForm.
- Contact Support - To contact support, you must submit a ticket to RoboForm’s support system. Find out how to submit a ticket in Chapter 9: Taskbar Icon.
- Problem Steps Recorder - This tool will help explain your problem to support in a step by step video format. Find out how to use Problem Steps Recorder in Chapter 9: Taskbar Icon.
-
About - Opens a window giving general information about your version of RoboForm. (Version Number, Account Name, License Expiration Date, an option to be notified about new versions, Copyright information, and the RoboForm End User License Agreement)
-
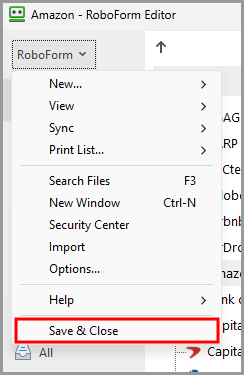
Save & Close - Saves any changes to and closes the RoboForm Editor.
Navigation Pane Commands
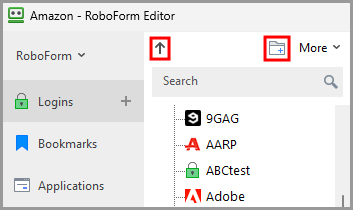
At the top of the Navigation Pane there are three buttons.
They are explained here:
- The Up Arrow Icon - Opens the parent folder of the folder you are using.
-
The New Folder Icon - Creates a new folder in the section you are using.
-
The More menu has the following options:
- Rename - Allows you to change the name of the item.
- Move - Allows you to move the item to another Folder.
- Clone - Allows you to duplicate the item.
- Delete - Allows you to remove the item.
- Copy - Allows you to copy the item.
- Cut - Allows you to copy and remove the item from its original location.
- Paste - Allows you to paste items from your clipboard.
-
Create Shared Folder - Creates a folder that can be securely shared between RoboForm users. Read more in Chapter 13: Sharing and Sending.

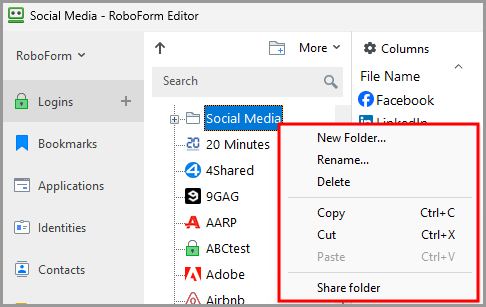
Right-Clicking any item of RoboForm Data in the Navigation Pane will show the following commands:
- Rename - Allows you to change the name of the item.
- Move - Allows you to move the item to another Folder.
- Clone - Allows you to duplicate the item.
- Delete - Allows you to remove the item.
- Copy - Allows you to copy the item.
- Cut - Copies and removes the item from its original location.
- Sharing - Opens the item in RoboForm sharing.
-
Send - Opens the item in RoboForm sending. Read more in Chapter 13: Sharing and Sending.

Right-Clicking any folder of RoboForm Data in the Navigation Pane will show the following commands:
- New Folder… - Creates a new folder within the folder you selected.
- Rename… - Allows you to choose a new name for the folder
- Delete - Removes the folder.
- Copy - Copies the folder.
- Cut - Copies and removes the folder from its original location.
- Paste - Allows you to paste an item or folder from your clipboard into the folder you selected.
-
Share Folder - Allows you to share the folder with another RoboForm user.
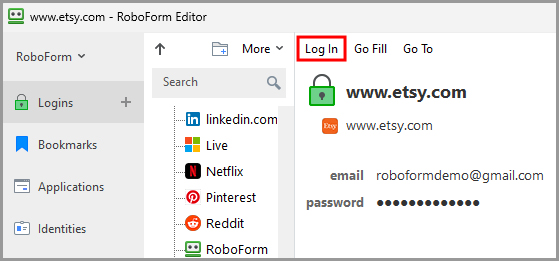
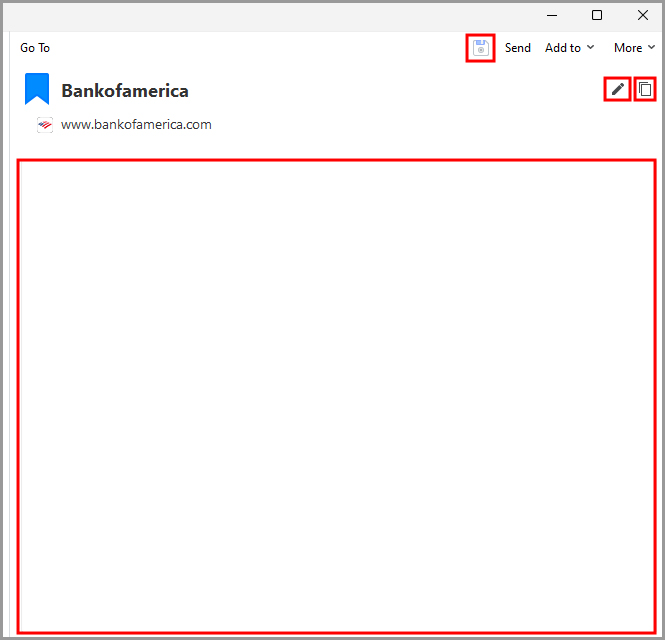
Logins in the Editor
All of your Logins are organized alphabetically in the Navigation Pane. From this tab, you can go to web pages, fill forms, and edit your Logins.
NOTE: You can’t create a new Login in the Editor. You can read more about creating Logins in Chapter 4: Logins.
-
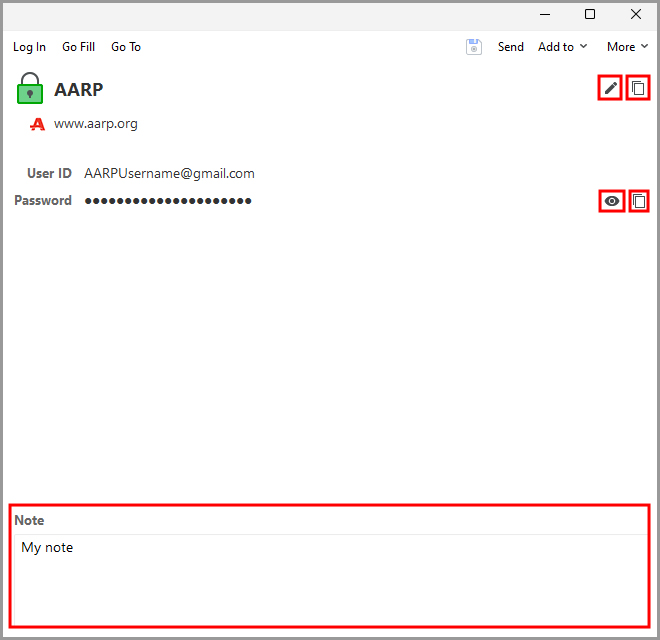
Selecting a Login in the Navigation Pane will open its information in the Details Pane. This includes the Name, Website, User ID, and Password
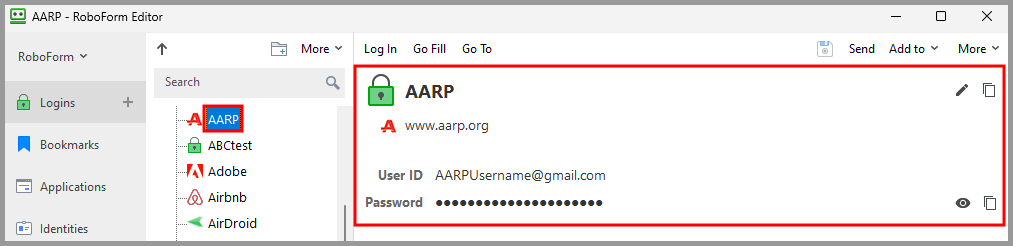
- Clicking the Eye Icon will reveal or hide the password.
- The Pencil Icon allows you to edit the Login. By clicking it, you can edit the URL (for Go To command and Matching Logins) and the user details.
- The Copy Icon copies the whole text of the Login.
- The Note at the bottom of the page keeps track of password changes and allows you to add any notes to it.
You can Drag and Drop the text of a Login into a web page. Simply click and hold the name of an individual field (E.g. Password) and drop it where you like on the page.
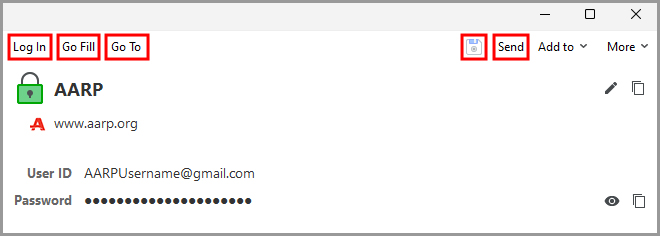
The Editor Toolbar at the top has the following Login options:
- Login - Opens the website of the Login and automatically logs you in.
- Go Fill - Opens the website of the Login and fills the forms.
- Go To - Opens the website of the Login.
- The Save Button (Floppy Disk Icon) - Saves any changes you made.
- Send - Opens the RoboForm Sharing window and allows you to send the Login to another RoboForm user.
-
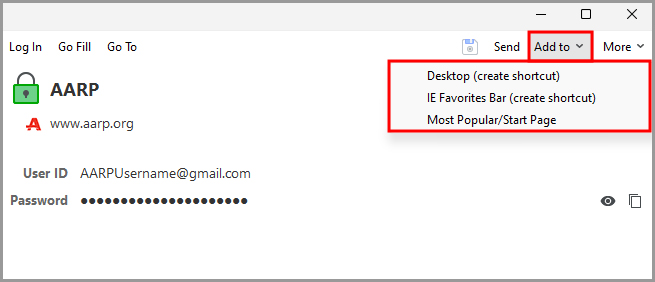
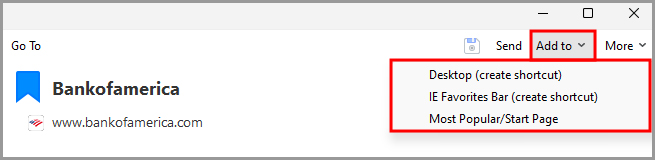
Add to - Creates a quick shortcut for this Login on:
- Desktop (shortcut).
- IE Favorites Bar (shortcut), in Internet Explorer.
- Most Popular/Start Page, in your Browser’s RoboForm Extension.
-
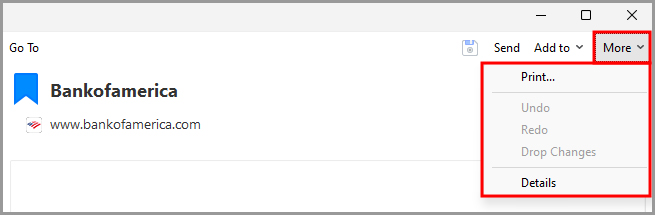
More has these options:
- Print - Opens the Login in a print preview. Click Print to print what you see or save to save the Login as an HTML File.
- Undo - Reverses the previous edit or change in text.
- Redo - Reverses the previously “undone” edit or change in text.
- Drop Changes - Reverses all edits or changes in text.
- Convert to Bookmark - Will change the URL of the Login into a new Bookmark. The other Login information will be deleted.
- Details - Shows the details of the Login.
-
Set Reminder - Creates a timed notification for you to update the password for the selected Login
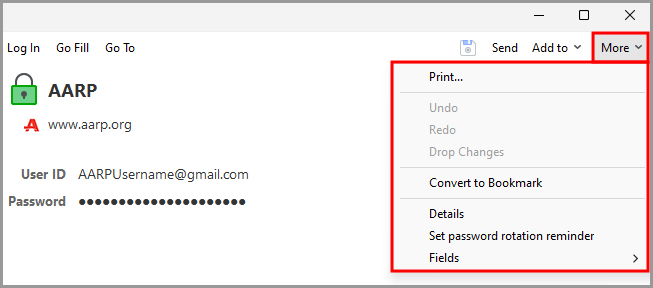
- Fields - Lets you customize the fields. Select the desired field to edit and click one of these commands:
- Add field - Adds an additional field. A dialog opens asking you to select the Field Type and Field Name. After clicking OK, you can edit that field and save your changes.
- Rename field - Allows you to change the Field Name
- Delete field - Removes the field.
- Ignore field - Will not fill in the selected field when you visit a page. RoboForm will fill the field with “$AnyValueHere$" into the field, such fields will be ignored by AutoFill, Login and AutoSave.
- Unignore field - Reverses the Ignore command and reverses changes.
-
Add Login Tip - Allows you to add a note to the Login.
NOTE: If you want to remove all changes to your Login, click Drop Changes in the More Menu in the Details Pane.
Bookmarks in the Editor
All of your Bookmarks are organized alphabetically in the Navigation Pane. Within the Navigation Pane, you can edit and go to your Bookmarks.
NOTE: You can’t create a Bookmark in the Editor. You can read about how to create one in Chapter 5: Bookmarks.
-
Selecting a Bookmark in the Navigation Pane will open its information in the Details Pane. This includes the Website, URL, and any Notes
- The Pencil Icon allows you to edit the Bookmark. By clicking it, you can edit the URL (for Go To command) and the Bookmark Note.
- The Copy Icon copies the whole text of the Bookmark.
- The Note allows you to add notes.
-
Click the Save Button (Floppy Disk Icon) to save any changes you made.
You can Drag and Drop the URL of a bookmark into the address bar. While in Edit mode, simply click and hold an individual field - in this case, the URL - and drop it where you like on the page.
The Editor Toolbar at the top has the following Bookmark options:
- Go To - Opens the website of the Bookmark.
-
Send - Opens the Bookmark in RoboForm sending. Read more about sending in Chapter 13: Sharing and Sending.

-
Add to - Creates a quick shortcut for this Bookmark on:
- Desktop (shortcut).
- IE Favorites Bar (shortcut), in Internet Explorer.
-
Most Popular/Start Page, in your Browser’s RoboForm Extension.
- More - Has further options:
- Print opens the Bookmark in a print preview. Click Print to print the bookmark as previewed or save to save the Bookmark as an HTML File.
- Undo reverses the previous edit or change in text.
- Redo reverses the previously “undone” edit or change in text.
- Drop Changes reverses all edits or changes in text.
-
Details shows the details of the item
Applications in the Editor
All of your Application Logins are organized alphabetically in the Navigation Pane. From here you can go to the application, login, and edit your Login.
Selecting an Application in the Navigation Pane will open its information in the Details Pane.
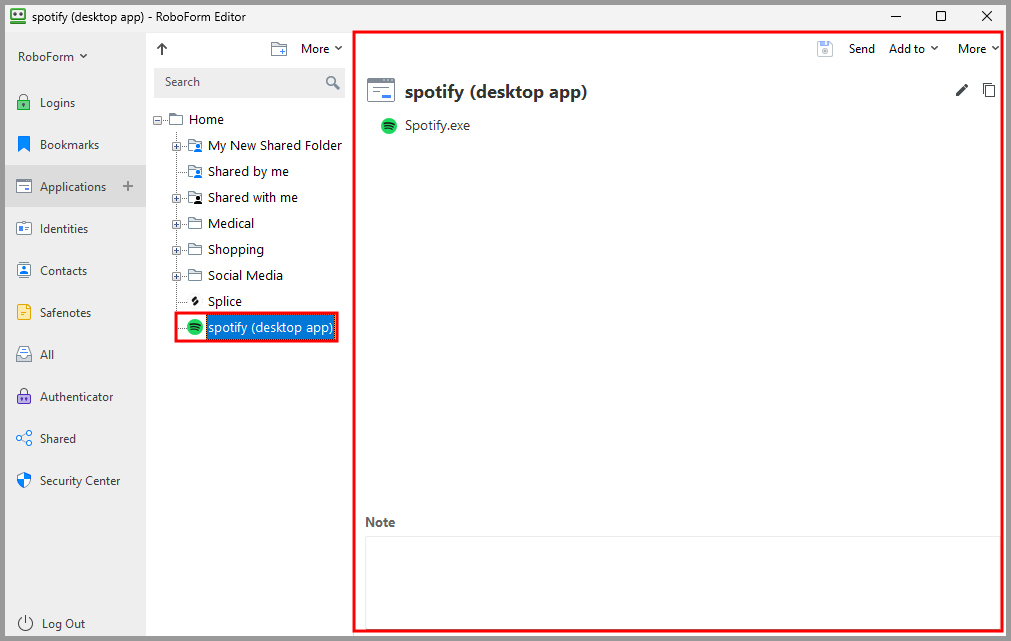
Application Logins share the same functions in the Editor as normal Logins. Please refer to the “Logins in Editor” portion of this chapter to learn more about using Applications in the Editor.
NOTE: If you want to remove all changes to your Application Login, click Drop Changes
Identities in the Editor
All of your Identities are ordered alphabetically.
NOTE: Go to Chapter 7: Identities if you would like to read about:
What are Identity Elements, How to Create an Identity, or How to Add and Edit Personal Details in Identity
-
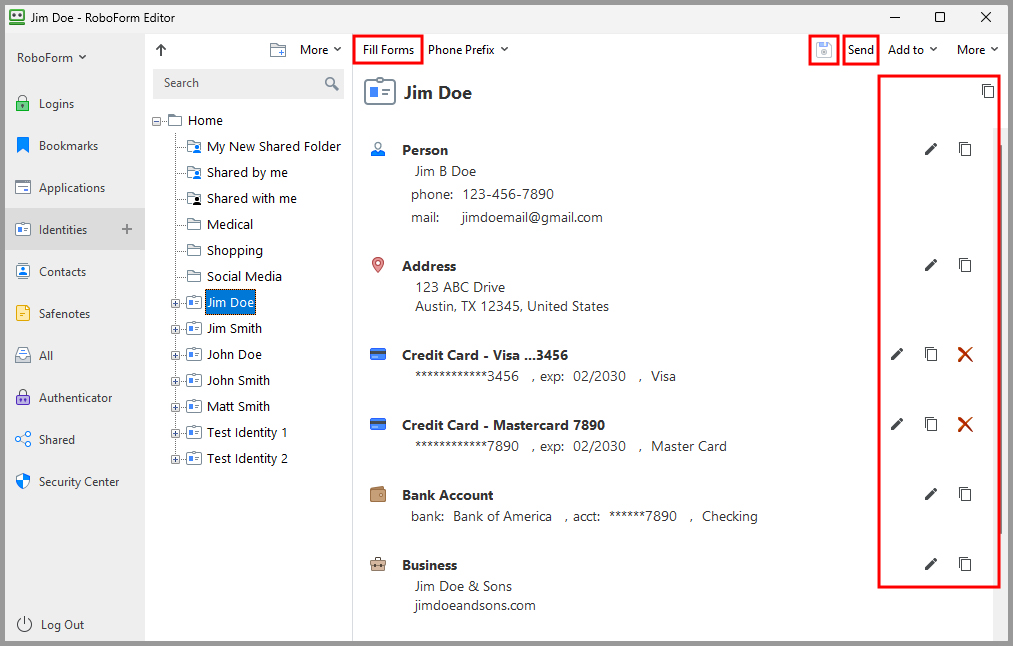
Selecting a Login in the Navigation Pane will open an Identity Summary in the Details Pane. Expanding the Identity folder in the Navigation Pane will show all the Identity Elements. Selecting an Identity Element will open its information in the Details Pane. Each Identity Element is made up of individual Identity Fields (E.g. Date of Birth), or distinct personal details.
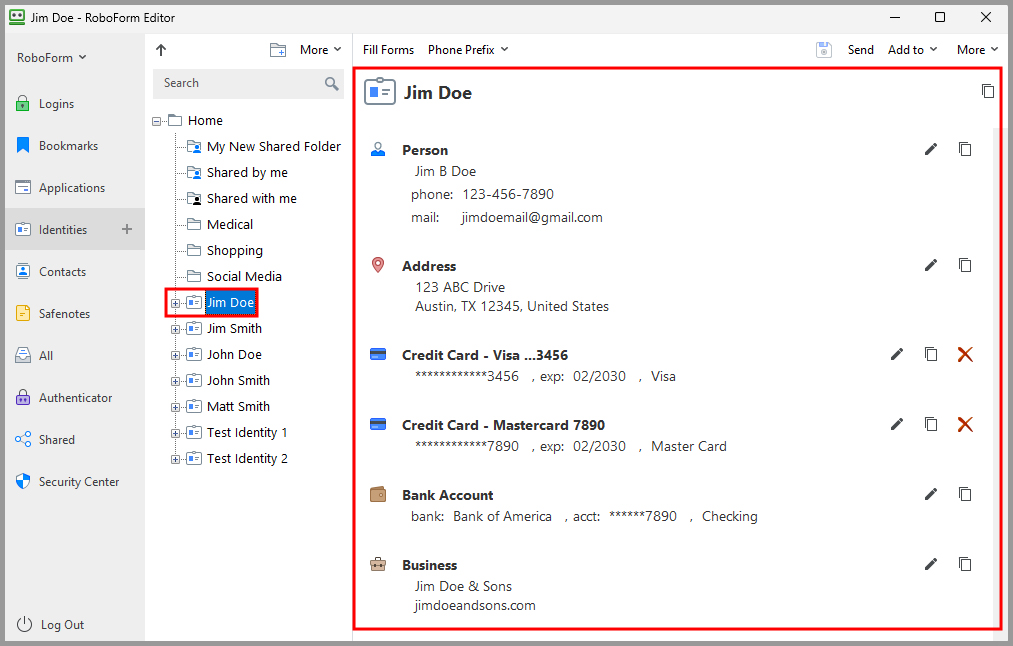
- Fill Forms allows you to fill forms in your browser with the Identity’s information.
- Click the Save Button (Floppy Disk Icon) to save any changes you made.
- Send opens RoboForm Sending in a new window.
- The Pencil Icon allows you to edit the Identity Element
-
The Copy Icon copies the whole text of the Identity Summary or an Identity Element.
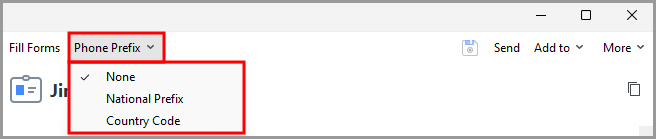
- Phone Prefix allows you to format your Identity’s phone number according to the form you are filling.
- None is the default for calling within the country.
- National Prefix is the number added to the front of a phone number to call long distance within the country.
-
Country Codes is the number added to the front of a phone number to call internationally.
- Add to allows you to add a shortcut to your Bookmark on:
- Desktop (shortcut).
-
IE Favorites Bar (shortcut), in Internet Explorer.

-
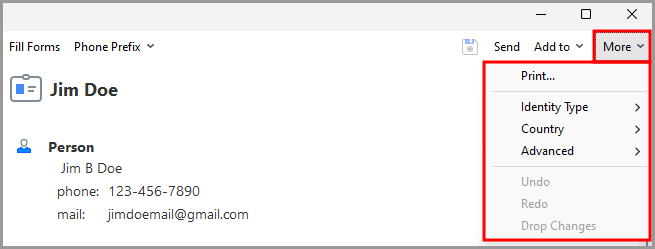
More has the following options:
- Send opens RoboForm Sending in a new window. Read more in Chapter 13: Sharing and Sending
- Print creates a printable version of your Identity. A dialog appears that previews the printed Identity. You may click the Print button to print what you see or click Save to save it to an HTML file.
- Identity Type can convert your Identity to a Contact.
- Country is the country of your Identity. Changing the Country might change the country-specific units for your Identity.
- Advanced allows you to open an App Upload Element in identities. This Application Upload is meant for saving information for licensing software.
- Undo reverses the previous edit or change in text.
- Redo reverses the previously “undone” edit or change in text.
-
Drop Changes reverses all edits or changes in text.
Filling Forms from RoboForm Editor
-
Navigate to the form you wish to fill in your browser.
- Select the Identity in the Editor.
-
Drag and drop the Identity information from the Editor into the form.
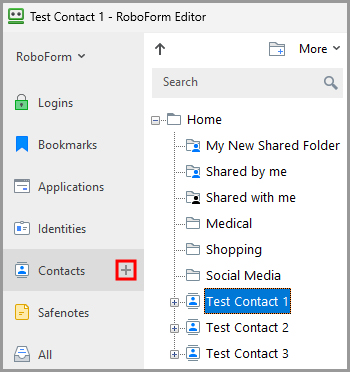
Contacts in Editor
Contacts are similar to a phone-book. You can store an individual's contact information here. All of your Contacts are ordered alphabetically. The RoboForm Editor is your main tool to create and edit contacts. From here you can create contacts, edit them, and fill forms with them.
-
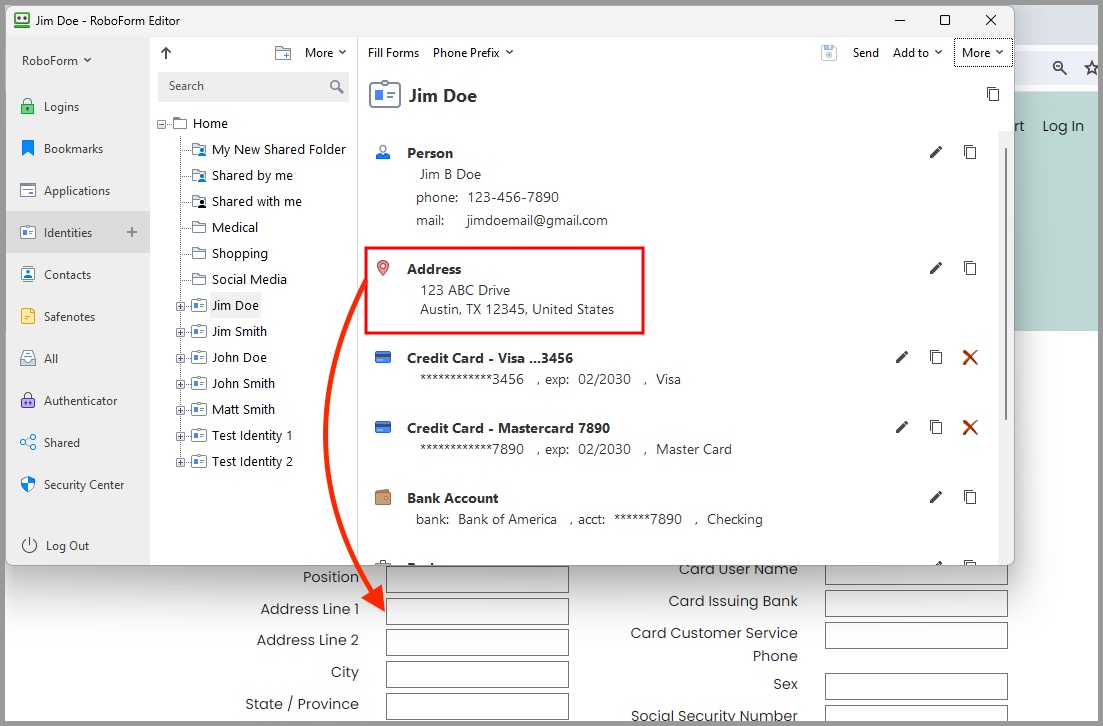
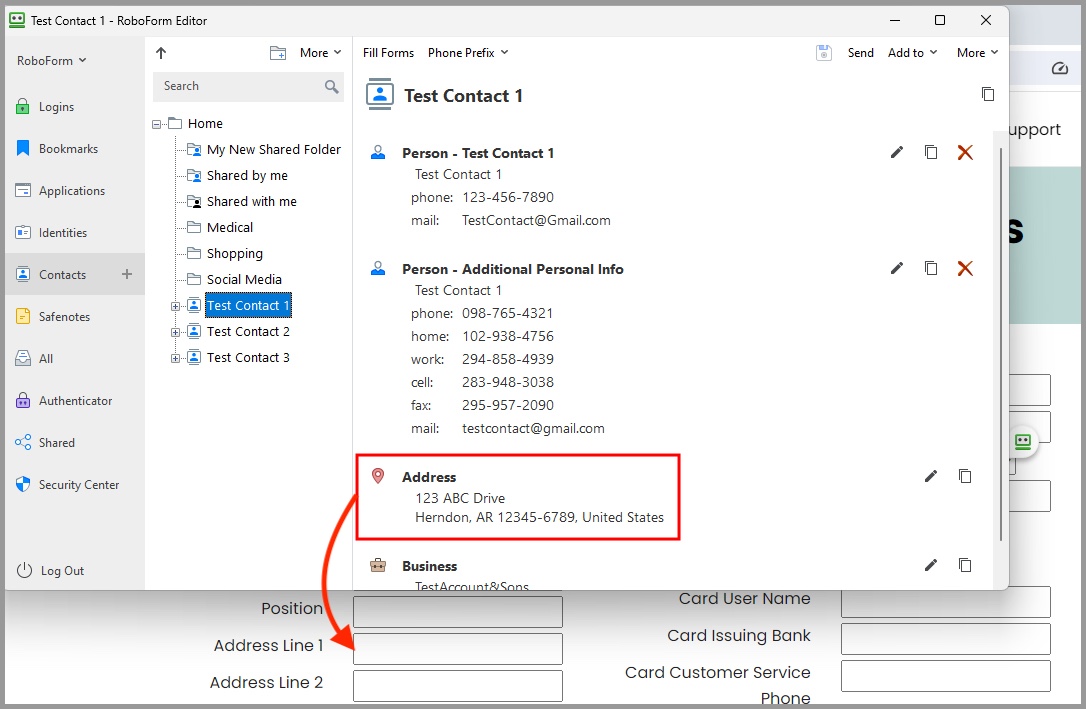
Selecting a Contact in the Navigation Pane will open the Contact Summary in the Details Pane. Expanding the Contact folder in the Navigation Pane will show all the Contact Elements (E.g. Person, Business, Address).
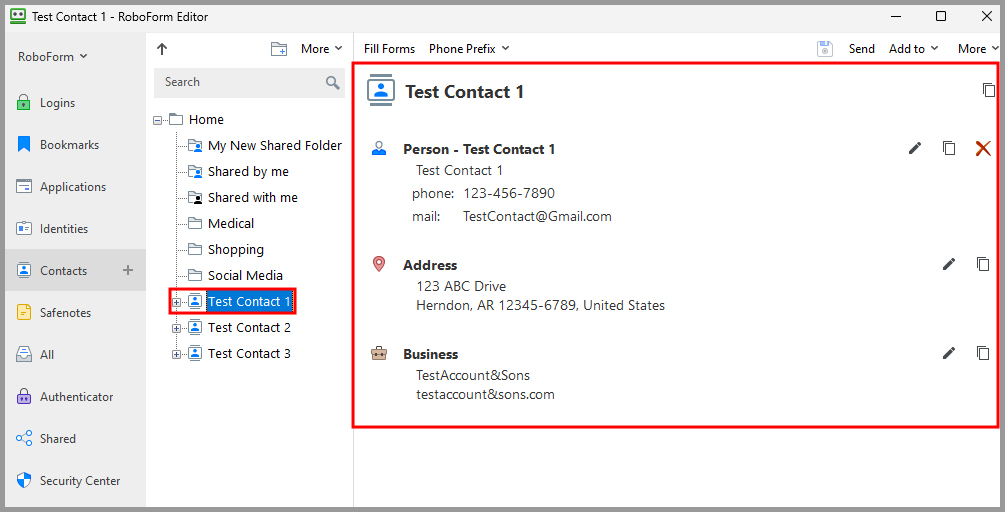 Selecting a Contact Element will open its information in the Details Pane.
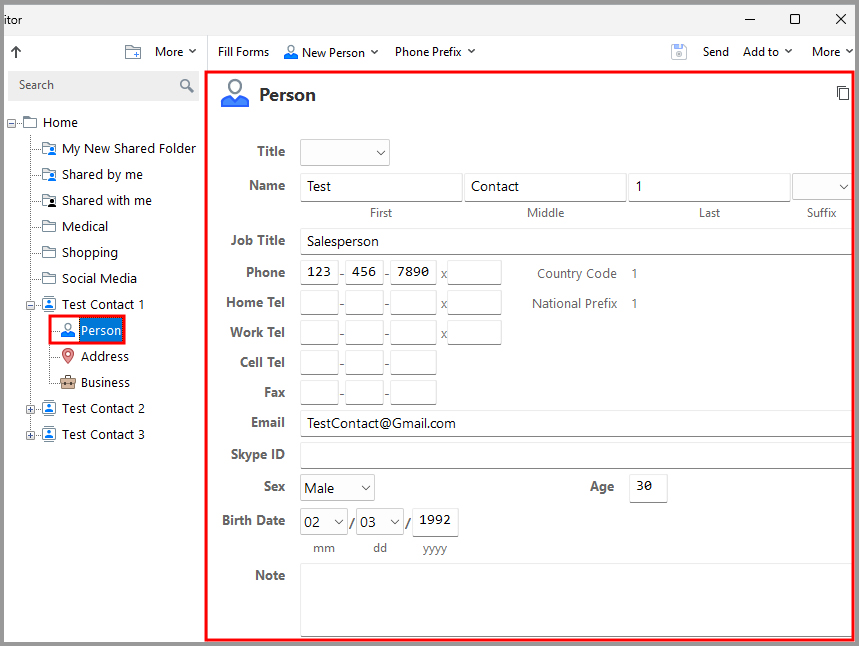
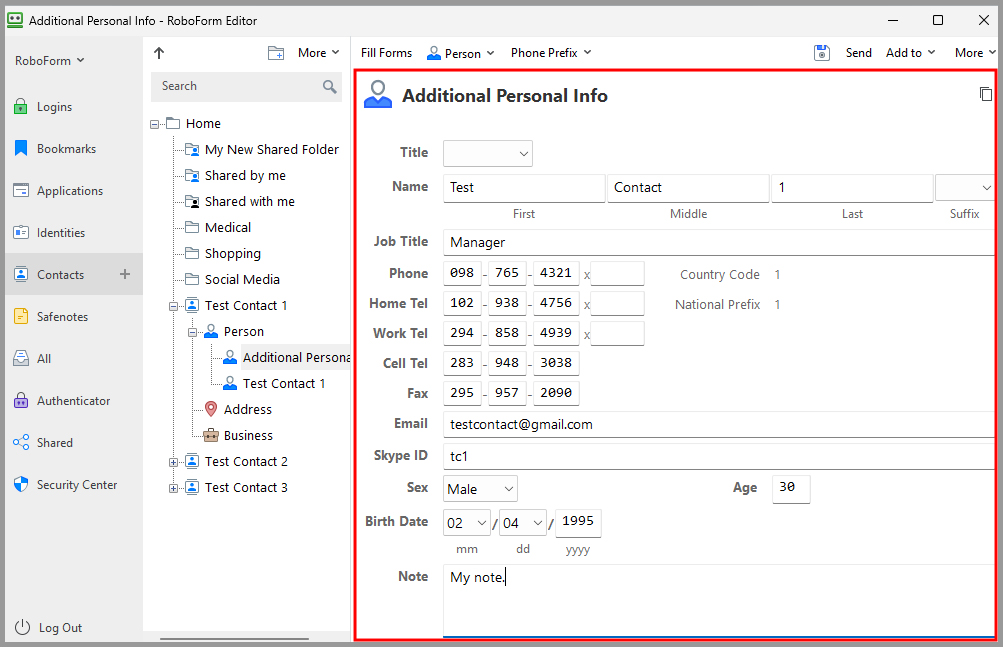
- Person has all the fields associated with an individual such as name, phone numbers, etc.
- Business is the business entity that the Contact is associated with.
- Address is your Contact’s physical location.
- The Pencil Icon allows you to edit the Contact
- The Copy Icon copies the whole text of the Contact
-
Click the Save Button (Floppy Disk Icon) to save any changes you made.
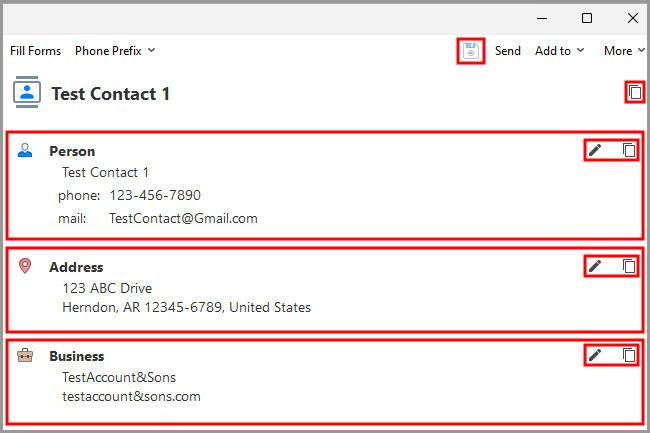
You can Drag and Drop the text of an Contact into a web page. Simply click and hold the name of an individual field (E.g. Phone Number) and drop it where you like on the page.
NOTE: You don’t have to enter any dashes or spaces when you are typing in fields with numbers
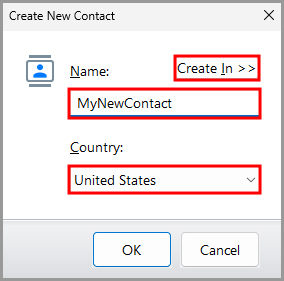
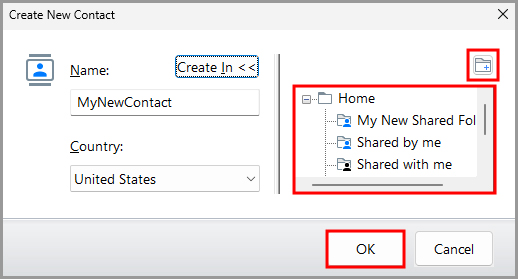
How to Create a Contact in Editor
-
In the RoboForm Editor, click the “ + ” next to the Contact tab.
- The New Contact dialog will pop up. Name the Contact, and select their Country. The “Create In” button allows you to select or create a Folder for your identity.
-
Click the “Ok” button once you have entered the information.
How to Add another Element
If you have more than one business or address for a contact, you can create Multiple Contact Elements
- Right click the Element and select “New” from the menu.
- Rename the new element by right clicking it and selecting “Rename” from the menu.
-
Then, select the New [Element] and you will be able to fill the Contact Fields of the new Element in the Editor.
NOTE: Your original Element will now be labeled “[Main]” on the left side of the Editor. Right click the original Element and select Rename to change its name.
How to Fill Forms with Contacts
-
Navigate to the form you wish to fill in your browser.

- Select the Contact.
-
Drag and drop the Contact information from the editor into the form.
The Phone Prefix, Add to, and More options for Contacts work identically to Identities.
Safenotes in Editor
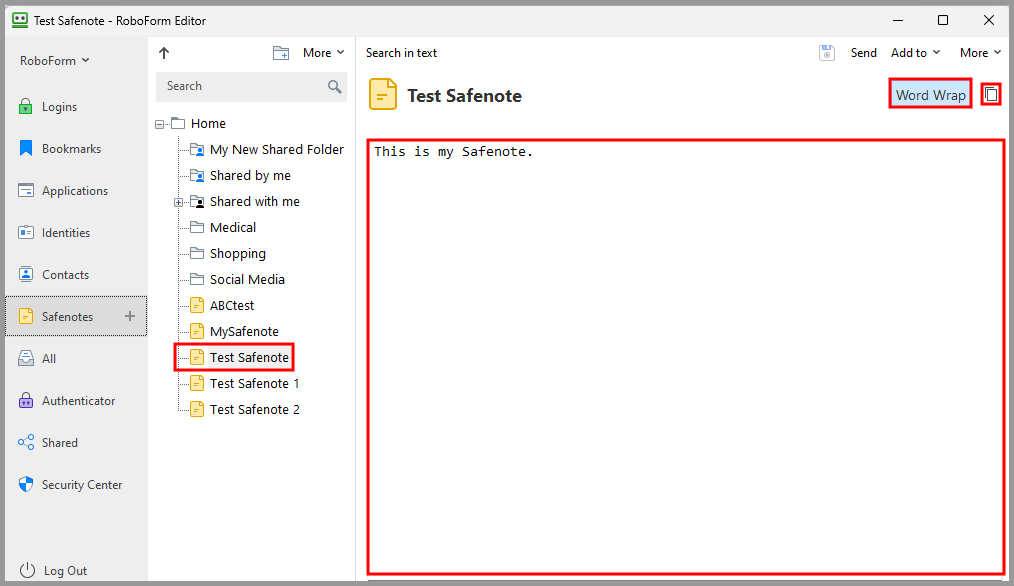
All of your Safenotes are organized alphabetically in the Navigation Pane. From here you can edit and view your Safenotes.
NOTE: Refer to Chapter 6: Safenotes for how to create a Safenote.
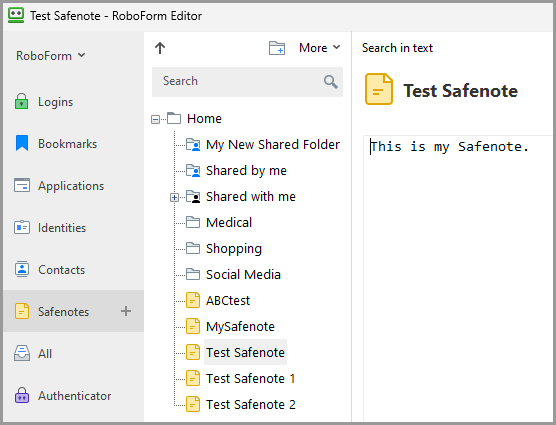
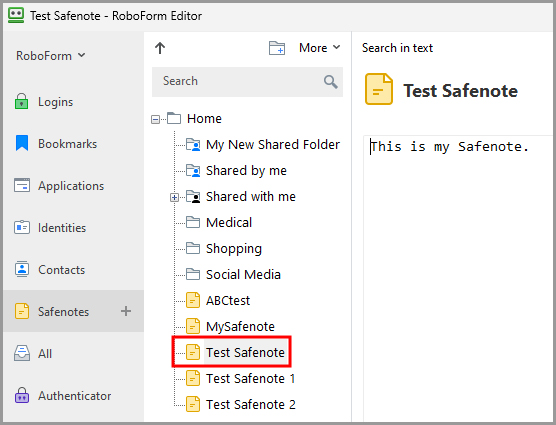
- Selecting a Safenote in the Navigation Pane will open its information in the Details Pane.
- Word Wrap allows you to toggle between having text wrap or not wrap in your Safenote.
- The Copy Icon copies the whole text of the Safenote.
-
You can Edit your Safenote by clicking inside the text box and inputting the text you wish your Safenote to contain.
You can Drag and Drop the text of the Safenote. Simply click and hold the name of the Safenote and drop it where you like on a web page.
The Editor Toolbar at the top has the following Safenote options:
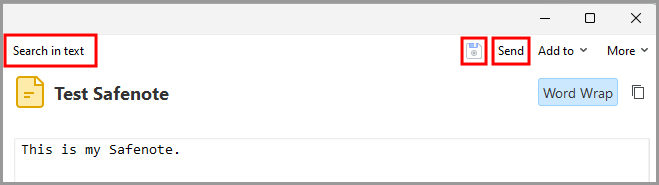
- Search in text opens a search toolbar near the top of the Editor. Your search query will be highlighted within the text of the Safenote. You are able to go between your search results, match the case of the search query, and search for the whole word.
- Click the Save Button (Floppy Disk Icon) after you made any changes.
-
Send opens the RoboForm Sharing window and allows you to send the Safenote to another RoboForm user.
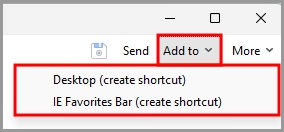
- Add to creates a quick shortcut for this Bookmark on:
- Desktop (shortcut)
-
IE Favorites Bar (shortcut), in Internet Explorer
-
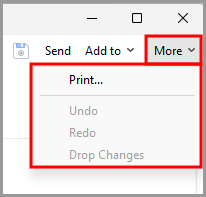
More has further option:
- Print - Opens the Safenote in a print preview. Click Print to print the Safenote or save to save the Safenote as an HTML File.
- Undo - Reverses the previous edit or change in text.
- Redo - Reverses the previously “undone” edit or change in text.
-
Drop Changes - Reverses all edits or changes in text.
The All Tab in the Editor
This shows all of your Logins, Bookmarks, Applications, Identities, Contacts, Safenotes and Folders together. They are organized alphabetically within their sections, e.g. all the Logins are grouped together, all the Safenotes are grouped together.
The Authenticator Tab in the Editor
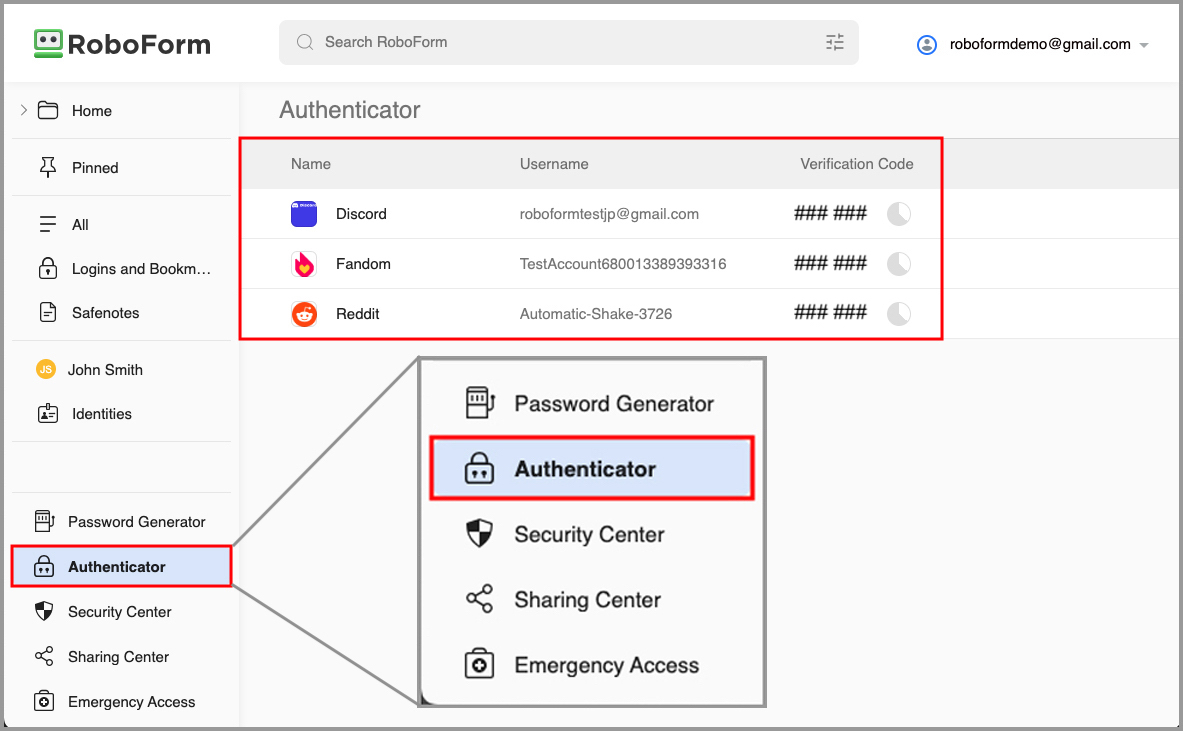
The RoboForm Authenticator allows you to use RoboForm as a two-factor authenticator for other sites and apps. To learn more about the RoboForm Authenticator, go to Chapter 12: Authenticator.
The Shared Tab in the Editor
Shared shows the RoboForm items that you shared with others or items that are shared with you.
- Items or Folders with a blue icon are items you shared with others.
-
Items or Folders with a green icon are items that are shared with you.
NOTE: To find out what the different permission levels mean, how to create a Shared Folder, and more Shared Folder information, read Chapter 13: Sharing and Sending.
The Security Center in the Editor
Read more about the Security Center in Chapter 15: Security Center.
Chapter 9: Taskbar Icon
The RoboForm Taskbar Icon provides quick access to all RoboForm functions and data and makes RoboForm compatible with Win32 applications (E.g. Skype). It opens in a vertical list that includes Logins, Safenotes, and Identities.
The RoboForm Taskbar Icon appears within the [ ^ ] menu (Show Hidden Icons) in the System Tray at the bottom right corner of your screen where time and date icons are displayed.
Data in the Taskbar Icon is only accessible when you are logged into RoboForm using your Master Password.
NOTE: For easier access to your RoboForm Taskbar Icon, click the [ ^ ] button (Show Hidden Icons) then drag and drop the RoboForm Icon into the Taskbar.
To make the Taskbar Icon appear again, you can login to RoboForm on your RoboForm Extension or the RoboForm Editor.
Options in the Taskbar Icon
-
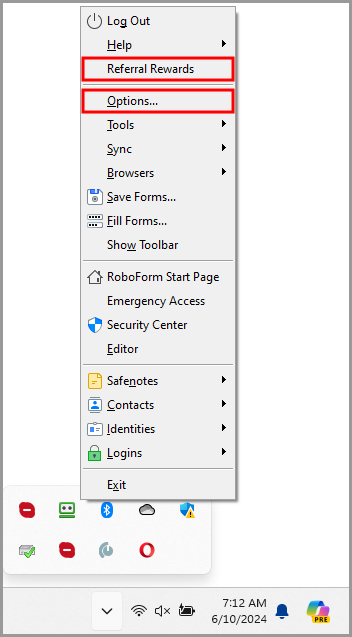
You can find the option to Log In or Log Out at the top of the taskbar menu.
-
The Help Menu, underneath the Logoff button in the Taskbar Icon, provides many services that will help you understand RoboForm.
- Manual on Taskbar - Opens the RoboForm manual for the Taskbar Icon in a new web page.
- Entire Manual - Opens the RoboForm manual in a new web page.
- FAQs - Opens frequently asked questions for RoboForm in a new web page.
- Home Page - Opens the RoboForm website in a new page.
- Forgot Password - Takes you to our Help Center to read our article explaining what to do if you forget your Master Password.
- Renew RoboForm Everywhere - Brings you to our Renewal purchase page.
- Manage RoboForm Account - Logs you in to RoboForm Online where you can manage your RoboForm Account.
- Check for Update - Checks what software version you have and whether it’s time to update RoboForm.
- Contact Support - Allows you to contact support. You may submit a ticket to RoboForm’s support system.
- Problem Steps Recorder: This tool will help explain your problem to support in a step by step video format.
- About - Shows the RoboForm License Agreement, the Version of RoboForm that you are using and whether your version of RoboForm needs to be updated.
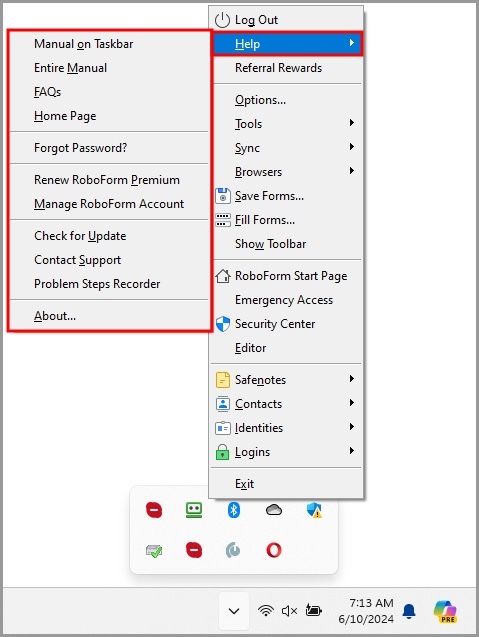
- Referral Rewards - Logs you into your RoboForm Online account and takes you to the Referral Program tab where you can learn about how to participate in our rewards program.
-
Options - Opens the settings of RoboForm in a new window. Read more in Chapter 18: Options.
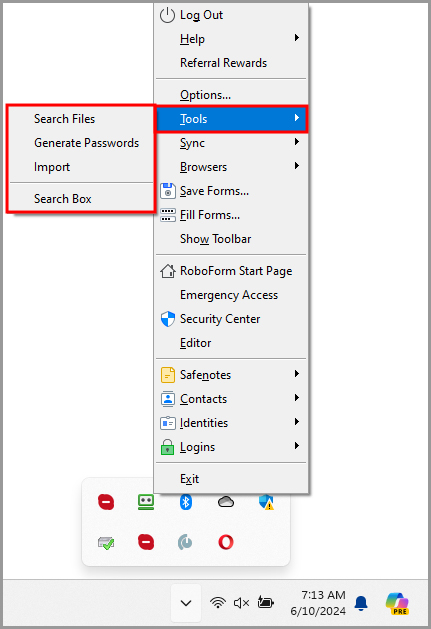
- Tools has miscellaneous options for RoboForm.
- Search Files - Opens a dialog window to search any item of RoboForm Data.
- Generate Passwords - Creates a randomly-generated and complex password for you to use and improve your Login security. Read more in Chapter 12: Password Generator
- Import - Allows you to import passwords from browsers or other password managers into RoboForm. For browsers, click the Import button next to the browser name. For other password managers, click Import from File and follow the directions on the page.
-
Search Box - Opens in the corner and allows you to search for RoboForm Data or for a query in a search engine. Read more in Chapter 11: Search Box.
-
Sync shows synchronization actions for RoboForm Data. Your RoboForm Data defaults to syncing automatically when you are either logged in with your master password or you edit an item
- Sync Now - Manually syncs your device and your RoboForm account.
- Automatic Sync - Does an automatic sync of your RoboForm data.
-
Settings - Opens the options for sync in a new window, click the arrows next to Proxy Setting to open the advanced settings.
-
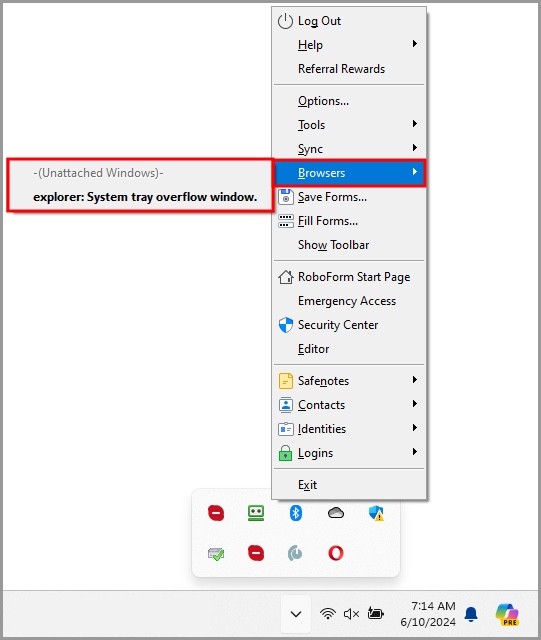
Browsers - Opens a list of browsers and windows, selecting one will open a Lower RoboForm Toolbar in the window. This is a good way to save Application Logins.
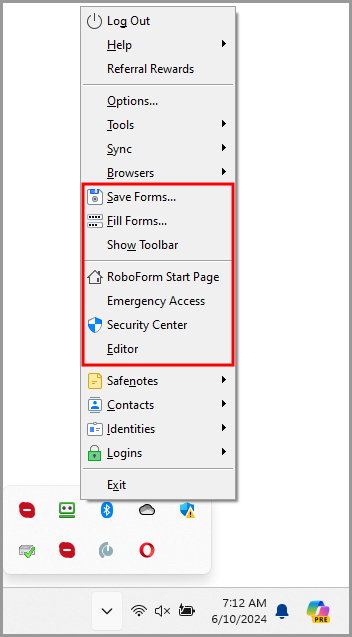
- Save Forms - Creates a Login or a Bookmark for the window you are on.
- Fill Forms - Completes the forms on the page with a Matching Login or Identity. Read more in Chapter 4: Logins.
- Show Toolbar - Opens a Lower RoboForm Toolbar for the window you are on.
- RoboForm Start Page - Opens the RoboForm Start Page in a new window in your browser. Read more in Chapter 17: RoboForm Start Page
- Emergency Access - Opens Emergency Access in a new window. This feature allows approved RoboForm users to gain access to your RoboForm data in case of an emergency. Read more in Chapter 14: Emergency Access
- Security Center - Opens Security Center in a new window. This tool evaluates the strength of your passwords. Read more in Chapter 15: Security Center.
-
Editor - Opens the RoboForm Editor
-
Safenotes - Allows you to view, create, and edit your Safenotes.
-
Contacts - Allows you to view and create Contacts
-
Identities - Allows you to view, create, edit, and use your Identities
-
Logins - Allows you to view, create, edit, and use your Logins
-
Exit - Will turn off RoboForm.
Chapter 10: AutoFill Dialog
AutoFill is an optional function that automatically fills forms (Logins or Identities) when you visit a website. It appears as a RoboForm icon on the side of a field.
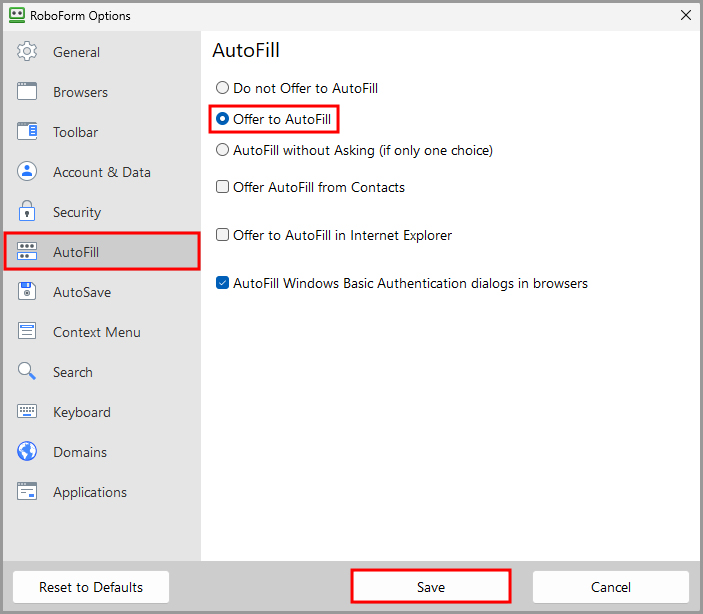
Turning On AutoFill Dialog
- Click the [ ^ ] button (Show hidden icons) in the lower right corner of your screen and then click the RoboForm Taskbar icon.
-
Select “Options…” from the menu.

-
Select the AutoFill tab from the column on the left and check the “Offer to AutoFill” box. Then, click the “Save” button.
How to Use AutoFill Dialog
RoboForm will offer to AutoFill website forms that contain:
- A login form that matches one of your RoboForm Logins.
- A long non-password form that can be filled by an Identity; by default, 4 fields in a form trigger AutoFill.
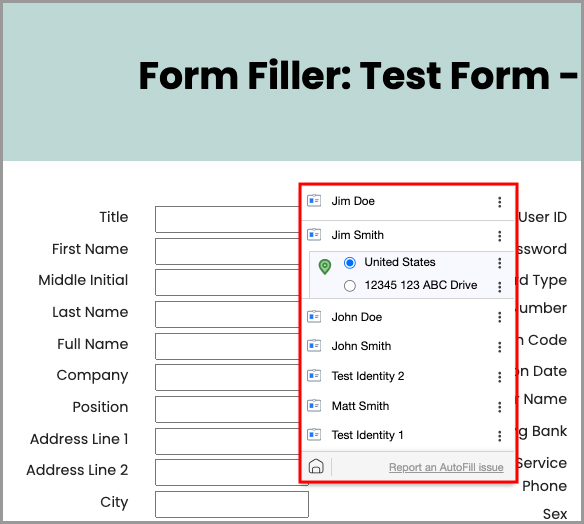
On a website with empty forms, the AutoFill Dialog will pop up and offer to fill the forms with:
- Matching Logins (previously called Passcards
- Any of your Identities.
Select the desired Login or Identity.
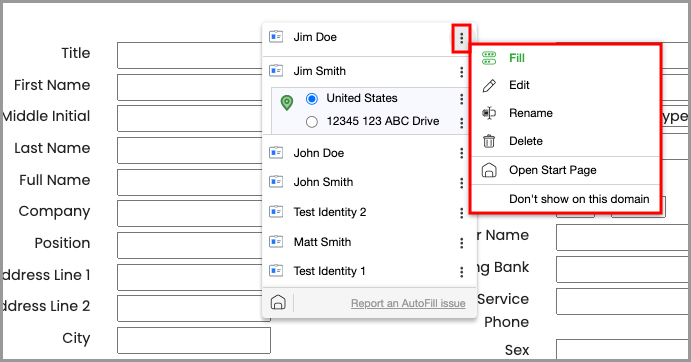
Clicking the 3 dots to the right of an item opens a menu with options to:
- Fill - Completes the form with the selected Login or Identity but does not submit.
- Edit - Allows you to edit the Login or Identity.
- Rename - Allows you to rename the Login or Identity.
- Delete - Allows you to delete the Login or Identity.
- Open Start Page - Takes you to the Start Page.
-
Do show on this domain - Turns off the Autofill dialog at that domain.
There are more settings for AutoFill actions and appearance within Options > AutoFill. Read more in Chapter 18: RoboForm Options.
Chapter 11: Password Generator
The RoboForm Password Generator is a powerful tool which allows you to generate random and secure passwords. It has customizable parameters to ensure that, no matter what the password requirements of a website are, you will be able to generate a password which complies.
Using the Password Generator When Creating a New Account
In order to generate a random password when creating a new account:
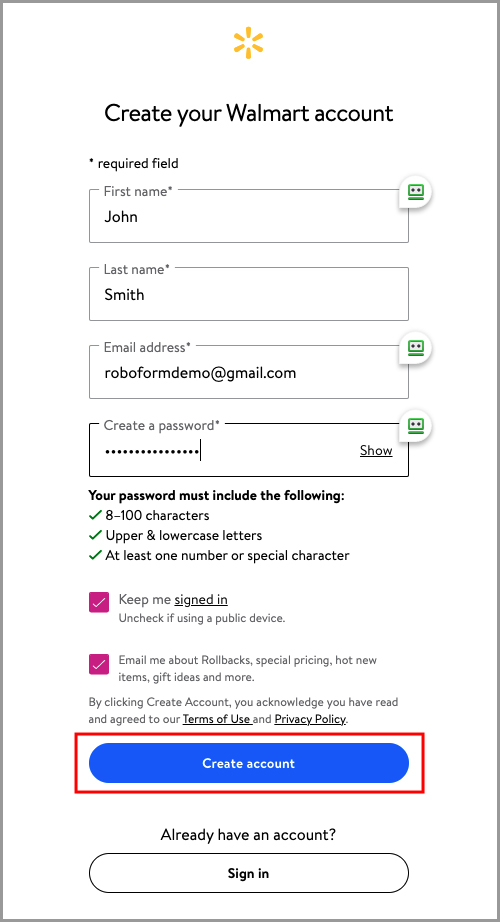
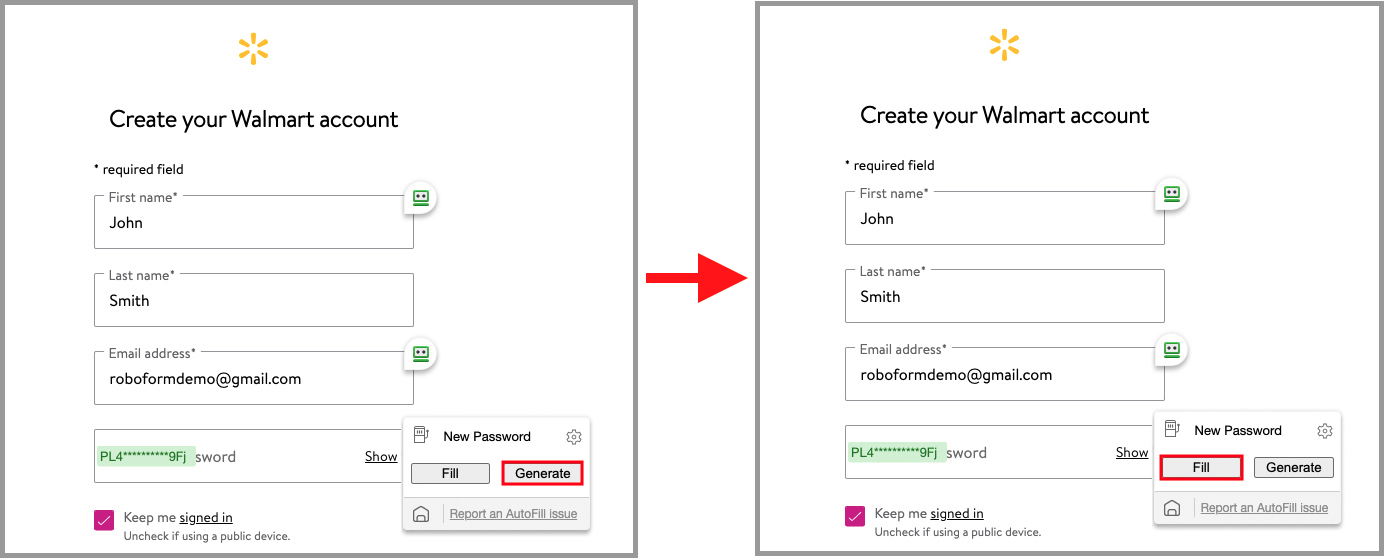
- Go to the website you wish to create an account for and navigate to their Account Creation page. For example: Walmart.com.
Enter the required information for account creation. When you reach the "Password" field, click the RoboForm autofill icon next to the field to bring up the password generation dialogue.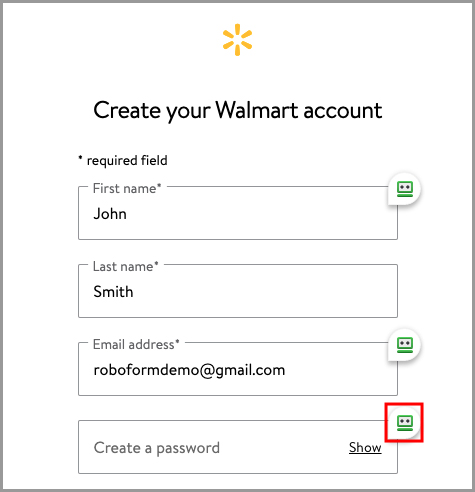 NOTE: If you do not see the RoboForm icon next to the field, you can still access the password generator by clicking the RoboForm extension, and then clicking the Password Generator icon (slot machine).

- Click "Generate" from the password generation dialogue, and then click the "Fill" button.
- After entering the account creation information, click "Create Account" or the equivalent button on the site you are on.
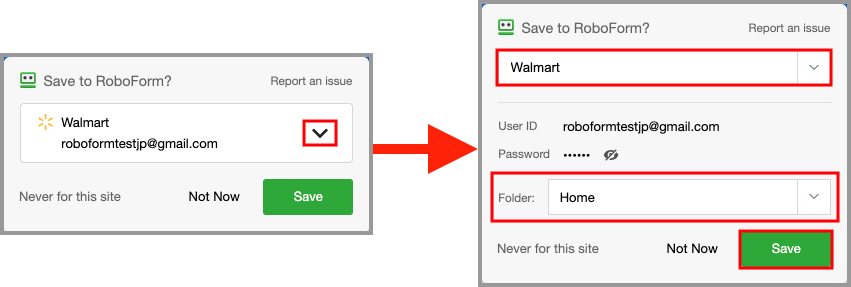
- The RoboForm autosave dialogue will appear offering to save the account credentials as a new Login. Confirm that the information is correct and that the Login's name and folder placement are to your specifications.
Then, click the "Save" button.
- RoboForm will present you with a window confirming that the new password was saved.

NOTE: If the RoboForm autosave dialogue does not appear, you will need to save your new Login manually through the Start Page. You can view our tutorial for creating a Login through the Start Page here.
Using the Password Generator to Update an Existing Password
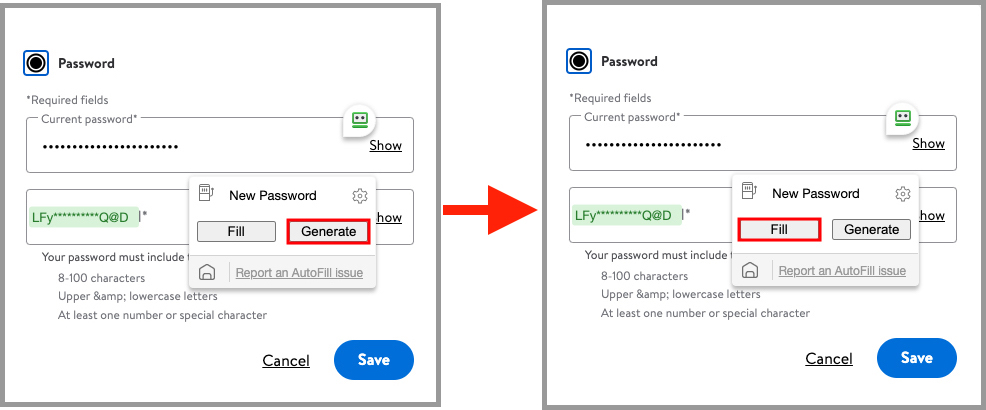
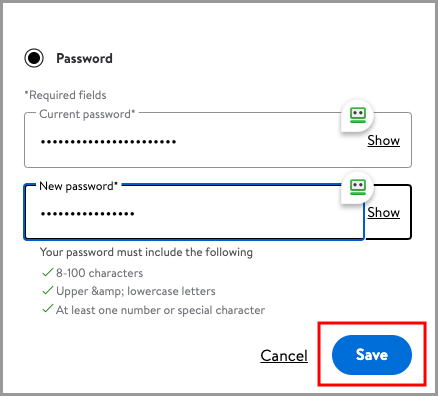
In order to update a Login to use a randomly generated password:
- Log in to the account you want to update the password for and navigate to the page which allows you to change the password for your account. Then, click the RoboForm icon next to the "New Password" field to bring up the password generation dialogue.
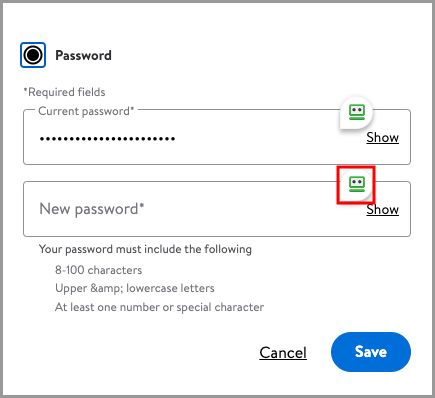
NOTE: If you do not see the RoboForm icon next to the field, you can still access the password generator by clicking the RoboForm extension, and then clicking the Password Generator icon (slot machine).
- Click "Generate" from the password generation dialogue, and then click the "Fill" button.
- Save your new password.
- The RoboForm autosave dialogue will appear offering to save the new password to your Login. Confirm that the information is correct, and then click the "Update" button.
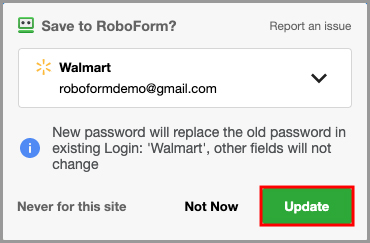
- RoboForm will present you with a window confirming that the new password was saved.

NOTE: If the RoboForm autosave dialogue does not appear, you will need to save your new password manually through the Start Page or Editor. You can view our tutorial for creating a Login through the Start Page here.
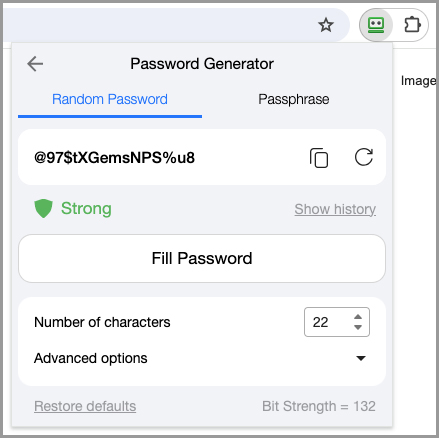
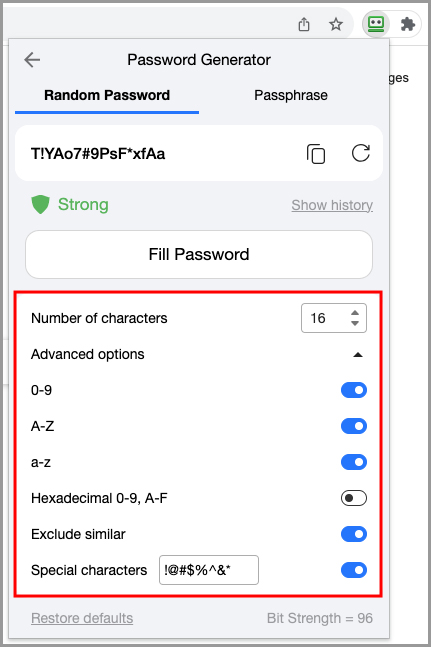
Customizing Password Generation Parameters
To change the password generation parameters on the RoboForm Password or Passphrase Generators, follow these steps:
- Open your browser, and click the RoboForm extension icon. Click the Password Generator icon (slot machine) in the upper right.

- Here, you will see the RoboForm Password and Passphrase Generators and will have access to their customizable parameters. The available customizations for the password generator are:
- You can change the character length of the generated password by adjusting the number in the "Number of Characters" field.
- Under "Advanced Options" there are more customizations:
- You can choose to allow or exclude numbers, uppercase letters, and/or lowercase letters by toggling on or off their respective options
- You can choose to only use hexadecimal characters by toggling on the "Hexadecimal 0-9, A-F" option
- You can choose to allow or exclude characters with similar appearances (For example, 1 and I) by toggling on or off the "Exclude similar" option.
-
You can choose to allow or exclude special characters and have the ability to specify which special characters to use.
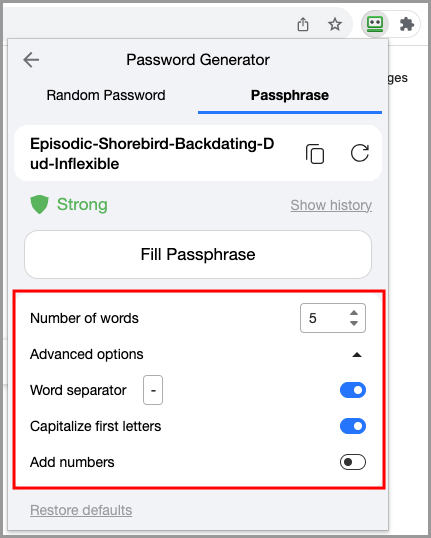
The available customizations for the passphrase generator are:
- You can change the number of words in the generated passphrase by adjusting the number in the "Number of words" field.
- Under "Advanced Options" there are more customizations:
- You can use any character of your choice as a delimiter using the "Word separator" option.
- You can choose to have the first letter of each word in the passphrase be capitalized using the "Capitalize first letters" option.
- You can choose to include numbers in your passphrase using the "Add numbers" option.
Chapter 12: Authenticator
The RoboForm Authenticator allows you to use RoboForm as a two-factor authenticator for other sites and apps. This allows you to contain both your login credentials and authentication code in one place, instead of having to use a third-party authentication app.
Logins you save an Authentication code for will be located in the Authenticator tab on the Start Page.

How to use RoboForm as a 2FA Authenticator for Other Sites and Apps
RoboForm offers built in 2FA services which allow for a more efficient log in experience.
- Log in to the account you wish to enable two-factor authentication for and go to your account's settings. Once there, find the option to enable two-factor authentication.
NOTE: Not every site will have the option to enable two-factor authentication.
-
You will be presented with a 2FA (two-factor authentication) key. Copy this key to your clipboard.
NOTE: Not every site will offer a 2FA key.
-
In your browser, click the RoboForm Extension icon. Then, click the house icon in the upper left of the RoboForm extension to go to the Start Page.

-
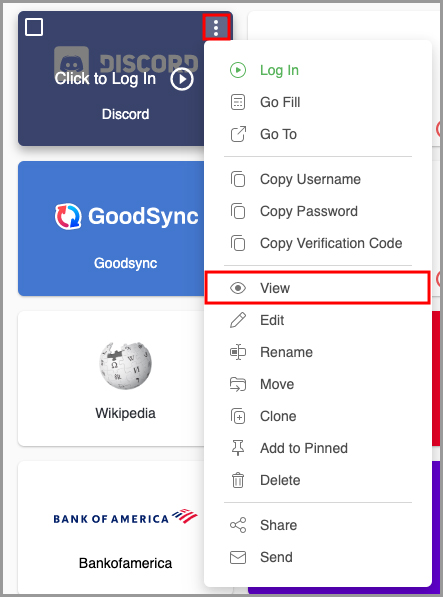
Hover your mouse over the Login you wish to enable two-factor authentication for, and click the 3 dots in the upper right corner. Then, select the "View" option.
-
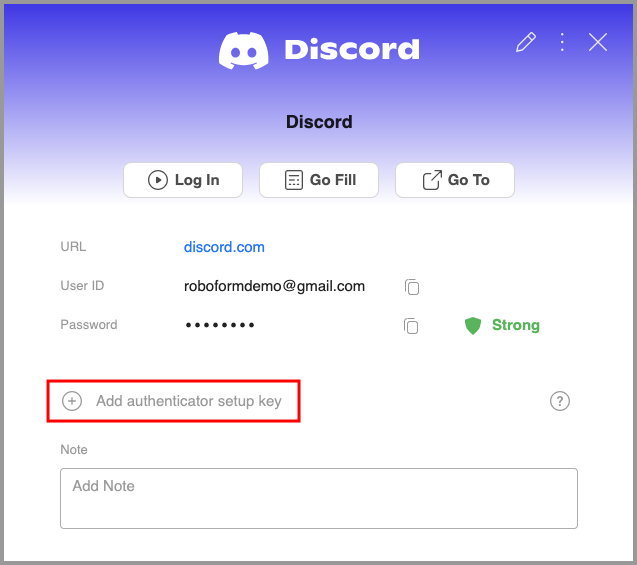
Underneath your login credentials, you will see an option to enable two-factor authentication for this Login. Click the "Add authenticator setup key" button.
-
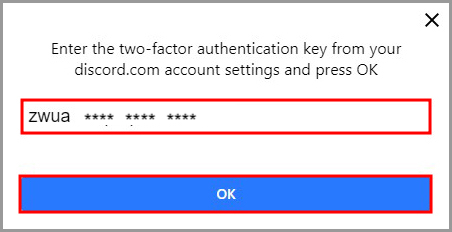
A window will appear prompting you to enter the two-factor authentication key from your account's settings. Paste the 2FA key you copied earlier into this window and click the blue "OK" button.
-
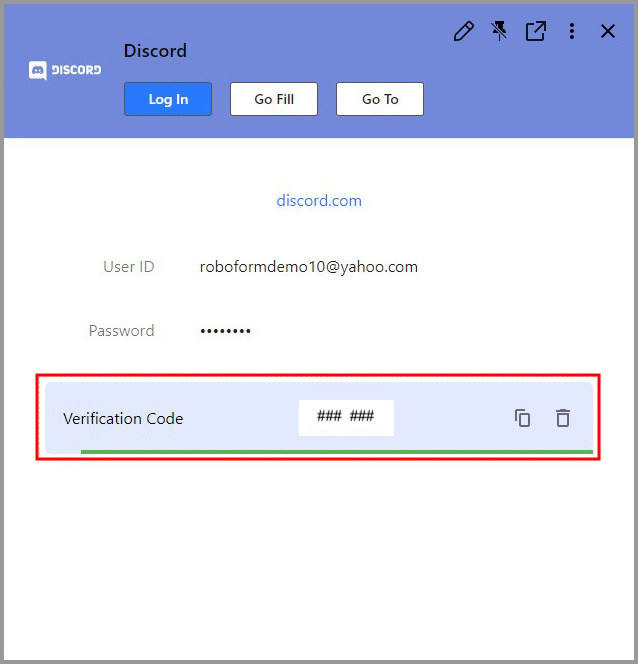
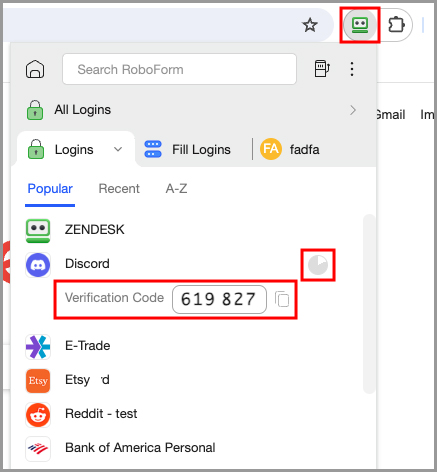
RoboForm will now present you with a time-sensitive verification code. In order to finish enabling two-factor authentication for this Login, copy this code and enter it back on the account settings page for the Login in question.
-
After you have successfully enabled two-factor authentication, you will be able to use RoboForm to enter your 2FA code for you when logging in to this account.
NOTE: If the RoboForm AutoFill icon does not appear, you can still fill the verification code by clicking the RoboForm Extension, and then clicking the "Clock" icon to the right of the Login you are using RoboForm as a 2FA authenticator for. RoboForm will display the verification code for you to copy and paste into the appropriate field.
To view a list of all your 2FA codes, select the "Authenticator" tab in the bottom left corner of the Start Page.
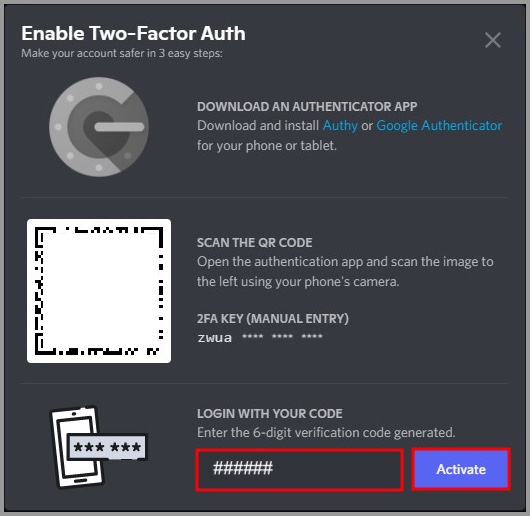
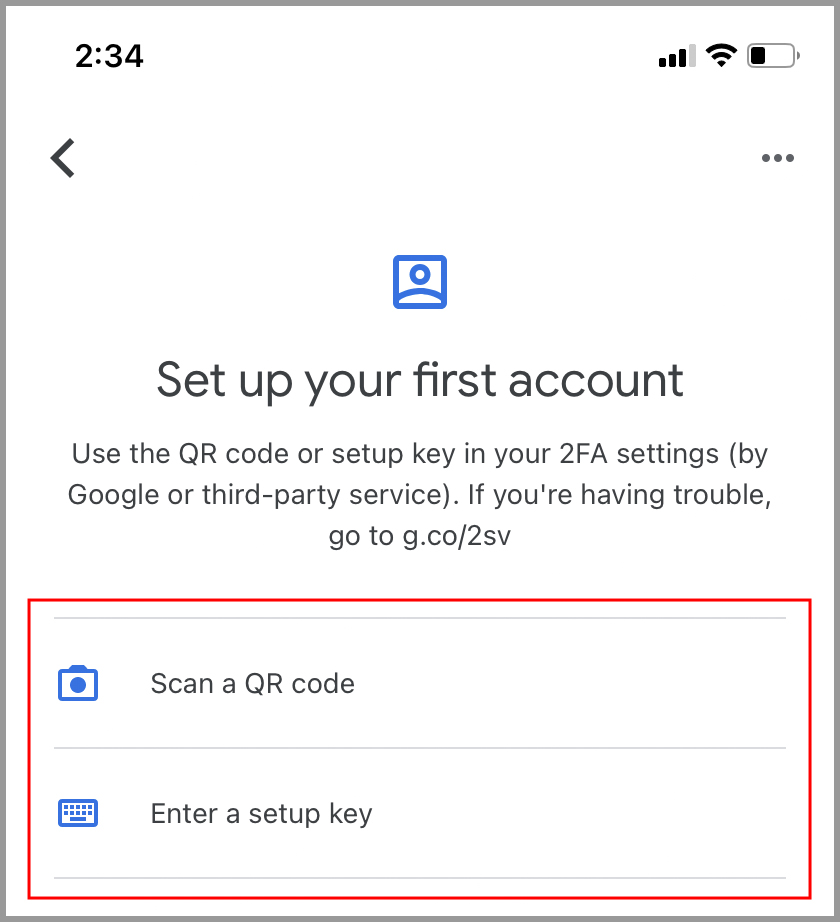
How to Set Up 2FA (Two Factor Authentication) Through A 3rd Party TOTP Authenticator App: RoboForm Extension
-
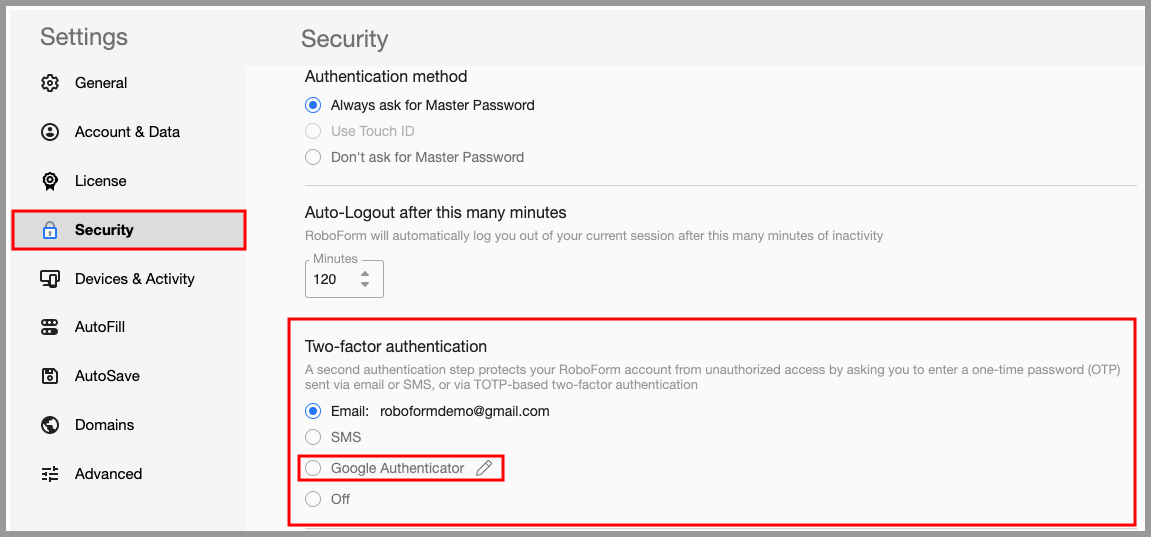
Open your browser and click the RoboForm extension icon. Click the 3 dots in the upper right corner. Select "Settings" from the menu.

-
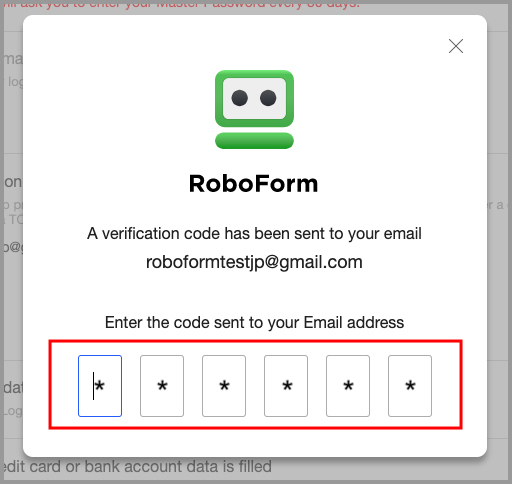
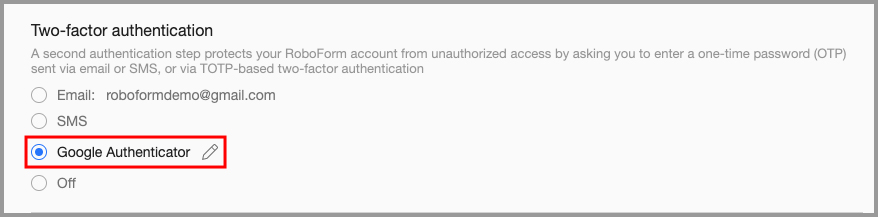
In the Settings menu, select "Security" from the column on the left. In the "Two-factor authentication" section, select Google Authenticator.
-
RoboForm may prompt you to verify your email address. Obtain the code sent to your email account and enter it in the designated field.
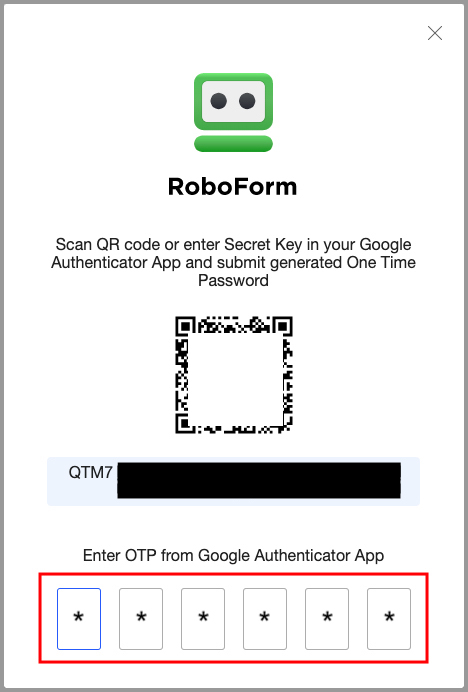
-
Using the device with the authenticator app installed, open the camera and scan the QR code or manually enter the secret key into your Google Authenticator app.
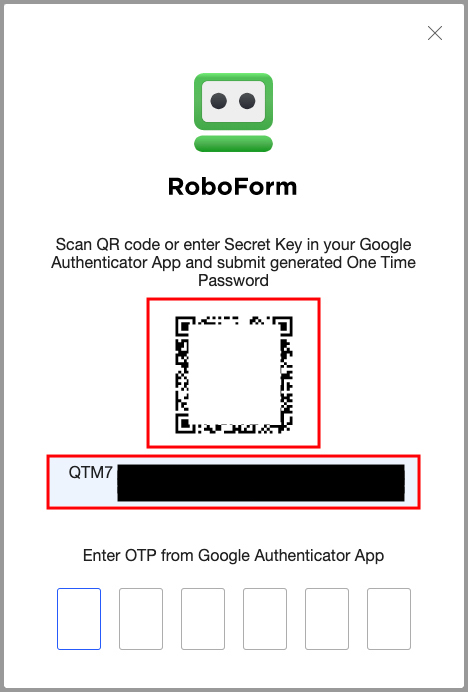
-
After scanning or entering the secret key, the authenticator app will present you with a six-digit numeric code
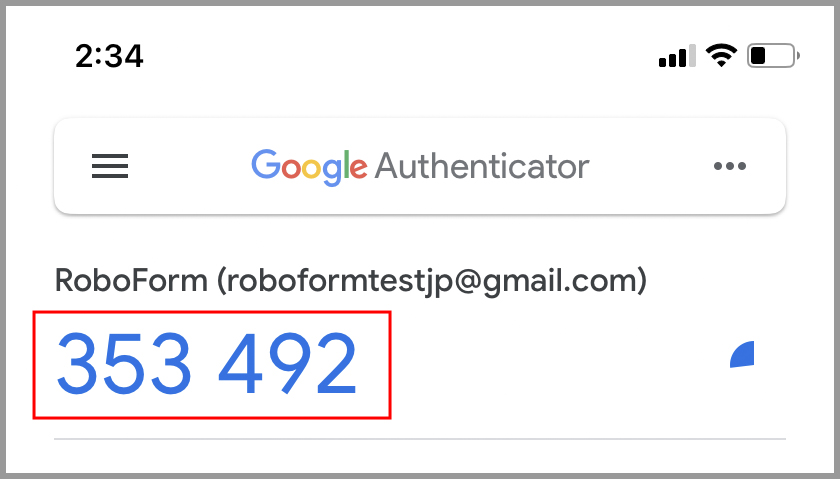
-
Enter this code into RoboForm where it says "Enter OTP from Google Authenticator App."
-
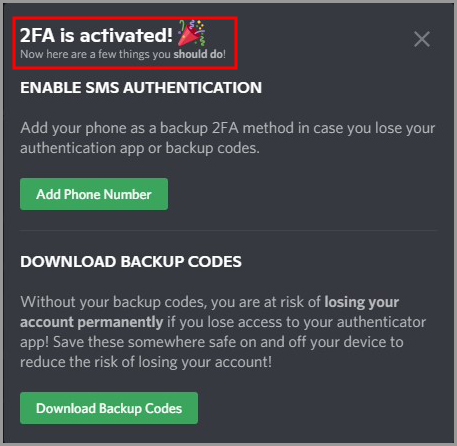
You have now enabled 2FA.
-
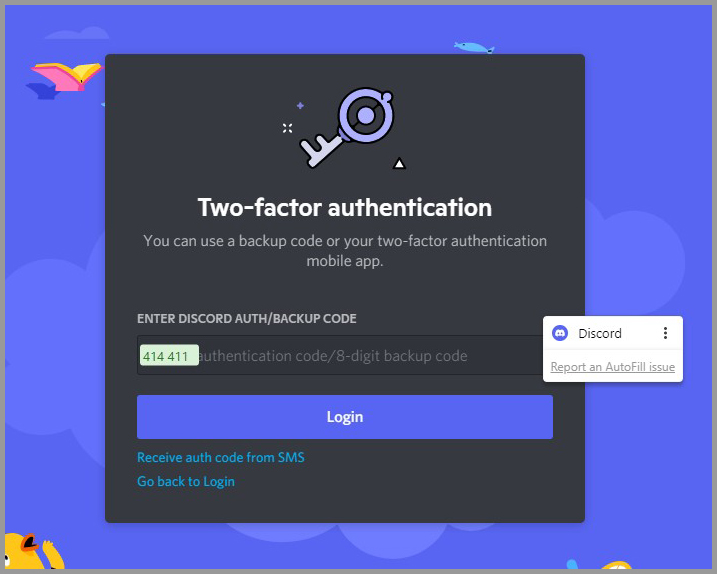
Moving forward, when accessing your RoboForm account from a new device, a One Time Password will be sent to your Google Authenticator app. You must successfully enter this six-digit numeric code into RoboForm to complete the authorization of that device before you can access your account.
While we strongly recommend using 2FA to protect your account data, if you wish to turn this security feature off, you can do so by going back to RoboForm's settings, selecting the Security tab, and checking the "Off" option under Two-factor authentication.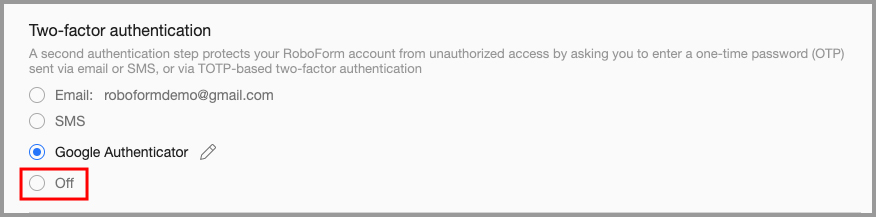
Chapter 13: Sharing and Sending
The RoboForm Sharing and Sending feature allows you to securely share RoboForm Data (items or folders) with others.
Sharing and Sending uses a Public-Private Key Encryption which replaces the risky practice of sharing your Master Password or emailing sensitive data.
If your recipient does not have a RoboForm Account, the recipient will receive an email with instructions on how to create a free RoboForm account
Sharing
Sharing RoboForm Data is like sharing a Google Doc - the shared data is updated to any changes (E.g. changing a password) and access to the shared data can be revoked at any time. The sharer may choose multiple recipients.
How to Share individual RoboForm items
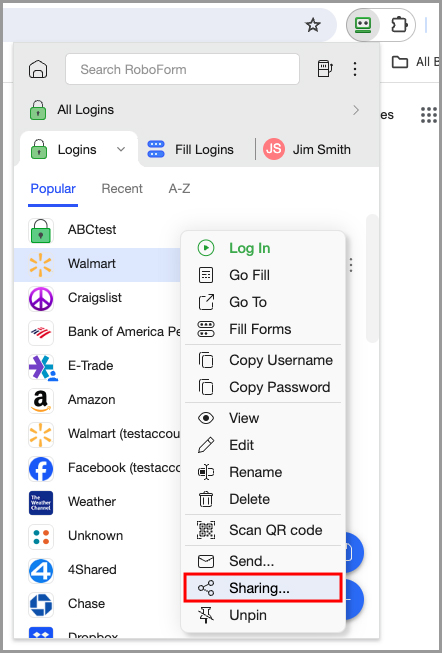
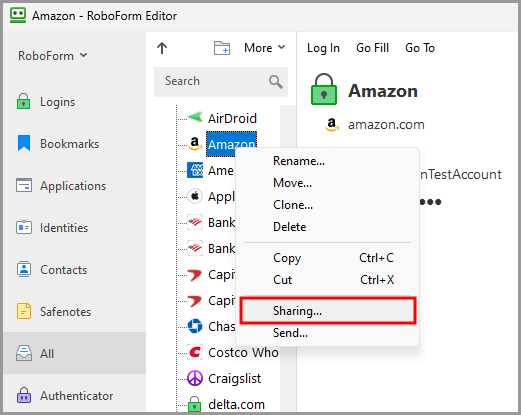
- Right-click the item in your RoboForm Extension or the RoboForm Editor.
-
Select “Sharing…”.
-
The RoboForm Sharing screen will open. Enter the recipient's email and click the blue "Add" button. Multiple recipients can be selected.
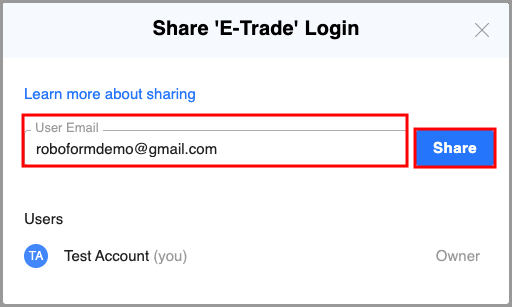
The recipient will be shown under Who Has Access with their name and email:
- If the recipient received and accepted the request their name and email will be listed under Who Has Access (E.g. Jane Doe).
-
If the recipient hasn’t received the request, their status will be Not Received Yet.

- If they deny the request, their name will be removed from Who Has Access.
To revoke Shared Data, click the X on the far right of the recipient. Another dialog will pop up checking whether you are sure to revoke access to this user
Shared Folders
A Shared Folder containing multiple RoboForm items is similar to a shared folder in Google Drive. Access to the shared item can be revoked at any time. The sender may choose multiple recipients.
NOTE: RoboForm Premium users can only create 2 shared folders. RoboForm for Business Users can create multiple shared folders.
How to Create a Shared Folder on the Start Page
-
Open your browser and click the RoboForm extension icon. Click the "House" icon in the upper left corner of the extension's menu. You will be brought to the Start Page.

-
In the bottom left corner of the Start Page, click the "Sharing Center" tab. Then, click the [ + ] button in the lower right hand corner of the Sharing Center.

How to Create A Shared Folder in the RoboForm Editor
-
Open your browser and click the RoboForm extension icon. Click the "House" icon in the upper left corner of the extension's menu. You will be brought to the Start Page
-
In the bottom left corner of the Start Page, click the "Sharing Center" tab. Then, click the [ + ] button in the lower right hand corner of the Sharing Center.
How to Create A Shared Folder in the RoboForm Editor
- Open the RoboForm Editor.
-
Click the “More” dropdown in the upper left and select “Create shared folder” from the menu.
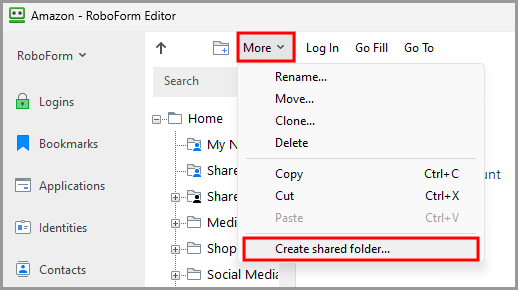
-
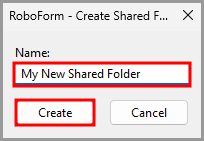
The Create Shared Folder dialog will open. Name your Folder. Then, click the “Create” button.
-
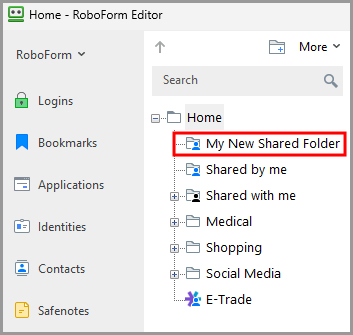
Your new Shared Folder will now appear in the Navigation Pane.
How to add RoboForm Items into a Shared Folder
- Copy and Paste the item into the Shared Folder.
- Or, drag and drop the item into the Shared Folder.
How to Use a Shared Folder on the Start Page
-
Name the shared folder and enter the email address of the recipient. Then, select the folder access level you wish to grant them.
Full control: Full access rights. In addition to being able to view and edit all items, the recipient can adjust permission levels, as well as add or remove other recipients (including the original sender).
Read and write: The recipient can view and edit RoboForm items in the Shared Folder, and the changes they make will be propagated to other recipients and the sender.
Log in only: The recipient will not be able to edit or share RoboForm items in the Shared Folder. Logins can only be used to log in to websites, applications, and mobile apps (the password cannot be viewed in the Editor). Identities and Safenotes can be viewed in the Editor. -
Once you are finished, click the blue "Add" button to add the recipient to the shared folder. Then, click the blue "Create" button to complete the folder creation and sharing process.
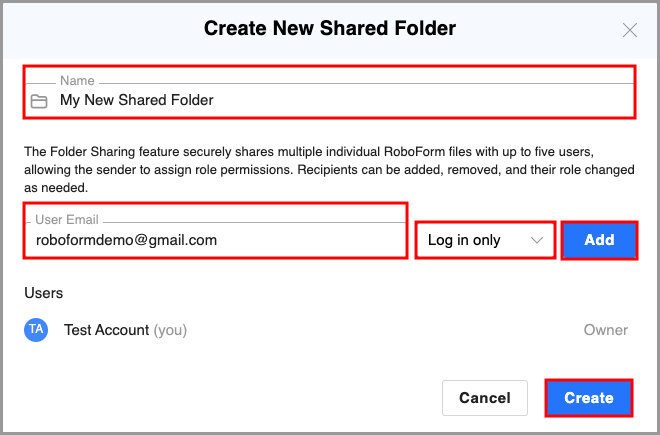
-
The user you shared the folder with will receive a message notifying them that a RoboForm user would like to share data with them. To receive the shared folder they will either need to log in to their account or sync if they are already logged in. Upon selecting “Accept,” the folder and its contents will be shared.
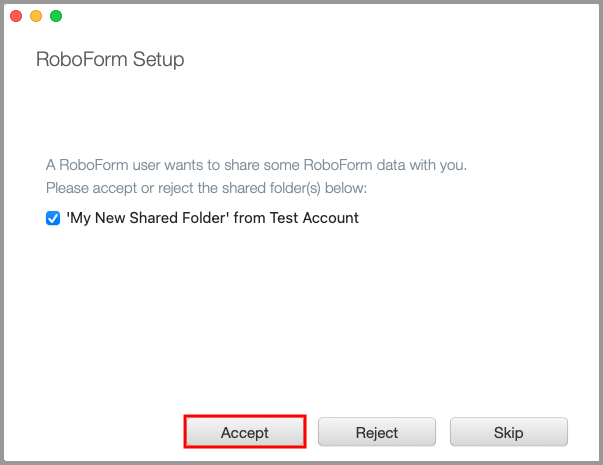
How to Use a Shared Folder in the RoboForm Editor
- Find the Shared Folder in the Navigation Pane in the RoboForm Editor.
-
Right-click the folder and select “Sharing Settings…”
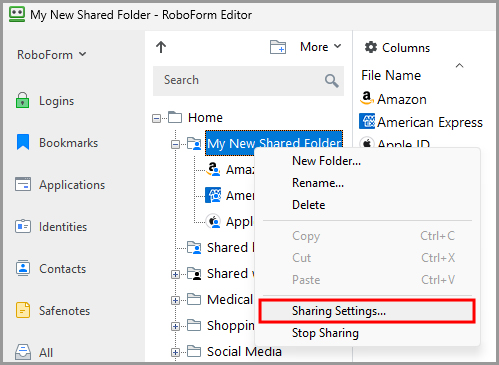
-
The RoboForm Sharing window will open.
Enter the recipient's email in the designated field. If your recipient does not have RoboForm, they will be emailed instructions on how to create a free RoboForm account.
Select their permission level. The sender can choose one of three different permission levels for the recipient:- Log in only - The recipient will not be able to edit or share RoboForm items in the Shared Folder. Logins can only be used to log in to websites, applications, and mobile apps - the passwords cannot be viewed in the Editor. Identities and Safenotes can be viewed in the Editor.
- Read and write - The recipient can view and edit RoboForm items in the Shared Folder, and the changes they make will be propagated to other recipients and the to sender.
- Full control - Full access rights. In addition to being able to view and edit all items, the recipient can adjust permission levels, as well as add or remove other recipients (including the original sender).
Once you are finished, click the blue “Add” button.
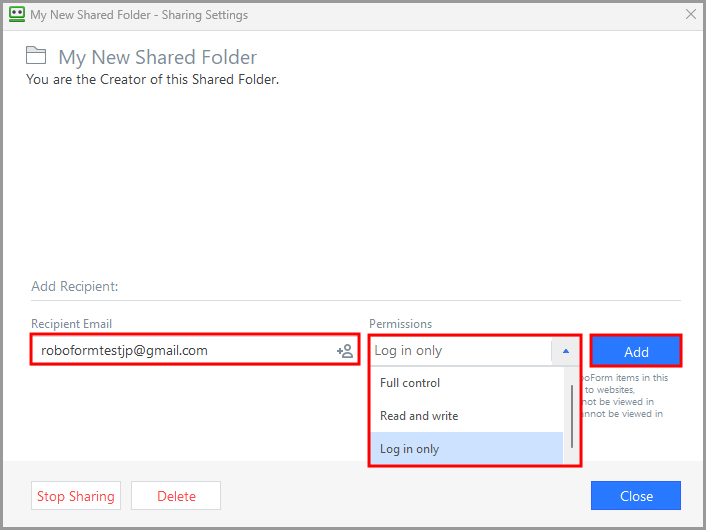
The recipient will be shown under “Recipients” with their email and permission level:
- If the recipient received and accepted the request their name and email will be listed under Recipients.
-
If the recipient hasn’t received the request, their status will be Not Received Yet.
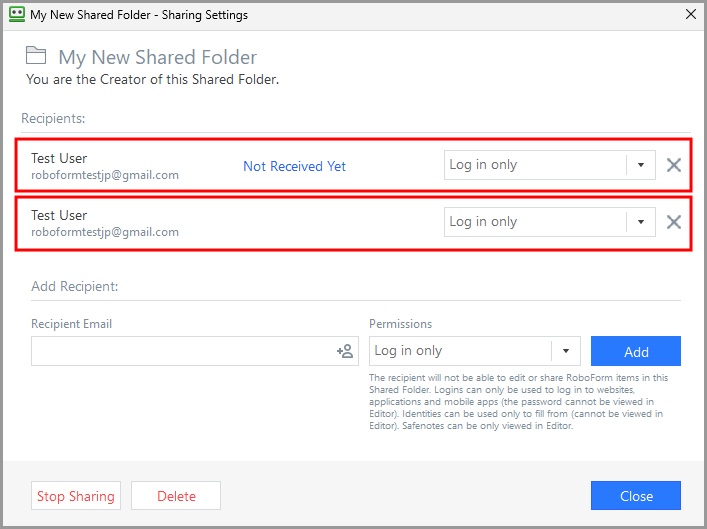
- If they deny the request, their name will be removed from Recipients.
To revoke Shared Data, click the X on the far right of the recipient. Another dialog will pop up checking whether you are sure to revoke access to this user.
Sending
Sending RoboForm Data is similar to sending an email. The RoboForm data is sent once, and any changes won’t be updated (E.g. changing a password) to the recipient and access to the sent data can’t be revoked. You can send an item to multiple recipients.
How to Send individual RoboForm items
- Right-click the item in your RoboForm Extension or RoboForm Editor
-
Select “Send…”.
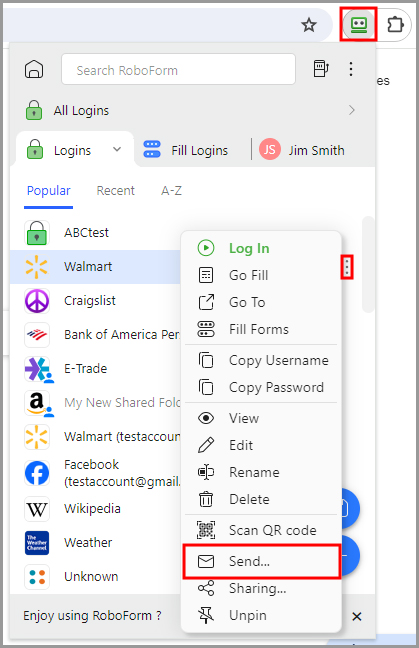
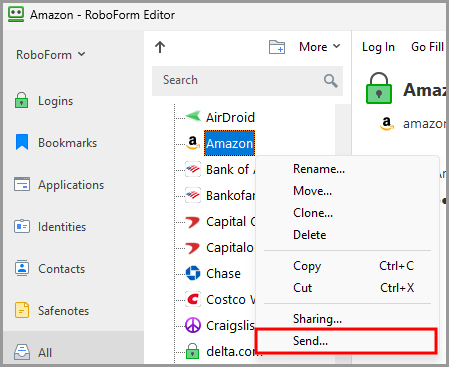
-
The RoboForm Sharing screen will open. Enter the recipient's email and click the "Send" button.
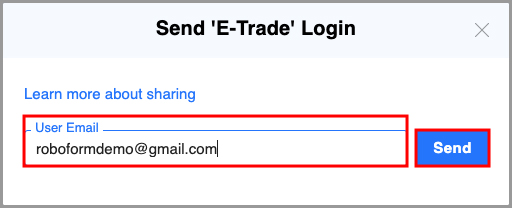
Chapter 14: Emergency Access
In case of an emergency, such as incapacitation or death, it could be vital to have a trusted person obtain access to your medical, financial, and other important information stored in RoboForm. With Emergency Access, you can set up measures for a pre-approved contact to securely receive access to your RoboForm Data after a certain time period passes.
Emergency Access uses public-private key encryption, similar to our Sharing and Sending features. This allows for secure access by the recipient without the grantor's Master Password.
To open Emergency Access and its settings, open your browser and click the RoboForm Menu Bar Icon. Then, click the 3 dots in the upper right corner and select “Emergency Access” from the menu.
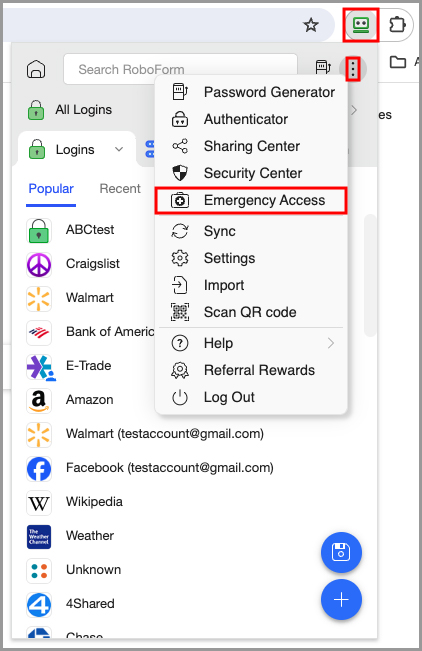
This will bring you to the Emergency Access page on the Start Page.
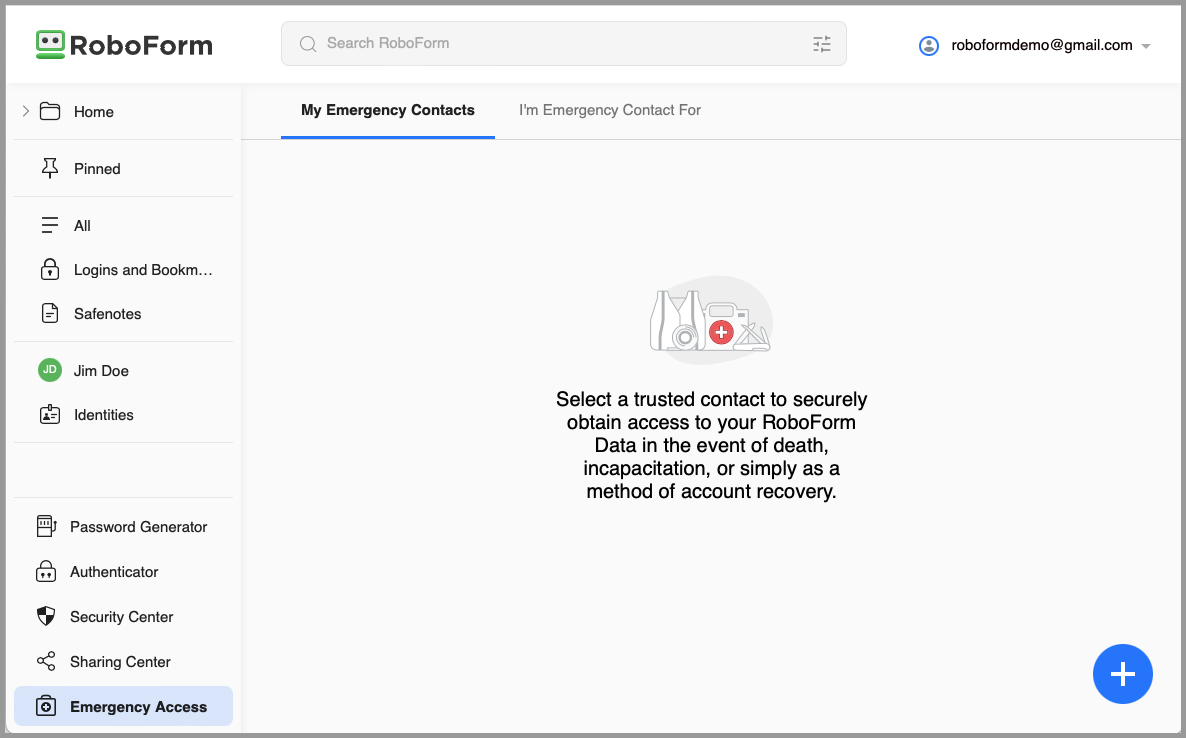
Make sure to set up Emergency Access as soon as possible to ensure you are prepared for an emergency. Setting up Emergency Access is explained below.
How to Set Up and Use Emergency Access
-
On the Emergency Access page, click the blue [ + ] button in the bottom right corner.
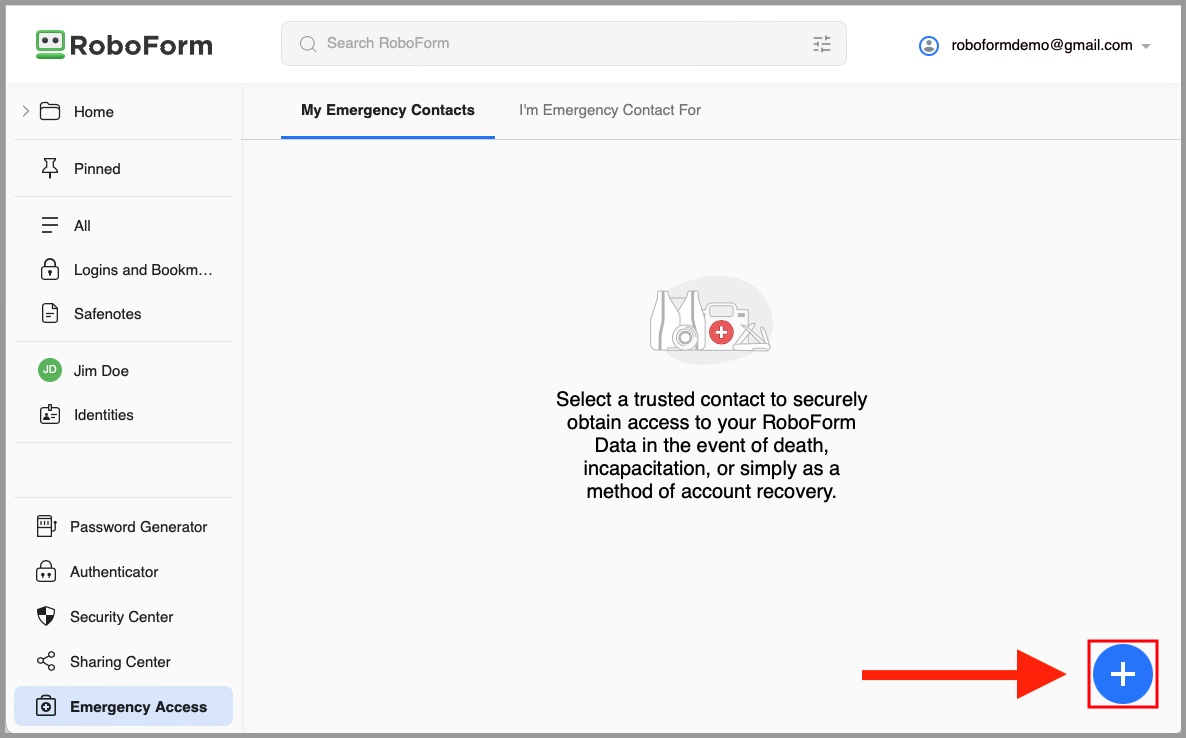
-
Enter the email and desired timeout period for your Emergency Contact.
The timeout period is the amount of time that the grantor of Emergency Access has before they are able to decline the Emergency Contact's request for Access. If the grantor does not decline or respond before the timeout period lapses, the Emergency Contact will receive access to their RoboForm Data.
NOTE: Before you invite someone, make sure they have an existing RoboForm account. Emergency Access will not send an invitation to an email that is not already associated with a Free or Premium account. In order to use them as your emergency contact, have them create an account through installing RoboForm from https://www.roboform.com/download.
Timeout periods to choose from are:Immediately
12 hours
24 hours
2 days
3 days
7 days
14 days
30 days -
When you are done entering the Email and Timeout period, click the blue "OK" button. After clicking "OK" your invited Emergency Contact will appear under the "My Emergency Contacts" tab
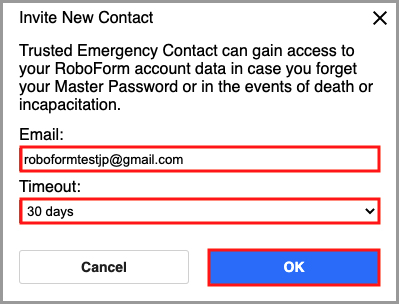

-
The invited Emergency Contact will also be notified of the pending invitation via email, within the RoboForm interface, and in the "I'm Emergency Contact For" tab on the Emergency Access page, where they can choose to accept or decline the invitation.
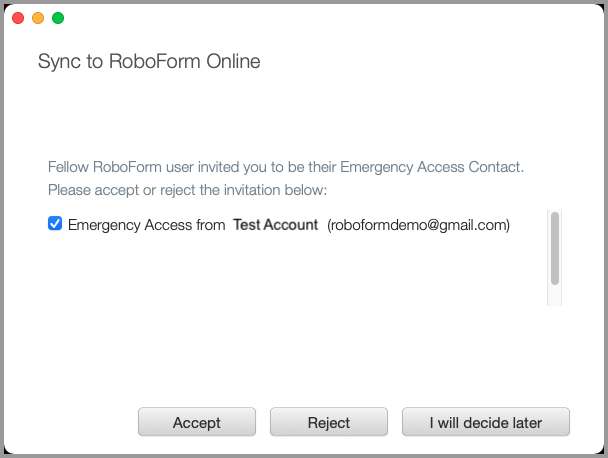

-
The Emergency Access grantor will be notified when the invited Emergency Contact accepts or declines the invitation. The grantor will need to login in and/or sync the account after the invitation has been accepted.

-
Upon accepting the invitation, Emergency Contacts have the option to request access to the grantor's RoboForm account data. You can do this through the Emergency Access page on the Start Page by clicking "I'm Emergency Contact For" tab, clicking the 3 dots on the right of the account you are the Emergency Contact for, and selecting "Request Access" from the menu. A window will appear prompting you to confirm the request. Click the blue "Yes" button on this window.
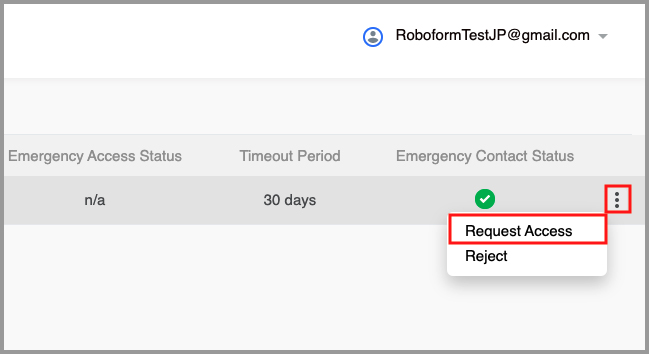
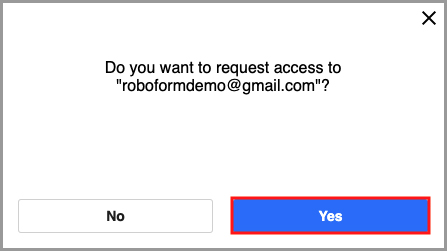
-
Once the Emergency Contact sends the access request, they will receive confirmation of the sent request via email and within RoboForm's interface; the timer starts counting down the preset timeout period.

-
As soon as the Emergency Contact requests access, the Emergency Access grantor is notified via email and within RoboForm's interface. They now have the option (within the preset timeout period) to manually grant, revoke, or not respond to the pending request.
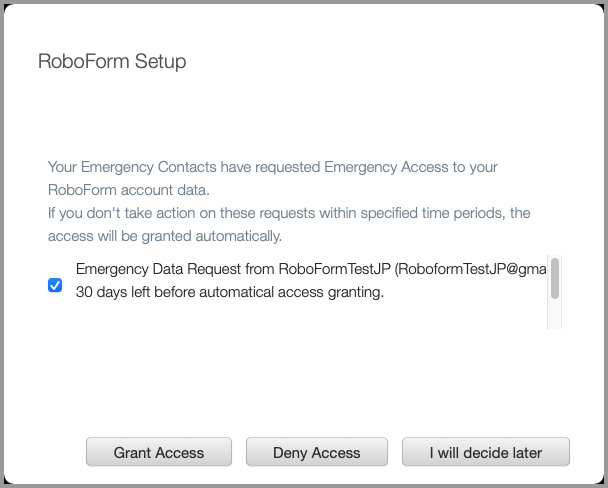

-
If the request is manually granted or no reply is provided within the preset timeout period, the Emergency Contact will receive access to all of the grantor's RoboForm account data. The request for access can also be rejected by the Emergency Access sender within the same preset timeout period. In the case of rejection, the Emergency Contact will be notified, and no data will be shared.

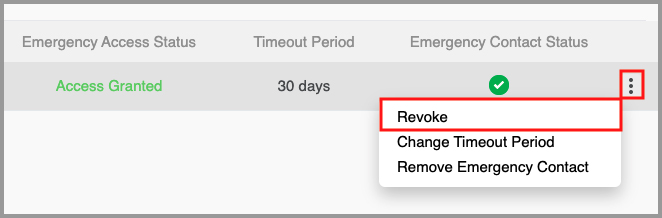
-
The Emergency Contact can access the grantor's data through the Emergency Access page on the Start Page by clicking "I'm Emergency Contact For" tab, clicking the 3 dots on the right of the account you are the Emergency Contact for, and selecting "Get Data" from the menu.
The Emergency Access grantor's account data will open in view only mode with an option for the Emergency Contact to also download specific items or the entire Emergency Access sender's RoboForm account data. The downloaded data will show up in the Emergency Contact's RoboForm account under a folder named after the grantor's email.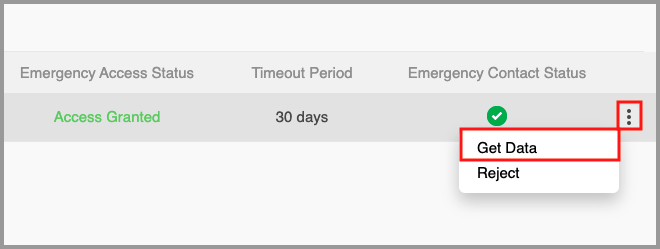
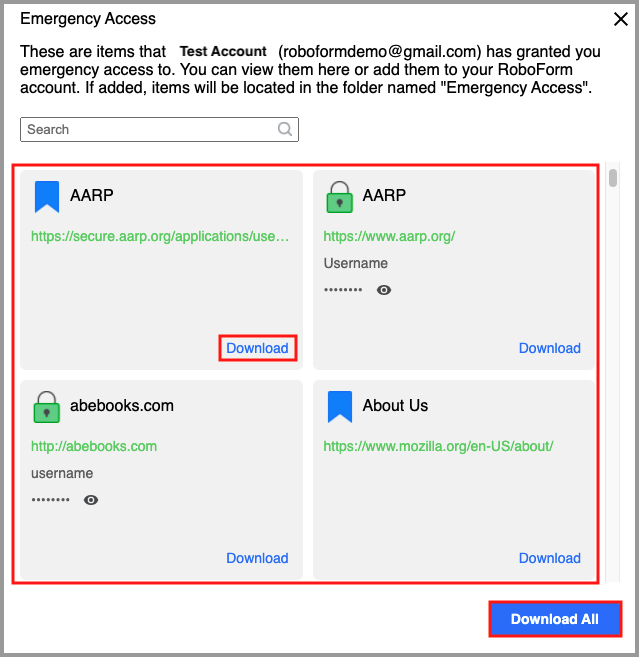
Chapter 15: Security Center
The Security Center identifies whether your passwords stored in RoboForm are unique, complex, and randomly generated. It also suggests which of your passwords should be changed and made stronger.
The Security Center is located:
-
On the Start Page.
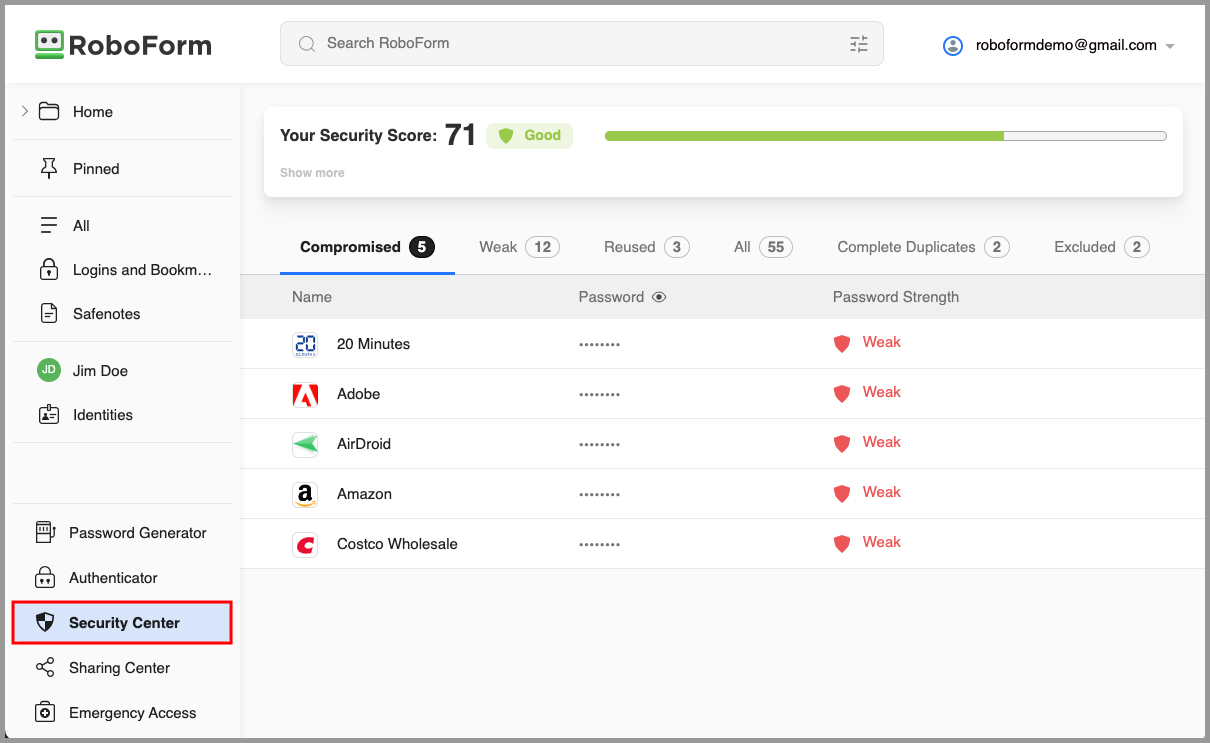
-
In the RoboForm Editor as a tab in the Left Panel.
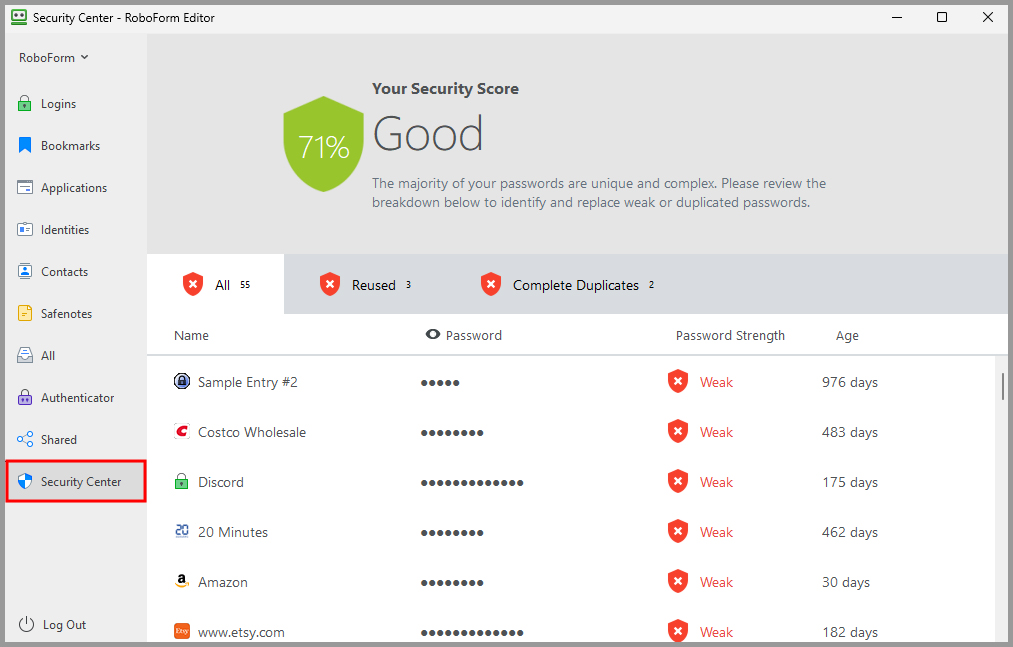
Security Score
What is the Security Score?
The Security Score represents the collective strength of all of your individual passwords. It is made up of an overall score out of 100, a rating (eg: “Good”), and a recommendation of how to improve the score. The rating of the Security Score is divided into sections: Low (0-25%), Average (26-50%), Good (51-75%), and Excellent (76-100%).

How is my Security Score calculated?
Your Security Score is calculated based on the following factors:
- Number of Compromised or Weak passwords
- Number of Duplicated Logins (username and password combinations)
- Number of Unique passwords
-
Strength of individual passwords, which is based on:
- Password strength evaluation by zxcvbn algorithm
- Checking the password against our Compromised Passwords base
- Checking whether the password is re-used
There are four possible password strengths:
- Strong - A password marked strong is considered Strong by zxcvbn, is not enlisted in the Compromised Passwords base, and is used only once.
- Good - A password marked good is considered Good by zxcvbn, is not enlisted in the Compromised Passwords base, and is used only once.
- Medium - A password marked medium is considered Medium by zxcvbn, is not enlisted in the Compromised Passwords base, and is used only once.
-
Weak - A password can be marked weak for the following reasons:
- It is considered Weak by zxcvbn
- It is listed in the Compromised Passwords base
- It is considered Good or lower by zxcvbn, is not enlisted in Compromised Passwords base, and is used for two different domains
-
It is considered Strong by zxcvbn, is not enlisted in Compromised Passwords base, and is used for three or more different domains
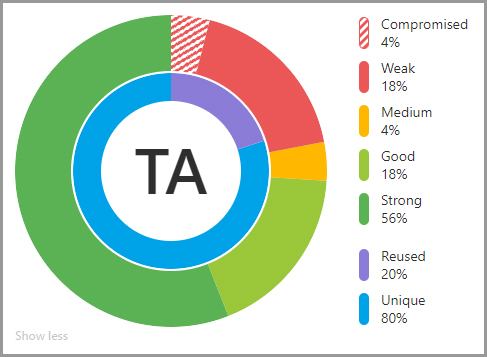
Security Center Overview
Once in the Security Center, you will see your Security Score displayed at the top of the window, with the individual password breakdown below. Clicking "Show more" beneath your Security Score will present you with a more detailed breakdown of the strength of your passwords.
Password strength for individual passwords is calculated using an algorithm based on zxcvbn. Logins can be sorted based on Name, Password Strength, or Age (starting with when they were stored in RoboForm)
NOTE: Sorting by age is only possible in the Weak, Reused, and All tabs.

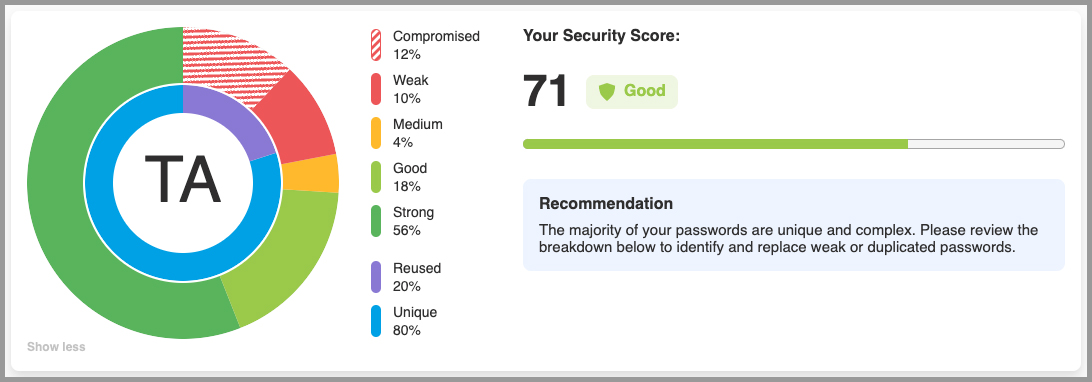
When you first open the Security Center, you will be on the Compromised Tab. To update a Compromised Login, or to increase a weak password’s individual strength and, by extension, the overall Security Score, hover your mouse over a Login and click the "Log In" (play button) button which will appear. Then, use the site’s procedure to update the password using the RoboForm Password Generator. Once saved in RoboForm, the Security Center will recalculate the score.
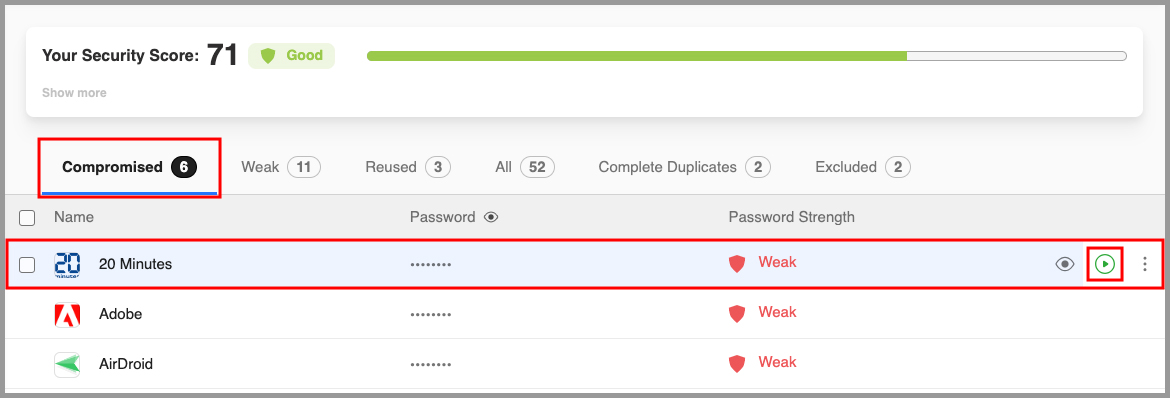
Compromised
The Compromised tab contains Logins with passwords that have previously been seen in a documented data breach where hackers released the stolen data publicly or sold it on the dark web. To learn more about Compromised Passwords and what to do if you see them, click here.
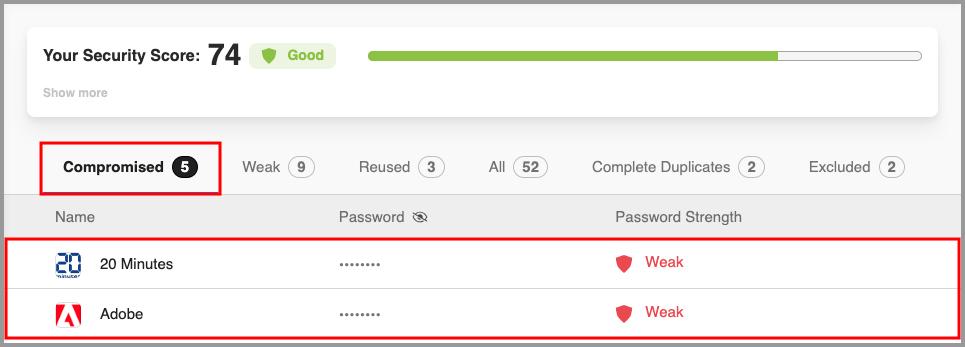
Weak
The Weak tab contains Logins with passwords which have a weak password strength score. We recommend that you update these passwords using the RoboForm Password Generator. To read our tutorial on using the RoboForm Password Generator, click here.
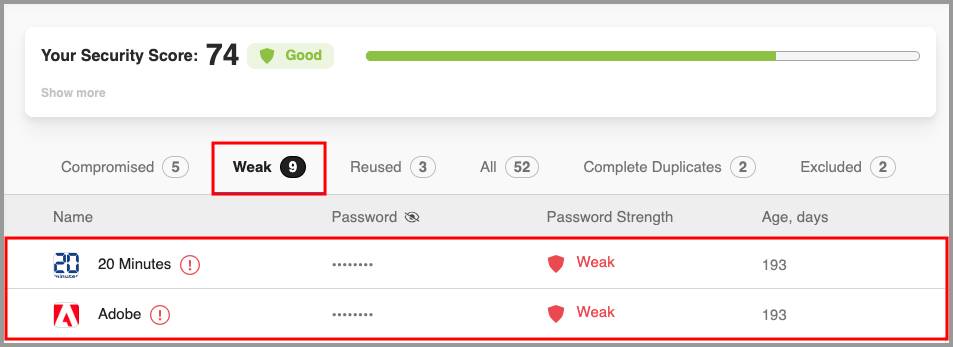
While viewing a Login with a password rated as Weak, you can view an explanation on why it was rated that way.
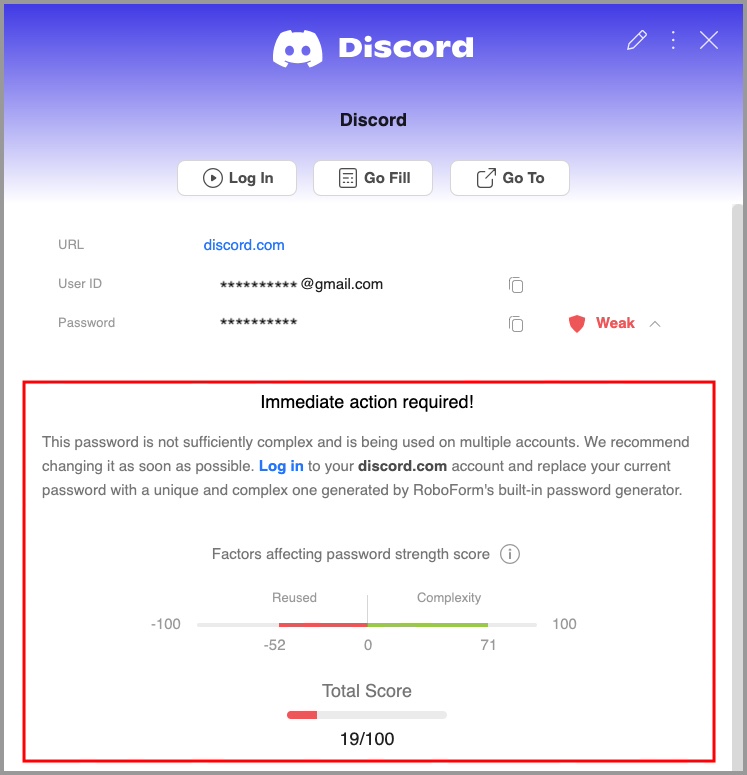
Reused
The Reused tab contains Logins with passwords you have reused multiple times. These passwords are grouped together based on their respective Logins.
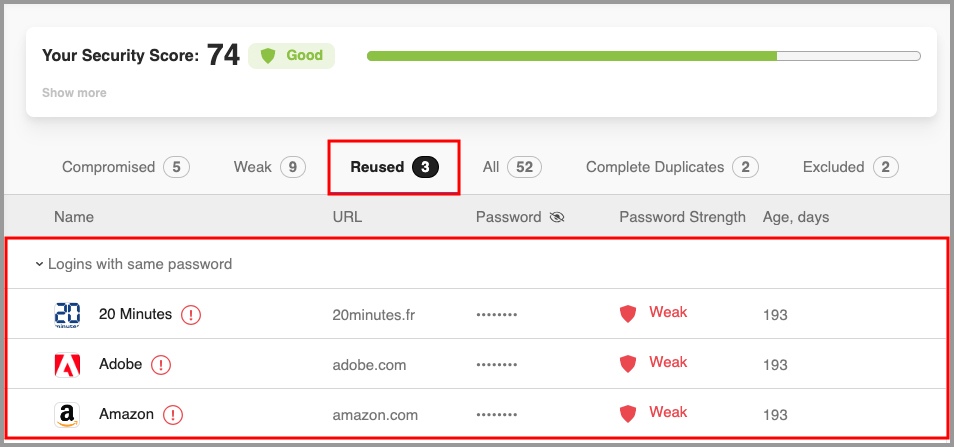
All
The All tab contains all of your RoboForm Logins along with their Password Strength and Age.

Complete Duplicates
The Complete Duplicates tab contains Logins which have an identical username and password. The Security Center makes finding and deleting them a one-step process.
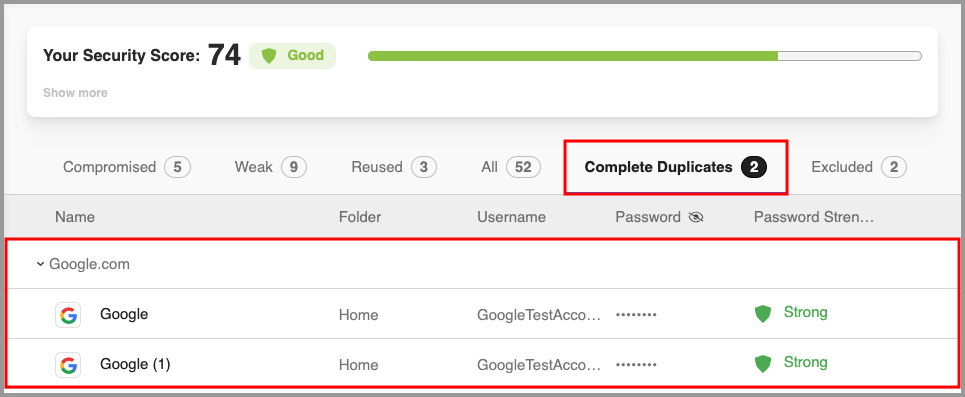
Excluded
The Excluded tab contains Logins which you have selected to be excluded from your Security Score calculation. To learn how to exclude a Login from your Security Score, click here.
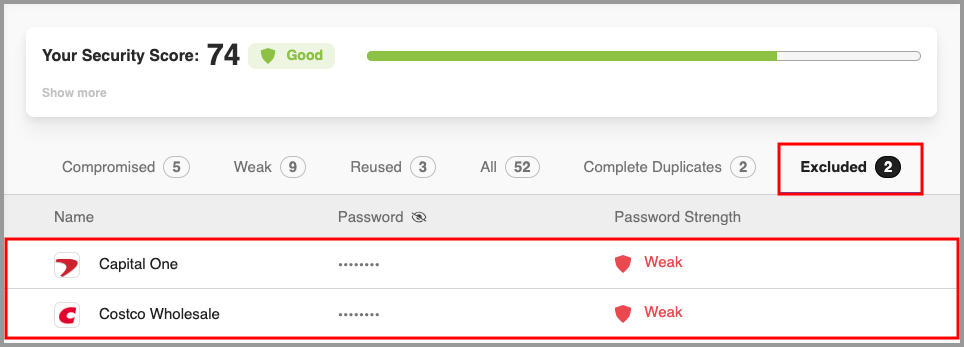
Compromised Passwords
On the Start Page, the Security Center also has a “Compromised Passwords” tab.

What is a compromised password?
A compromised password is an individual password that has previously been seen in a documented data breach where hackers released the stolen data publicly or sold it on the dark web. To detect compromised passwords, RoboForm checks against a list maintained by Have I Been Pwned (HIBP), a service that collects passwords exposed in data breaches.
How can I tell which of my passwords have been compromised?
Logins with compromised passwords are marked with a red exclamation point icon  in the RoboForm extension and in the Security Center.
What should I do if I see a password that is compromised?
You should update it immediately.
To update a compromised password, follow these steps:
-
Click the house icon
 in the upper left of the RoboForm extension to go to the Start Page
- Select "Security Center" in the bottom left navigation tab, then go to the "Compromised" tab.
-
Hover your cursor over top of the Login in the Compromised tab on the Start page and click the "Log In" (play button) button.
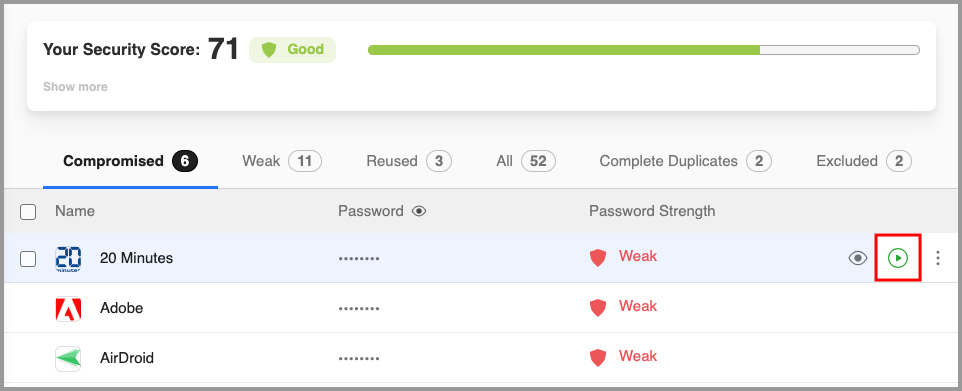
- Once logged in, go to the site’s “Change Password” menu. Use the RoboForm Password Generator to create a complex password rated Strong. From there, RoboForm will save the updated password, remove the exclamation point indication, and update your Security Score accordingly.
For help using the RoboForm Password Generator, click here for our tutorial video and article.
Other Common Questions
I can't or don't want to change a password marked as compromised. How can I remove the red exclamation point icon  ?
?
Excluding the compromised password from your Security Score will also remove the red exclamation point icon  . To exclude a compromised password, follow these steps:
-
Click the house icon
 in the upper left of the RoboForm extension to go to the Start Page.
-
Select "Security Center" in the bottom left navigation tab, then go to the "Compromised" tab.
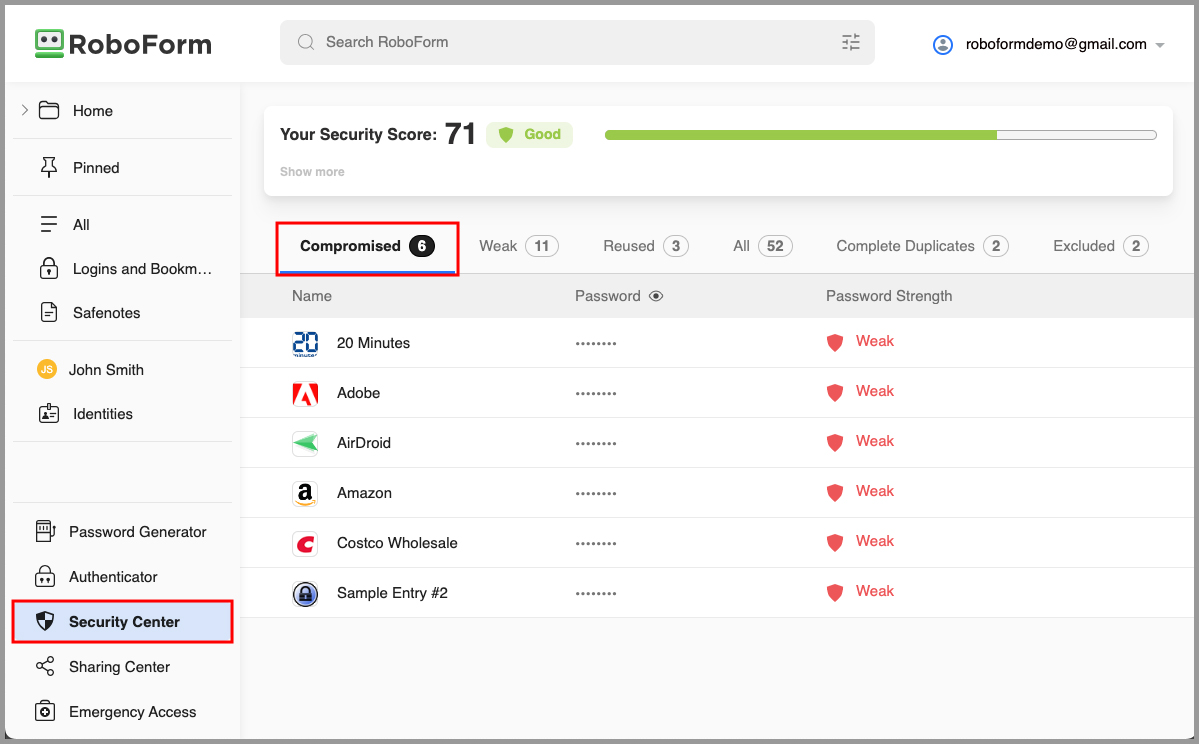
-
Hover your mouse over the login you wish to exclude the password for and click the 3 dots which will appear on the right.
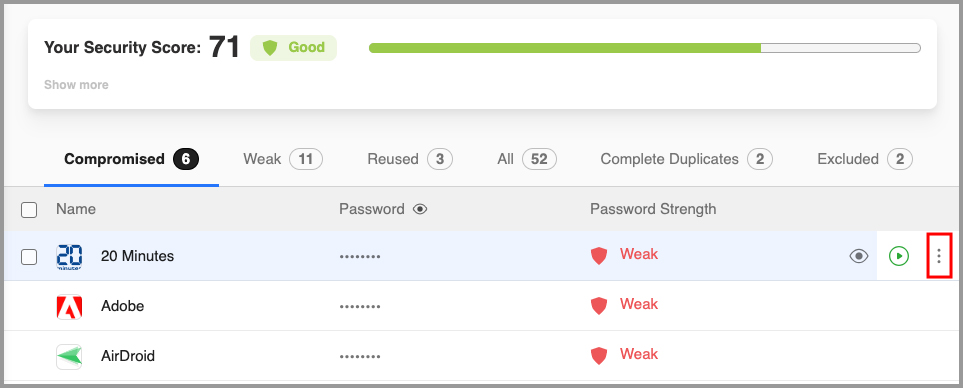 NOTE: If you would like to select multiple Logins from the Compromised passwords list, hover your mouse over top of one of the items you wish to select and then check the box which will appear on its left.
Once this box is checked a menu will appear at the top of your Compromised passwords list with options to:
Exclude from Security Score - Excludes all checked Logins from your Security Score.
Batch Log In - Opens all checked Logins in new tabs and logs you in to each.
Move - Allows you to change the folder all checked Logins are stored in.
Clone - Allows you to duplicate all checked Logins.
Delete - Allows you to delete all checked Logins.
Select All - Allows you to select every Login in the Compromised passwords list.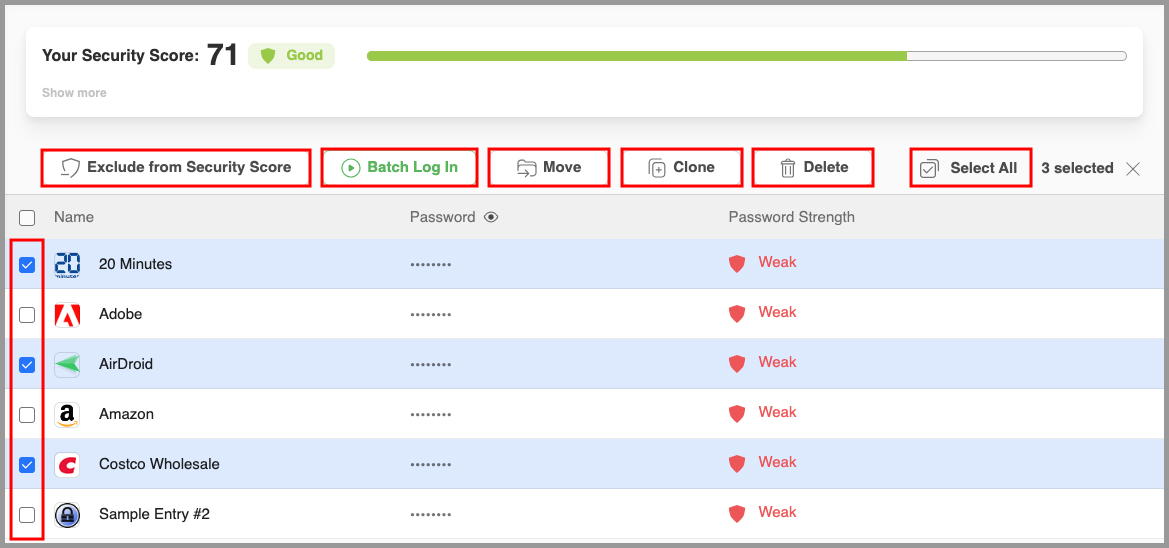
-
Select "Exclude from Security Score" from the menu. RoboForm will no longer display the red exclamation point for this Login or include it in your Security Score.

NOTE: If you wish to re-include this Login, you can do so by going to the "Excluded" tab and then clicking the "Include in Security Score" (shield icon) button.
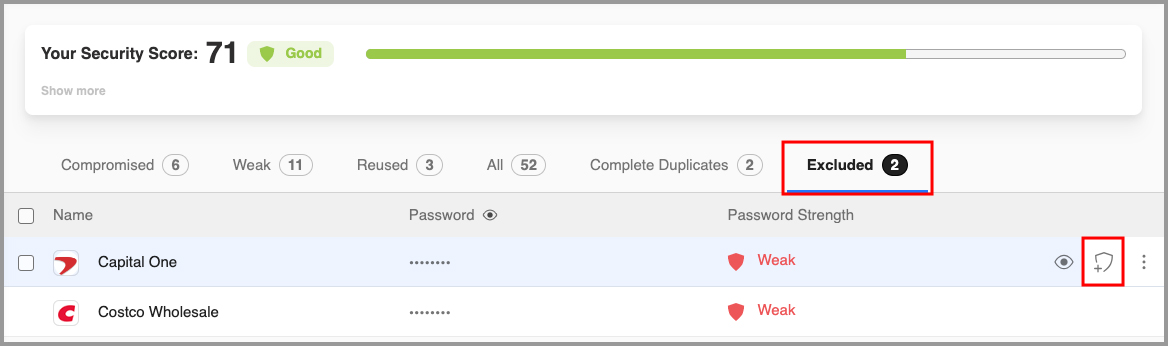
How do I remove the red exclamation point icon  from showing up for all Logins?
-
Click the house icon
 in the upper left of the RoboForm extension to go to the Start Page.
-
In the top right under your account email, click the "Settings" option.
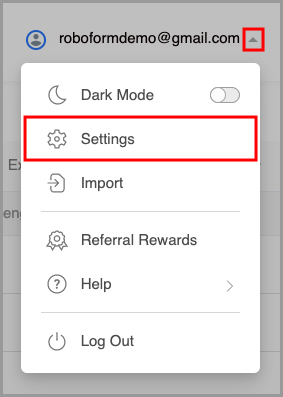
-
Under the "Security" tab, toggle off the "Show compromised passwords indicator" option. Then, click the blue "Done" button in the upper right corner.
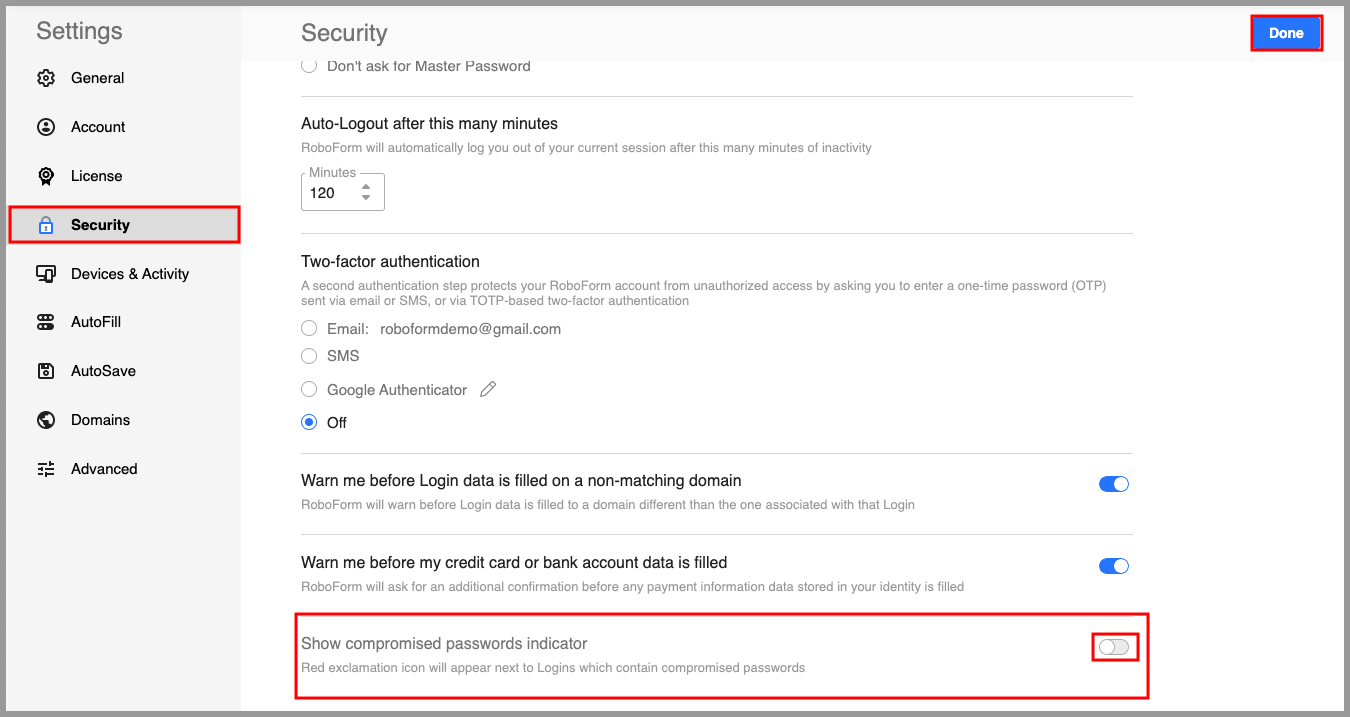
How does RoboForm know that a password is compromised?
RoboForm checks against the Pwned Passwords list maintained by HIBP. The list is compromised of hundreds of millions of real world passwords previously exposed in data breaches. This exposure makes them unsuitable for ongoing use as they're at much greater risk of being used to take over other accounts.
How does RoboForm securely and anonymously scan my passwords without revealing them?
The passwords on the full HIBP list of compromised passwords are hashed with SHA-1. In addition, the RoboForm client does not transmit complete password hashes when checking against the list. As discussed in more detail here, we use a technique called k-anonymity in order to verify without revealing the individual password.
Can RoboForm tell me when or where an individual compromised password was hacked?
No. Our provider HIBP does not store any information about who the password belonged to, only that it has previously been exposed publicly and how many times it has been seen.
How to Improve your Security Score
Improving your security score means regularly updating compromised, weak, reused, or duplicated passwords. To elevate your score, utilize our password generator to create random, unique, and complex passwords. To read more about how to improve your Security Score using the RoboForm Password Generator, click here.
For example, a weak password would be something like "ABC123!". Go to the "Change Password" page for the account associated with this password, and hover your mouse over top of the RoboForm icon next to the "New Password" field.
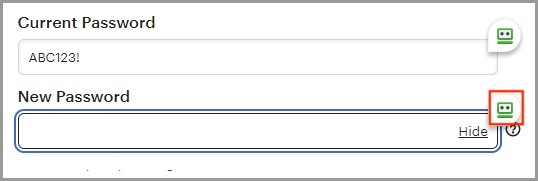
Then, use the RoboForm Password Generator to generate and fill a new password which is rated strong, for example: x3XB9Eu5VcKz67&^
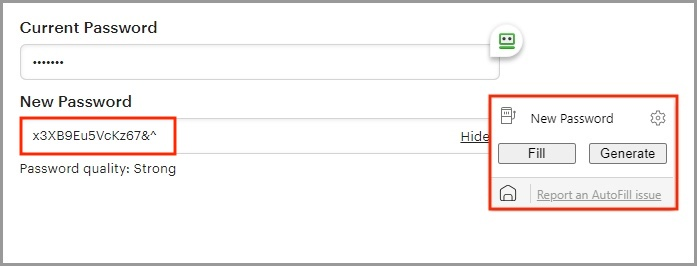
Chapter 16: RoboForm Online
RoboForm Online is now the same as the Start Page. You can still log in to RoboForm online through RoboForm’s website, but the appearance is now identical to the Start Page
You can find RoboForm Online here. Simply log in with the email that is associated with your RoboForm account and your RoboForm Master Password.
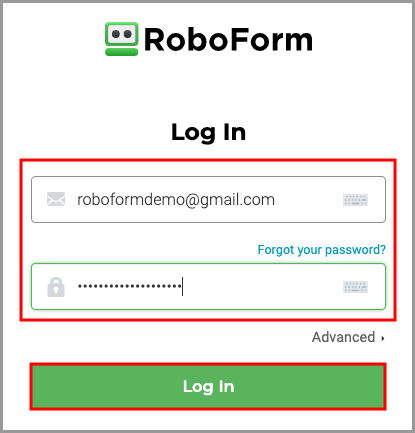
For information on RoboForm Online, please refer to Chapter 17: Start Page
Chapter 17: RoboForm Start Page
The RoboForm Start Page is available here and allows quick access to all of your Logins, Bookmarks, Safenotes, Identities, Contacts, and more
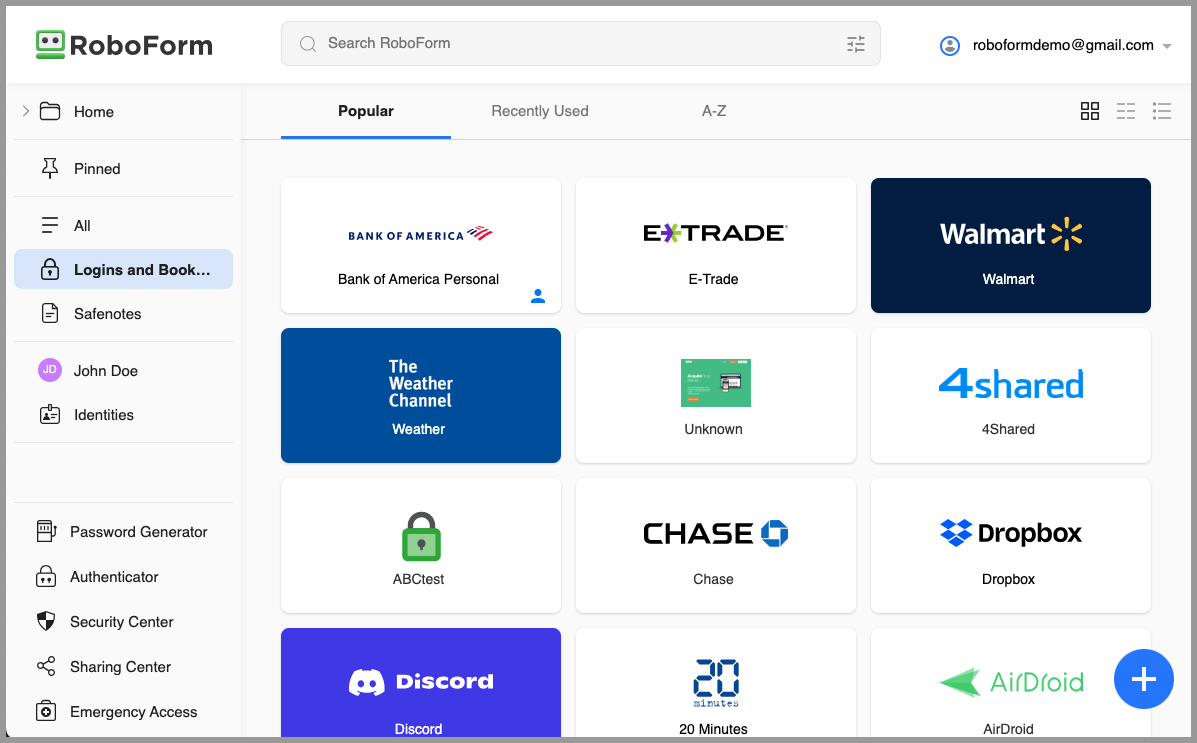
Accessing The Start Page
To use the RoboForm Start Page, the RoboForm Browser Extension must be installed into the browser you wish to use. You can easily access the Start Page by clicking the RoboForm Extension in your browser, and then clicking the house icon in the upper left corner.
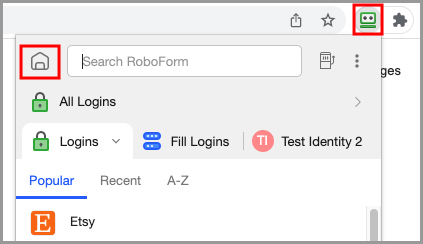
Navigating The Start Page
Sorting
You can sort/view your RoboForm data via the three selections listed under the search bar: Popular (most frequently used), Recently Used (most recently used), and A-Z (alphabetical order).

Folders and Item Types
In the left navigation bar, clicking the drop-down to the left of the Home folder will display a list of all subfolders:
- The All tab will display a list of all RoboForm data files and folders (Logins, Identities Bookmarks, Contacts, and Safenotes).
- The Logins and Bookmarks tab displays a list of Logins and Bookmarks only
- The Safenotes tab displays a list of Safenotes only.
- The Identities tab displays a list of Identities only.
-
Clicking on an Identity listed in this column will open the Identity for viewing.
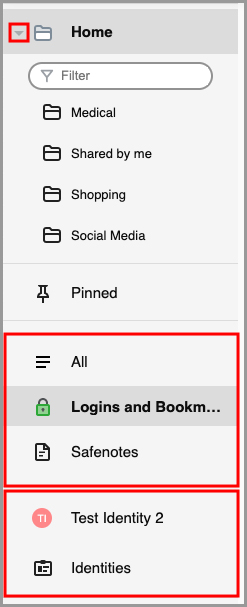
If you click directly on the Identity in the column on the left, or you go to the Identities tab and click on an Identity, you will open a window which displays the information attached to that Identity. This information can be edited as needed by clicking the Pencil icon in the top right corner, or copied by clicking the Copy icon to the right of the pencil icon.
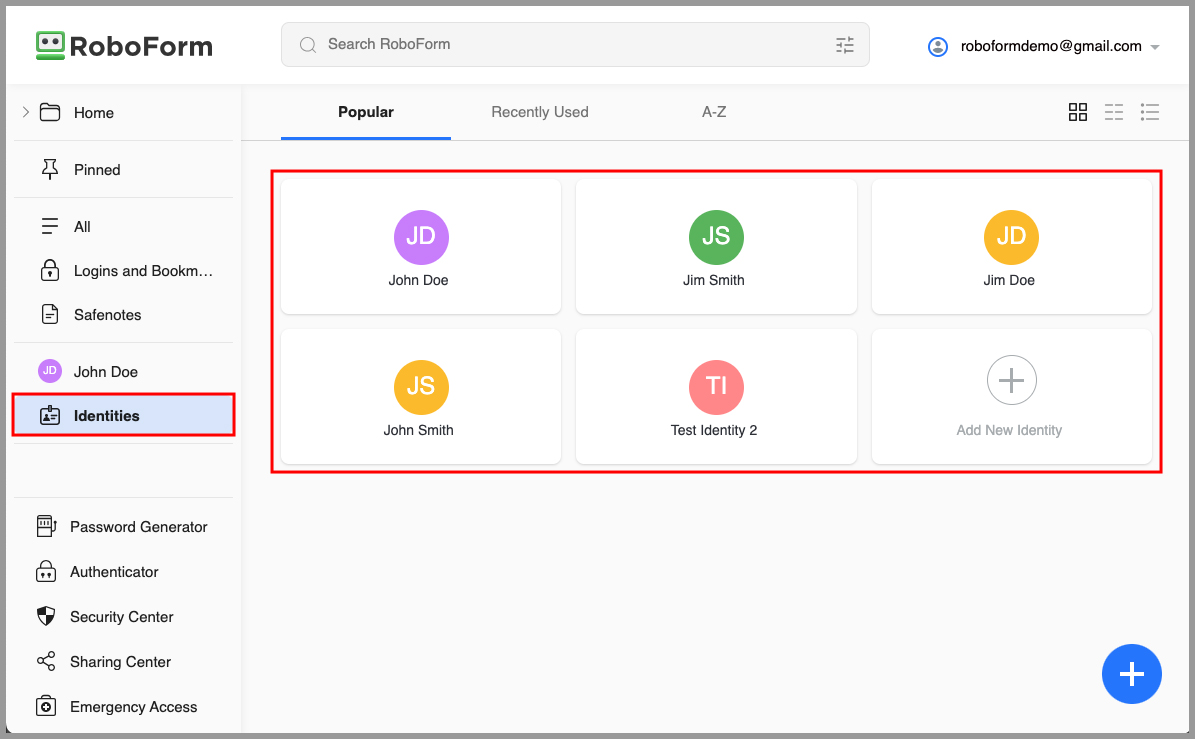
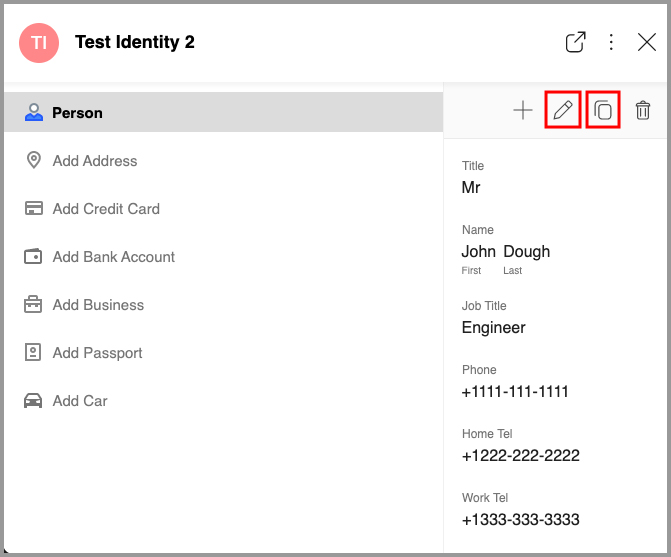
Adding Logins to Your Start Page
-
While on the "Logins and Bookmarks" tab, click the blue [ + ] icon in the lower right corner of your Start Page.
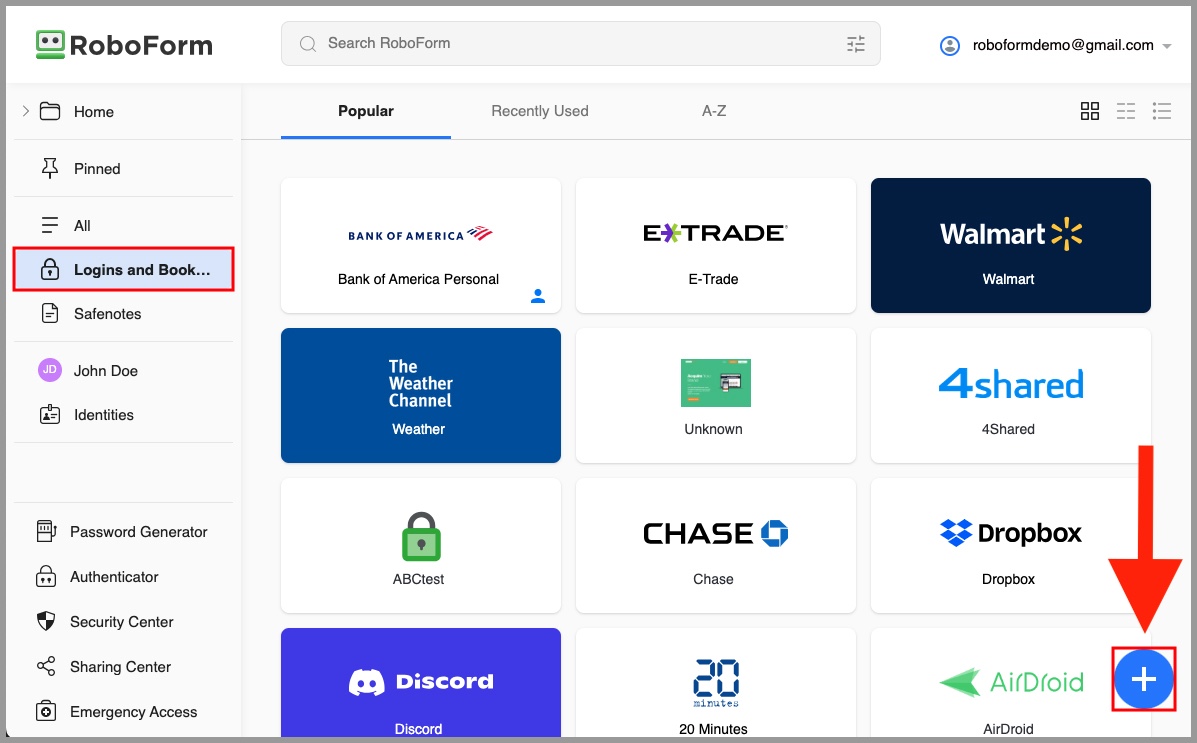
-
The “Add New Login” window will appear. This window contains a list of commonly saved websites. Use the search field to search for the website you wish to save.
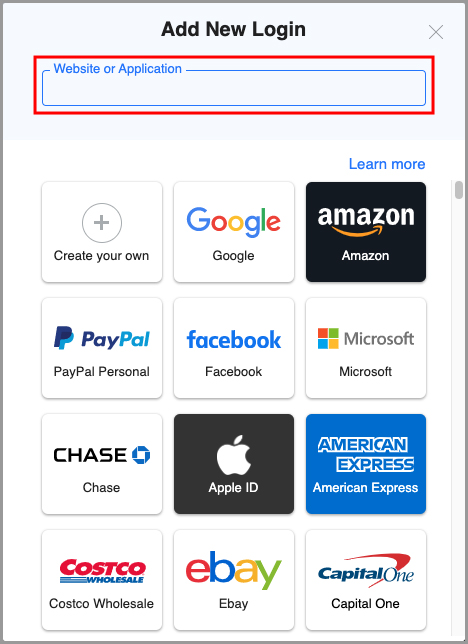
-
Name the Login as you wish, enter your username and password, and select the folder you wish to store the Login in. If you would like to pin the newly saved Login to your Start Page, click the Pin icon. Use the "Add Note" button to add any notes that you would like to save with your new Login. Then, click the “Save” button.
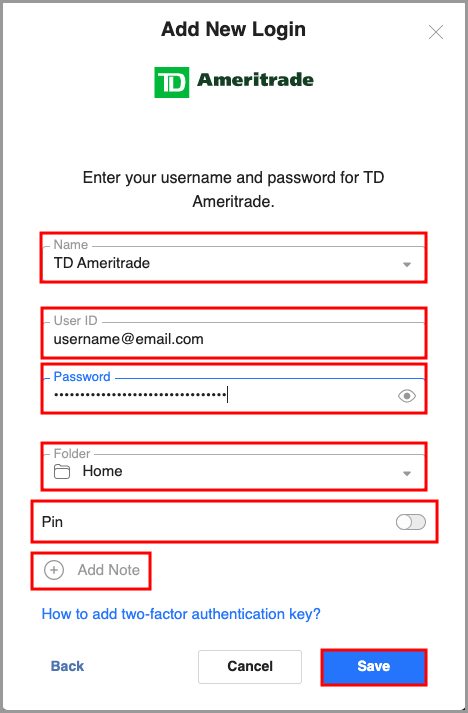
Customizing Your Start Page
There are a variety of different ways that you can customize the appearance and functionality of your RoboForm Start Page.
Start Page Layout
You can change the format in which you view your data by selecting Grid, Compact, and List icons on the right, under your account dropdown.
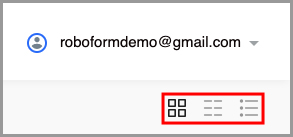
Pinned
The Pinned tab allows you to customize the Start Page with the RoboForm files you access most often. In the upper right of each Login, you can click the 3 dots and select “Add to Pinned” to add that Login to your pinned list.
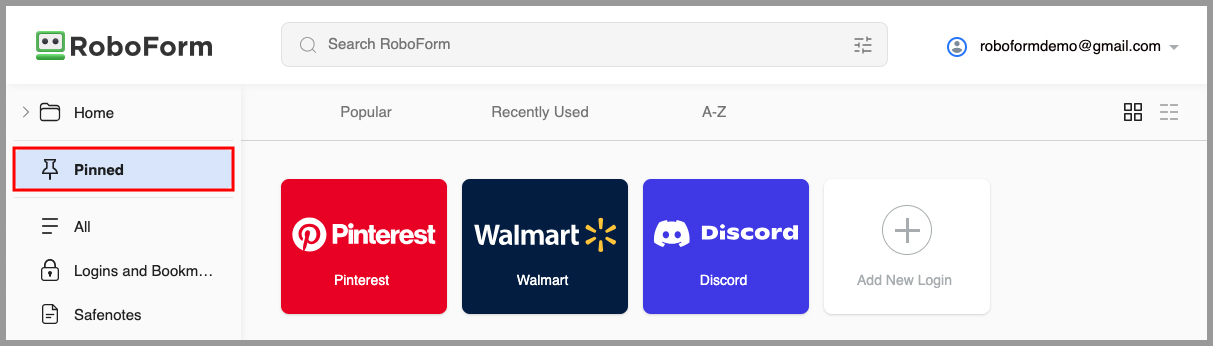

Dark Mode
You can turn on “Dark Mode” by clicking on your account’s dropdown menu in the upper right, and toggling the button next to “Dark Mode” to the “On” position. This is useful if you find bright, white screens irritating to your eyes, and would prefer a darker color theme on your Start Page.
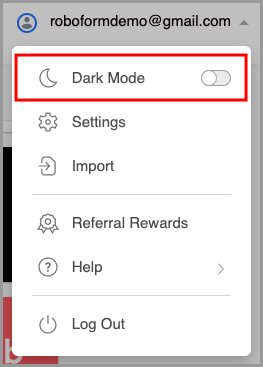
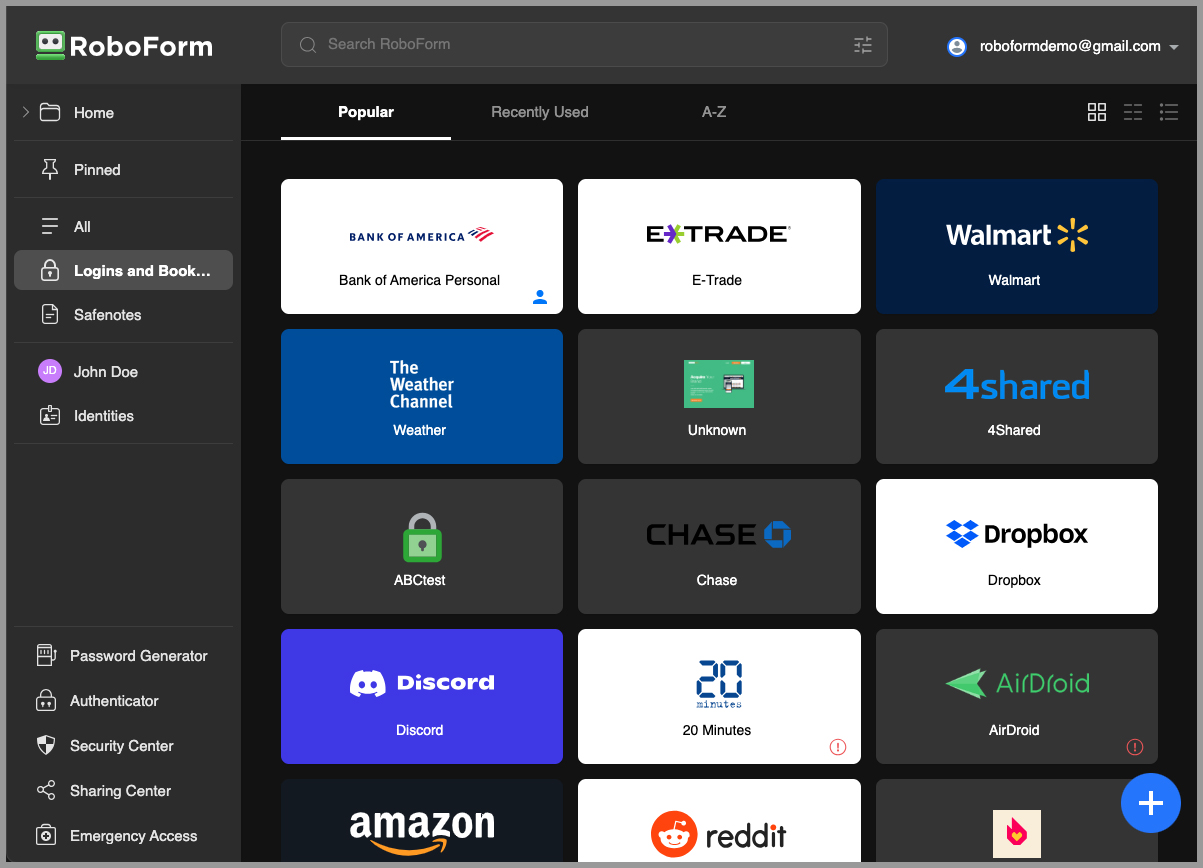
Editing your data from the Start Page
You may edit individual Logins, Identities, Bookmarks, and Contacts from within the RoboForm Start Page.
NOTE: You can also edit these items from the RoboForm Desktop Editor
To edit a Login or Bookmark:
-
Click the three vertical dots. Then, select “Edit” from the menu.
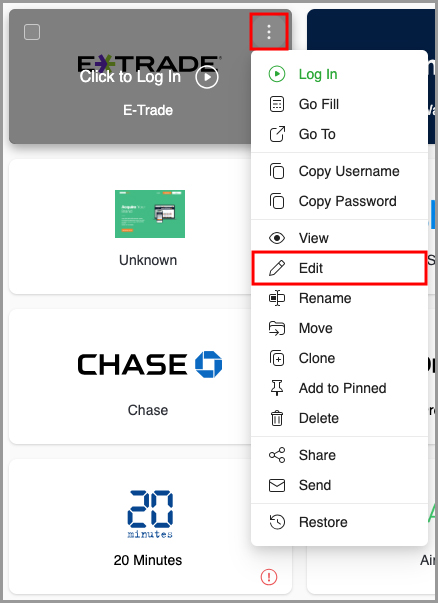
-
Edit the fields as needed and then click the blue "Save" button.
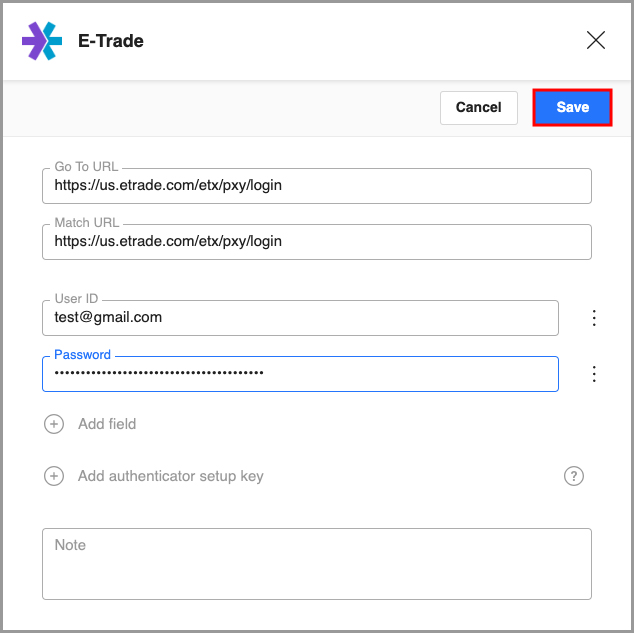
To edit an Identity or Contact:
-
Click the 3 vertical dots. Then, select “View” from the menu.
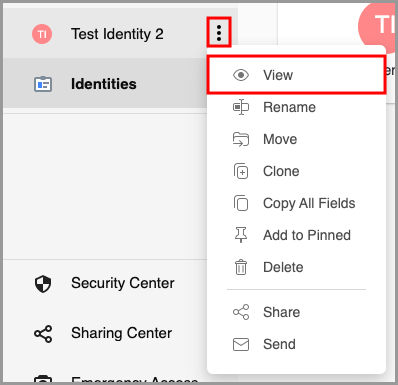
-
Click the “Pencil” icon at the top right.
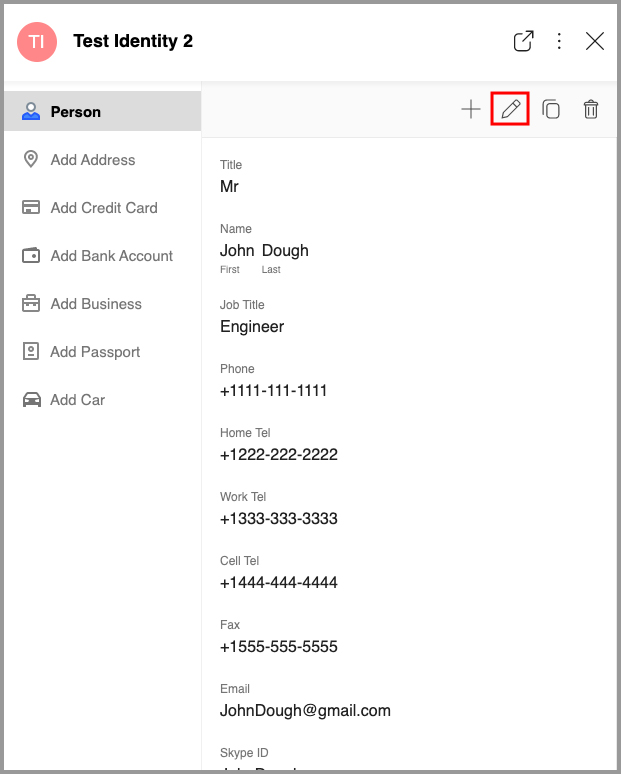
-
Edit the fields as needed and then click the blue “Save” button.

To edit a Safenote:
Go to the "Safenotes" tab and click the Safenote you wish to edit. You will now be viewing your Safenote
On this screen, click the text field of the Safenote to edit the text. Edit the Safenote as needed and then click the blue “Save” button.
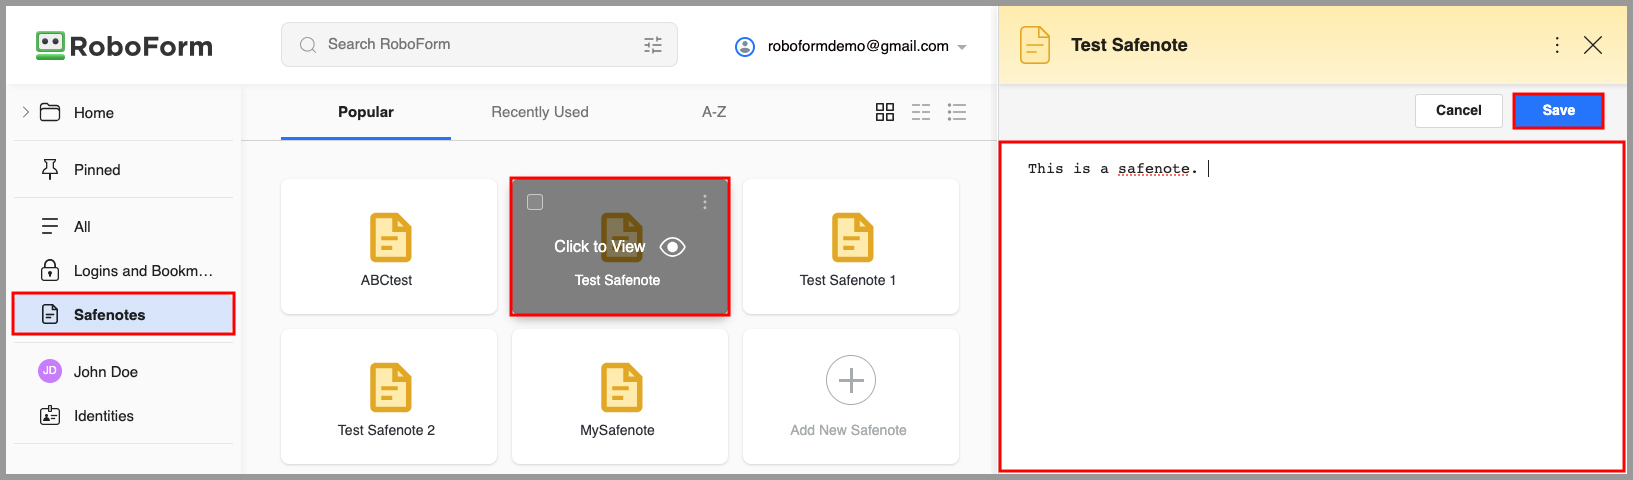
Additional Start Page Options
From the Start Page, you may also log in, go fill, go to, copy username, copy password, view, edit, rename, move, clone, delete, add to pinned, share, send, and print RoboForm Logins, Bookmarks, and Safenotes.
Click the three vertical dots located at the right-hand corner of an individual Login, Bookmark, or Safenote.
Depending on whether you are selecting a Login, Bookmark, or Safenote, a menu will appear offering you some combination of options to log in, go fill, go to, copy username, copy password, view, edit, rename, move, clone, add to pinned, delete, share, send, and restore.
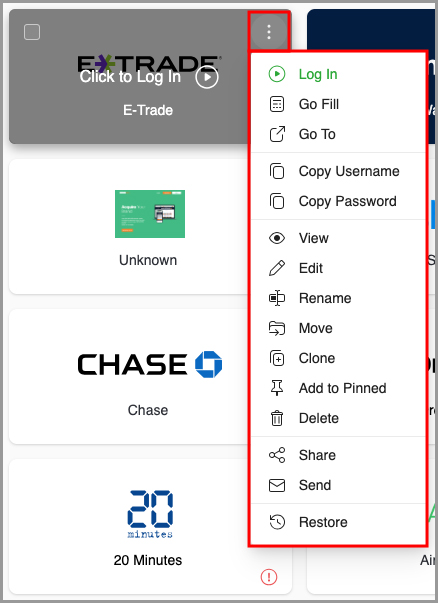
You can find the option to “Print” by selecting “View” from this menu, and clicking the 3 vertical dots in the upper right of the view page.
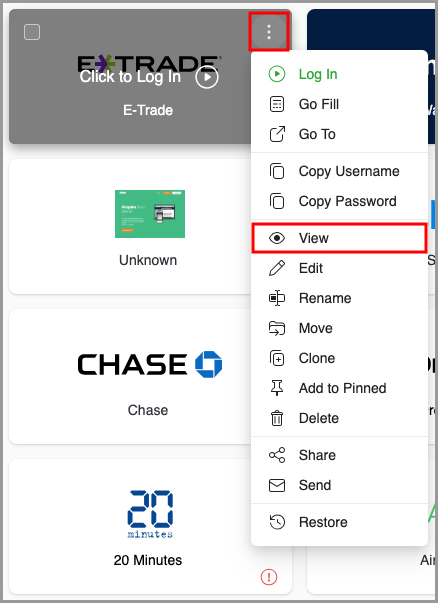
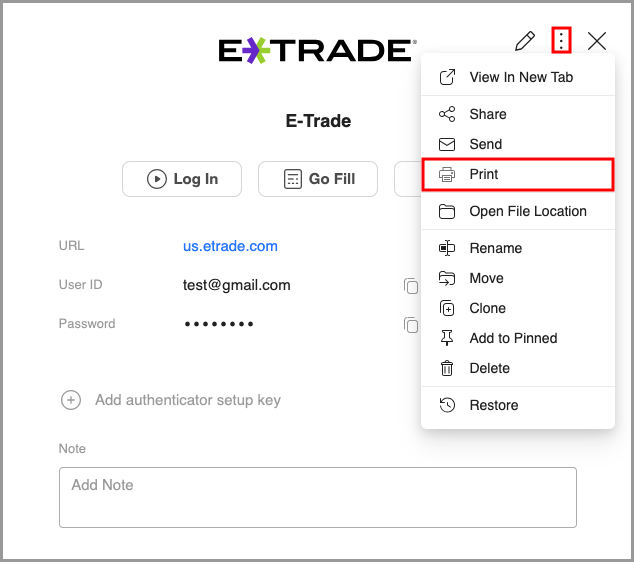
There are also options in the bottom left corner to view the Password Generator, Authenticator, Sharing Center, Security Center, and the Emergency Access page from the Start Page.
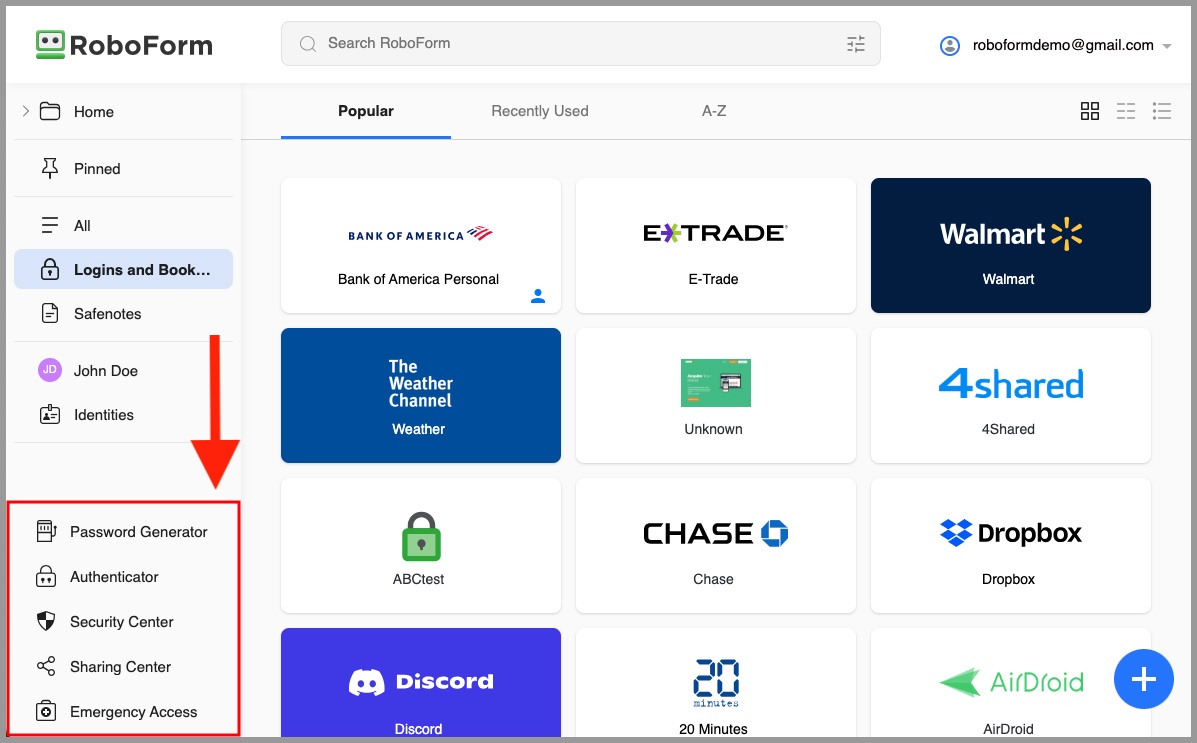
To view your account settings from your RoboForm account, you can click your account’s dropdown in the upper right, and select “Settings” from the menu.
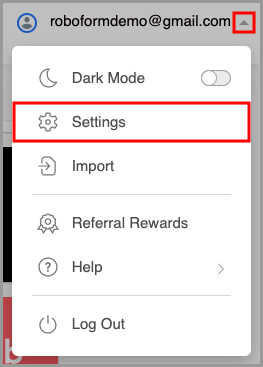
Using Start Page Search
You can easily conduct a search for any data included within your RoboForm account using the Search RoboForm bar at the top of the page

Chapter 18: Options and Settings
Desktop Application Options
Options hosts all the settings and preferences for the RoboForm Desktop Application.
You can open Options in the following ways:
-
Opening the RoboForm Taskbar icon and selecting “Options” from the menu.
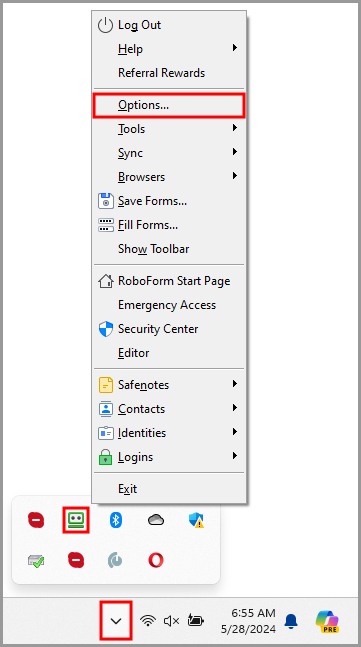
-
In the RoboForm Editor, click the RoboForm dropdown and select “Options” from the menu.
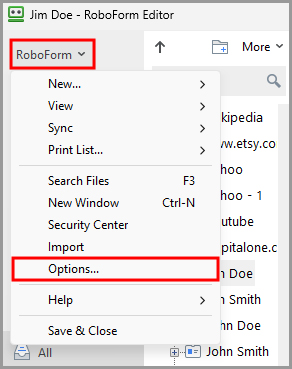
The Options window is split into two sections:
- The Left Panel shows navigation tabs such as Language, Browsers & Apps, etc.
- The Details Pane shows the options available in the selected navigation tab.
At the bottom of the window, there are three buttons:
- Reset to Defaults will change all of your options to their original default settings.
- Save will save any changes you made in settings. Clicking save will close the Options window.
-
Cancel closes the Options window without saving any of your changes.
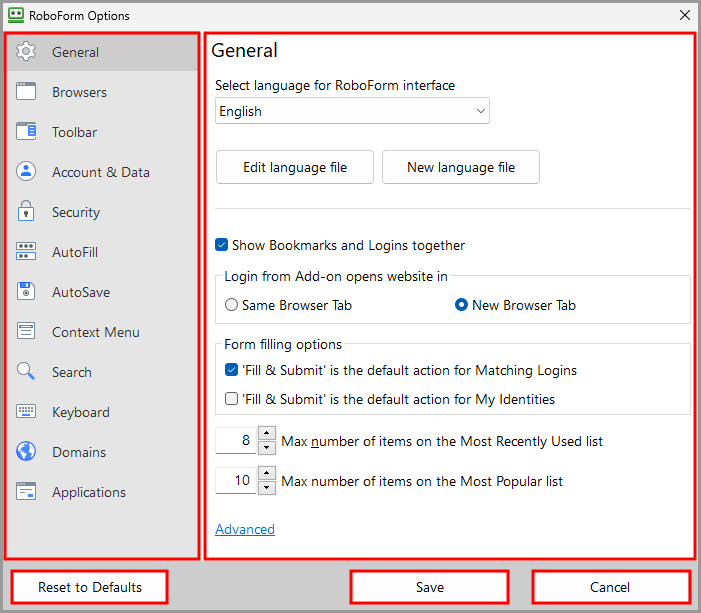
The next section will go through each tab in the Left Panel and explain their individual options.
General
This tab goes over the general options available within RoboForm.
-
The first option on the General page is to change the language for your RoboForm interface. Simply select the language in the drop-down menu.
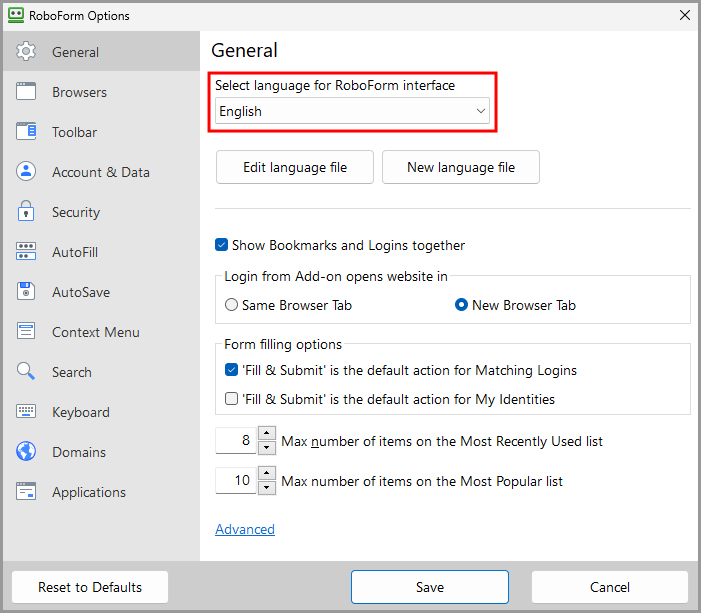
-
Edit Language File is the language editor.
NOTE: This is for development purposes.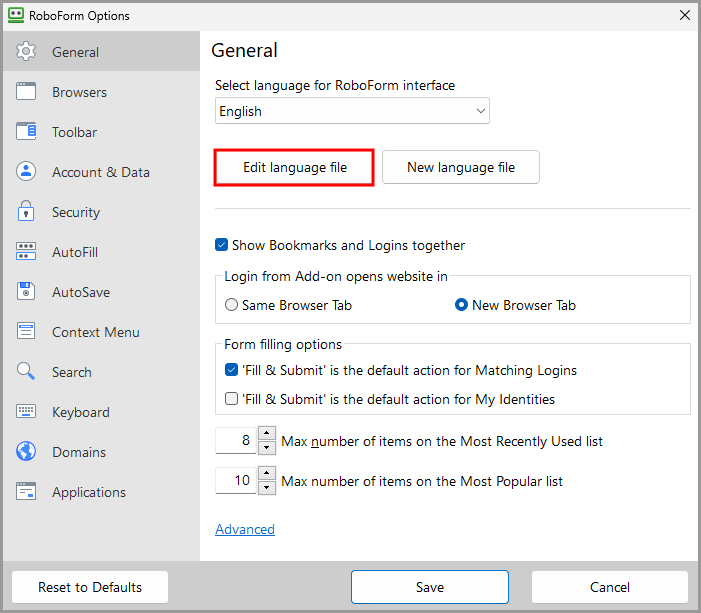
-
At the top of the Edit Language File window, you are able to select whether to show untranslated, modified and translated strings.
-
At the top left of the window:
- Load - Opens a language file into the Language Editor.
- Apply - Implements the translated text into RoboForm.
- Save - Saves your changes or edits as an rfs file.
- Send - Forwards your Language File to RoboForm Support System.
-
At the top left of the window:
-
To edit a String, do one of the following:
- Edit directly in the table by typing in your updated String into the String field.
-
Double click the row or string you would like to edit. A pop up window will appear.
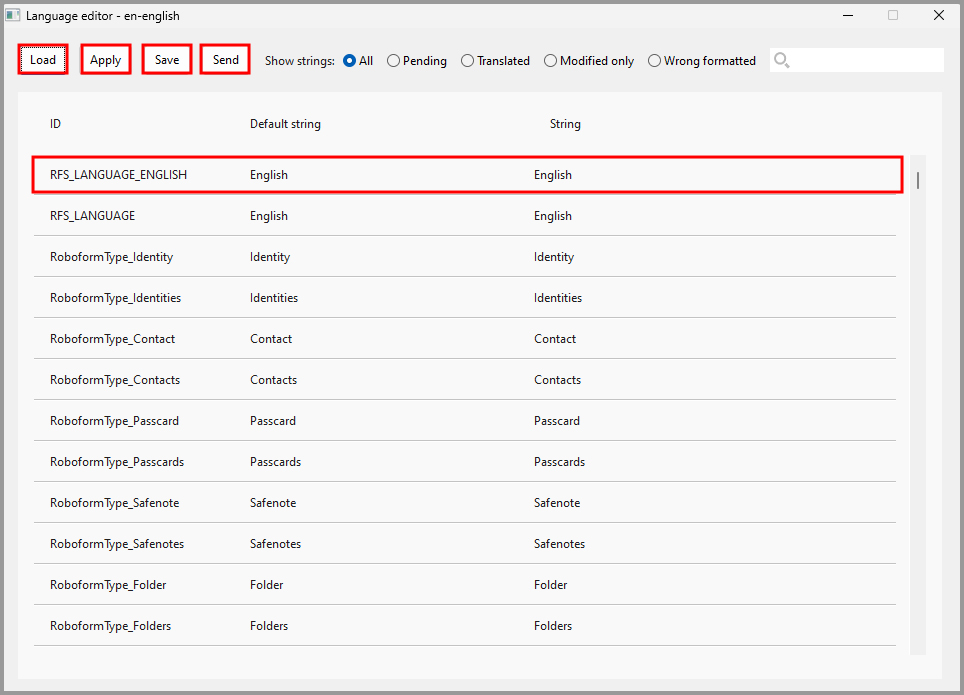
-
New Language File - Creates a new language file.
NOTE: This is for development purposes. - Show Bookmarks and Logins together - Shows your Bookmarks and Logins together in the RoboForm toolbar and taskbar menus
-
Login from Extension opens website in gives you two options:
- Same Browser Tab - Opens the website and logs you in from the same browser tab you are currently on.
- New Browser Tab - Opens the website and logs you in in a new tab.
-
Form filling options gives you two options:
-
‘Fill & Submit’ is the default action for Matching Logins
- If checked, the default action for Matching Logins is Fill & Submit.
- If unchecked, the default action for Matching Logins is Fill Forms.
-
‘Fill & Submit’ is the default action for My Identities
- If checked, the default action for My Identities is Fill & Submit
- If unchecked, the default action for My Identities is Fill Forms.
-
‘Fill & Submit’ is the default action for Matching Logins
- Max number of items on the Most Recently Used list - Allows you to set the maximum number of items on your Most Recently Used list.
-
Max number of items on the Most Popular list - Allows you to set the maximum number of items on your Most Popular list.
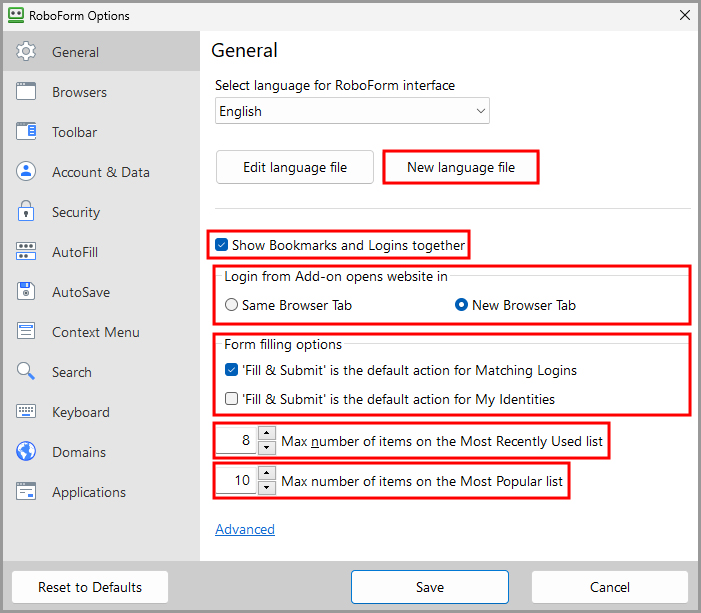
-
Clicking “Advanced” at the bottom left of the General tab reveals options to change how your data’s popularity is calculated.
- The “How to calculate data popularity” option allows you to select between calculating your data’s popularity Automatically, using the new history-based algorithm, or using the legacy algorithm.
-
The “How fast does used data become popular” option allows you to select whether you want your data to become popular Slowly, Gradually, Steadily, Swiftly, or Promptly.
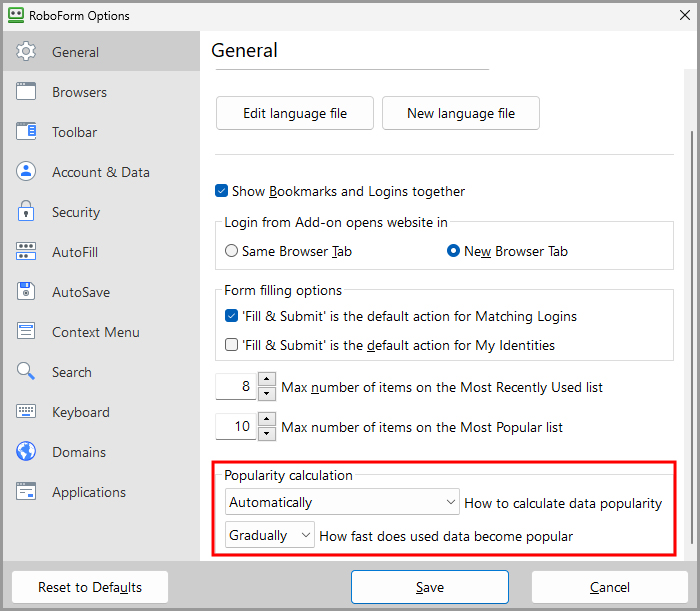
Browsers
This tab shows which Browsers are available to have the RoboForm extension installed, shows whether or not the extension is already installed to each browser, and provides links to the installation pages for each extension.
Your installed Browsers will be shown on the left of the page
Click the “Install” button to the right of the browser name if you would like to install the RoboForm extension in that Browser.
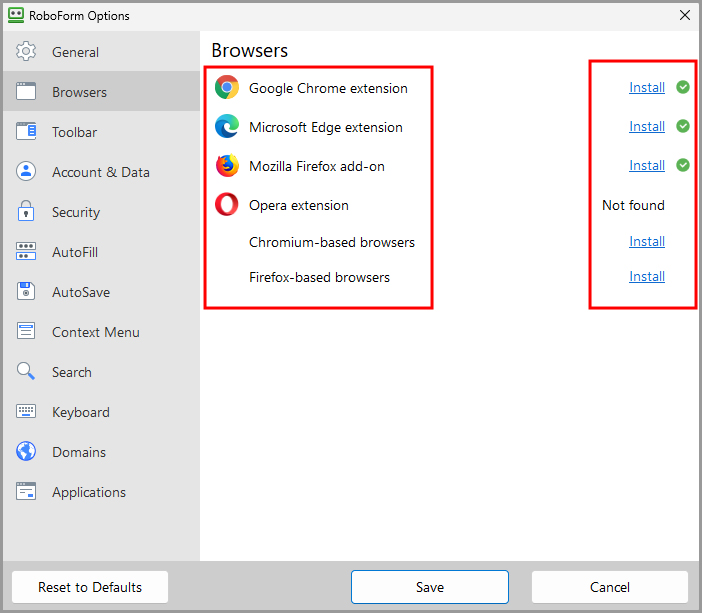
Toolbar (IE Only)
These are options for the Toolbar which are now only available for Internet Explorer.
- Maximum Matching Login button width in pixels - Changes the size of the Matching Logins Button. 200 pixels is the default size. Simply type the amount of desired pixels to change the size.
- Number of My Identity Buttons - Changes how many Identities you want to be visible in your toolbar. Simply type the number to change the amount.
- Maximum Matching My Identity button width in pixels - Changes the size of the Identity Button. 100 pixels is the default size. Simply type the amount of desired pixels to change the size.
- Search Box Width in pixels - Changes the size of the Search Box. 150 pixels is the default size. Simply type the amount of desired pixels to change the size.
-
Mini Dialog appearance delay time in milliseconds - Changes the time in milliseconds it takes for the mini-dialog for Matching Logins and Identities to pop up. 100 milliseconds is the default time. Simply type the amount of desired milliseconds to change the time.
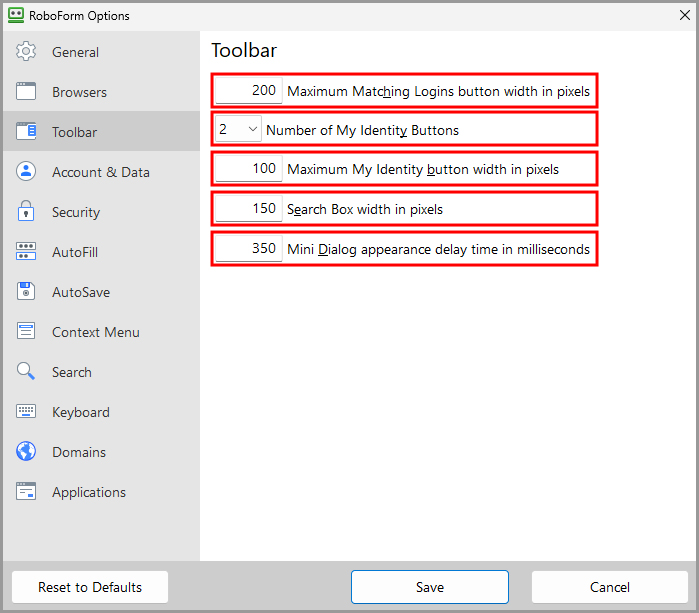
Account & Data
This page provides options for Data and Syncing Data.
- Account - Shows the Email associated with your RoboForm Account. Clicking the email will open RoboForm Online. Read more in Chapter 16: RoboForm Online
- Change Account - Opens a dialog to login into a different RoboForm Account.
-
Automatic Sync - When checked, will automatically sync your device and your RoboForm account whenever you log in with your master password or you edit an item. Uncheck this if you want to do manual sync.
-
One way you can do a manual sync is by clicking Sync RoboForm on this options page. Another way is by clicking the three dots in your RoboForm Extension, going to the Sync menu and clicking Sync RoboForm there.
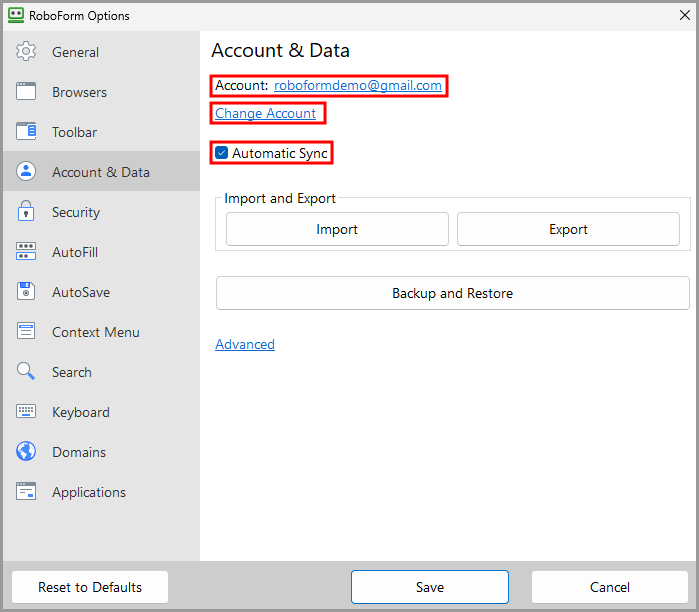
-
One way you can do a manual sync is by clicking Sync RoboForm on this options page. Another way is by clicking the three dots in your RoboForm Extension, going to the Sync menu and clicking Sync RoboForm there.
-
Import - Allows you to import any data from browsers or other password managers to RoboForm. For browsers, click the Import button next to the browser name. For other password managers, click Import from File and follow the directions on the page
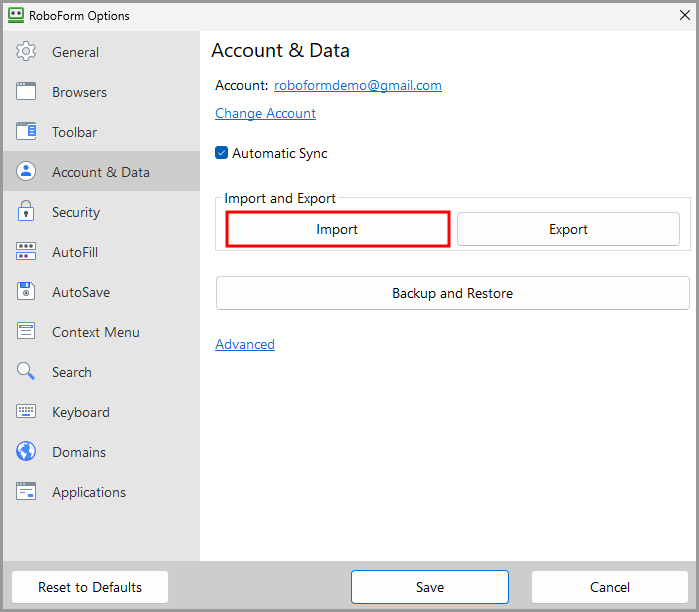
-
Sort imported data into sub-folders - Allows you to select a folder to import your data into.
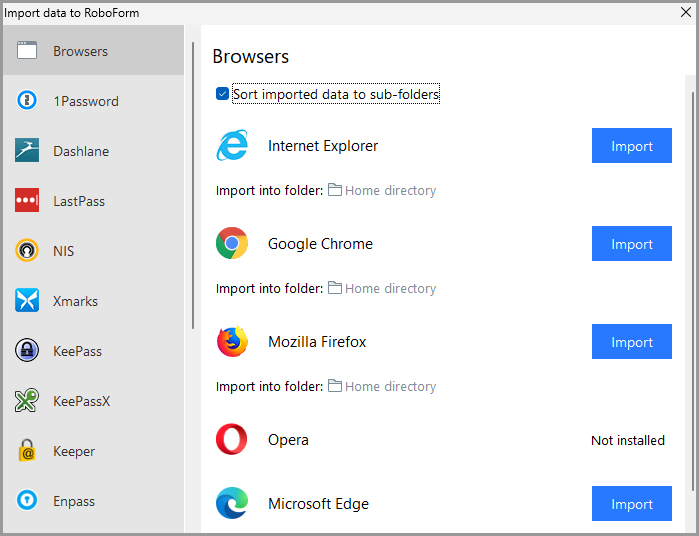
-
Sort imported data into sub-folders - Allows you to select a folder to import your data into.
-
Export - Allows you to export your RoboForm Data to a location on your computer.
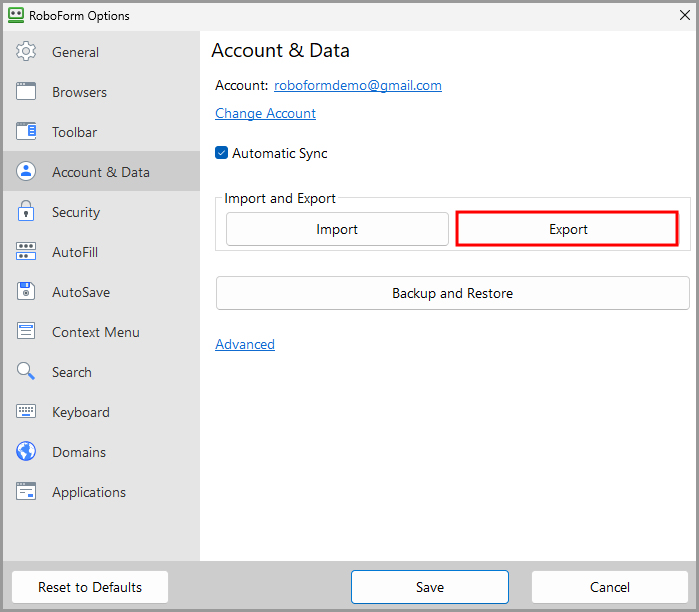
How to Export RoboForm Data
-
Go to RoboForm Options > Account & Data and click Export
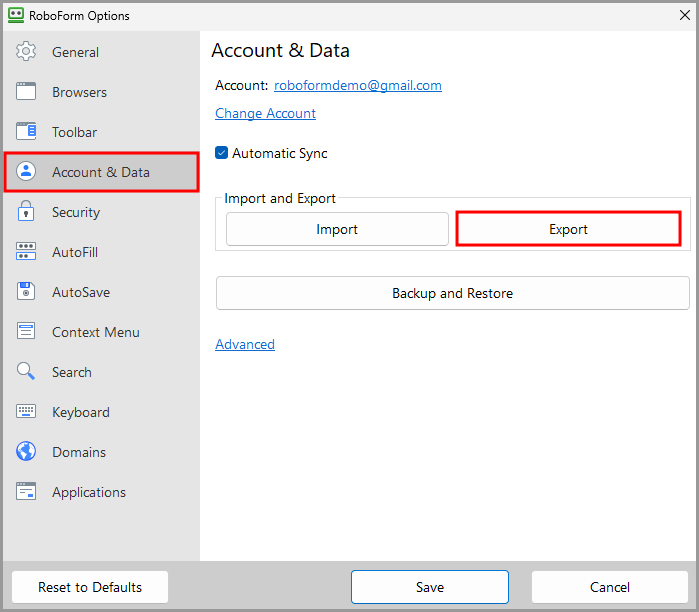
-
You will be prompted to enter your Master Password to confirm the Export.
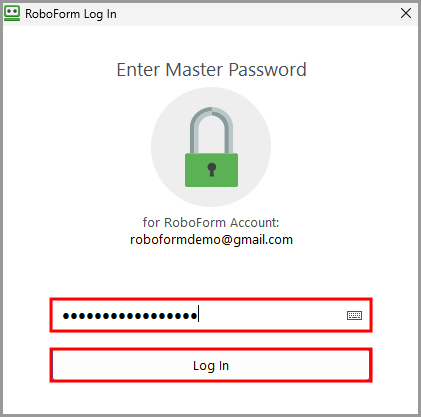
- Select the Folder you would like to export under Data to Export.
- Select a Location for your exported data in Browse.
- Select the type(s) of data you wish to export. Your choices are Logins, Bookmarks, and Safenotes.
- Select the format you would like your files to be exported in. The options are Internet Explorer Favorites, HTML file or CSV file.
-
Click Export.
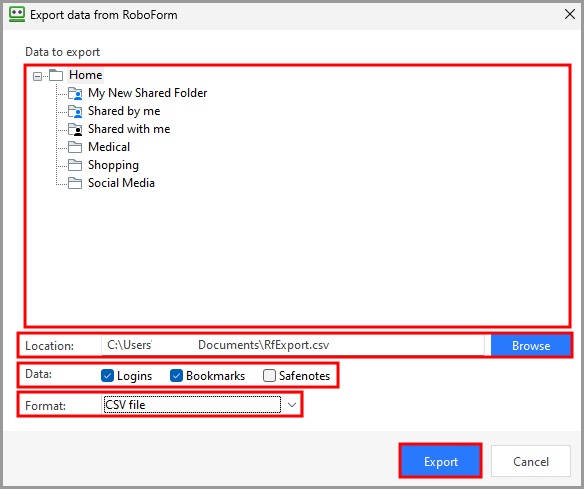
-
RoboForm will present you with a warning about exporting your data into an unencrypted file. Click “Yes” to continue.
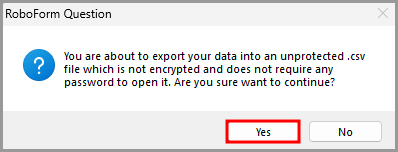
-
The Export will show its status bar and say when the Export is complete.
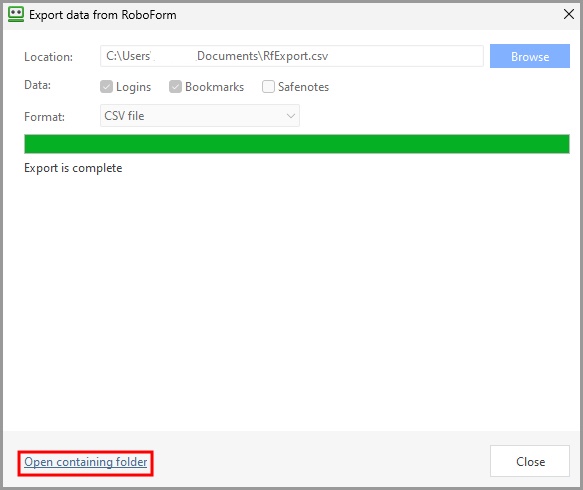
You can click “Open containing folder” to see where the exported data is now.
-
Backup and Restore - Opens a window showing options to backup or restore your RoboForm Data.
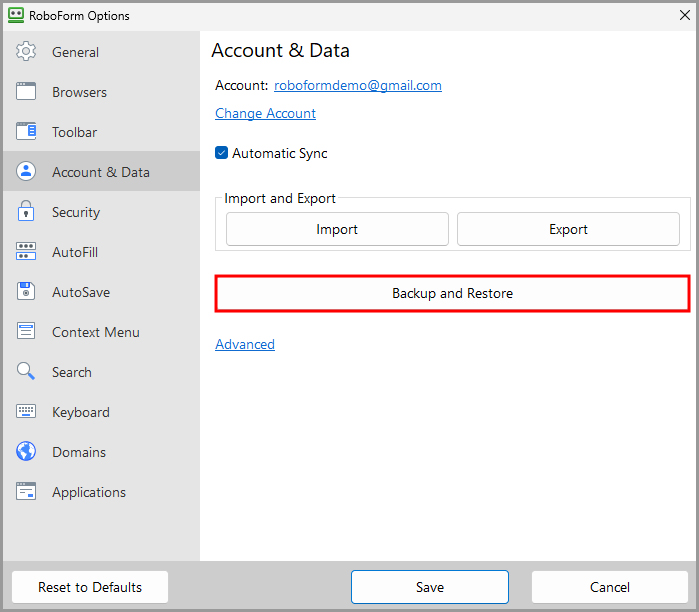
-
The first pane, labeled “Backup,” shows the backups you have available to restore from. These are points in time that RoboForm Data can be restored back to - your restored data would match your data at that time point.
- To restore data to a time point, click Restore to the right of the desired data file.
- To create a new restore point click Create new Backup. The new backup will appear at the top of the list.
- To remove a restore point, select it and click Delete to the right of the data file.
- Restore from folder - Allows you to choose a file that contains a saved copy of RoboForm User data and restore from it. Simply find the location in Browse and click Ok.
-
Preserve as Manual Backup - Preserves the backup manually.
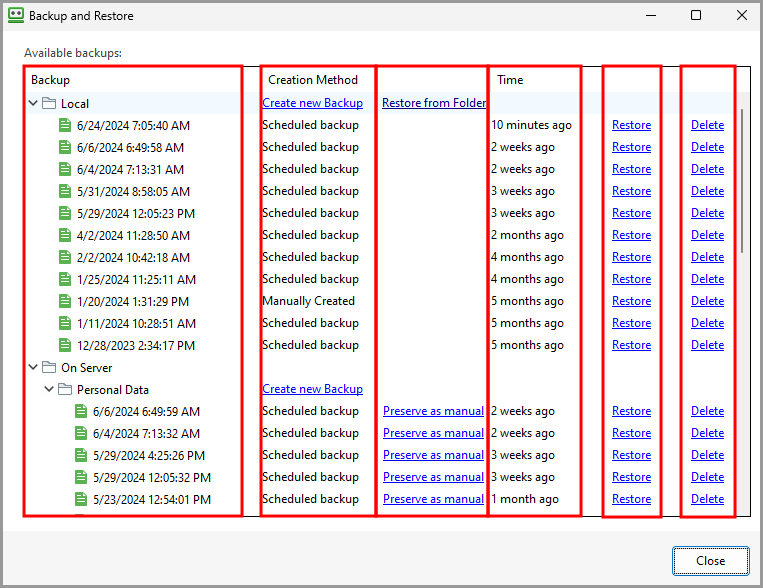
-
The first pane, labeled “Backup,” shows the backups you have available to restore from. These are points in time that RoboForm Data can be restored back to - your restored data would match your data at that time point.
-
At the bottom of the Data & Sync Options page, Advanced opens the following advanced options:
- Select Data Folder - Allows you to select a folder for your RoboForm data.
- Import V7 Data - Allows you to import RoboForm data from your previously installed RoboForm 7
- Clear Unused RoboForm data - Searches for unused RoboForm data (including RoboForm version 8 profiles and data from the previous versions of RoboForm) on your computer in order to delete it after your confirmation.
- Import Templates - Allows you to import custom RoboForm templates.
- Clear Templates - Clears your custom RoboForm templates.
-
Set Default Data Location - Sets a default data location for your RoboForm data.
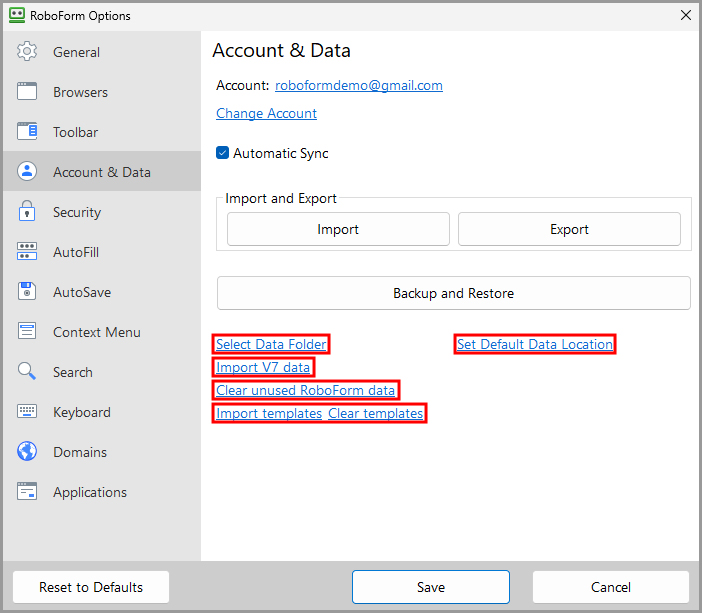
Security
This page provides Security options. Read more in Chapter 19: Security.
- Change Master Password - Allows you to change your master password.
-
Authentication Method - Provides the following options:
- Always ask for Master Password - When checked, means you can only log in by typing your Master Password.
-
Windows Hello - Allows you to use Windows Hello to log in instead of your Master Password.
NOTE: You may still need your Master Password to log in, so be sure not to forget it -
Fingerprint (WBF) - Allows you to use Windows Biometric Framework to log in instead of your Master Password
NOTE: You may still need your Master Password to log in, so be sure not to forget it. - Don’t ask for Master Password - Checking this option will turn off the prompt requesting the Master Password. For security reasons, we recommend against this.
-
Automatic Logout provides you with two options:
- Auto-Logout on User Switch or Lock Workstation - Automatically logs you out when you switch users or lock your workstation.
- Auto-Logout after this many minutes - The time period before RoboForm automatically logs you off. You can turn off Auto-Logout by checking the box. The number at the bottom shows the amount of minutes before Automatic Logout. To change the time period, simply type in a number or click the up and down arrows to select a number of minutes.
- Encryption Algorithm - Allows you to adjust the number of iterations in the data encryption algorithm.
-
Reset all warnings to show - Resets all RoboForm warning messages to show up if they have been hidden.
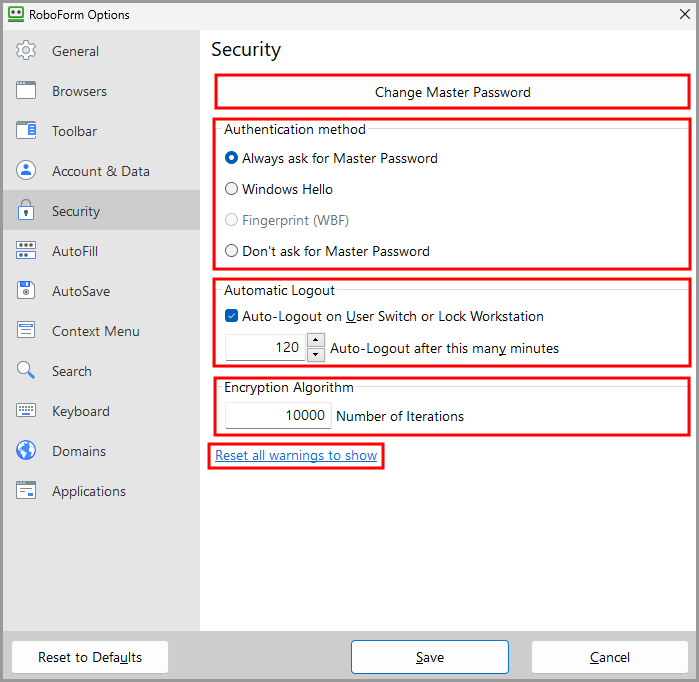
How to Change your Master Password:
-
Go to the Security and select Change Master Password.
NOTE: If you have forgotten your master password, RoboForm cannot restore your master password. RoboForm will prompt you to set up a new account. Read more in Chapter 19: Security.
-
A dialog will open asking for your current Master Password.
-
On the next page, enter and retype your new Master Password. Please memorize your Master Password. It cannot be recovered if forgotten.
-
The dialog will say the RoboForm Setup is Completed. Your Master Password has been changed.
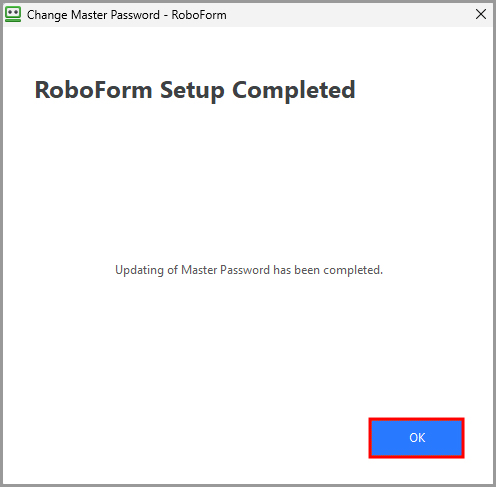
AutoFill
This page provides AutoFill options. Read more in Chapter 10: AutoFill Dialog
- Do not Offer to AutoFill - When checked, means RoboForm will not offer to automatically fill forms
- Offer to AutoFill - When checked, means that when RoboForm encounters a form that can be filled from a Matching Login or an Identity, the in-page AutoFill icon will offer to AutoFill the form.
- AutoFill Without Asking (if only one choice) - Will automatically fill all forms when you visit a web page with the Matching Login or Identity. If there are multiple matching Logins, the AutoFill dialog will pop up. Read more about AutoFill in Chapter 10: AutoFill Dialog.
- Offer to AutoFill from Contacts - Offers to fill from Contacts in addition to Identities.
- Offer to AutoFill in Internet Explorer - When checked, means that when RoboForm encounters a form while browsing using Internet Explorer which can be filled from a Matching Login or an Identity, the in-page AutoFill icon will offer to AutoFill the form.
-
Offer to AutoFill Windows Basic Authentication dialogs in Browsers - When checked, means that when RoboForm encounters a Windows Dialog, also known as a Basic Authentication, AutoFill will offer to fill the Matching Login. Read more about Basic Authentication in Chapter 4: Logins.
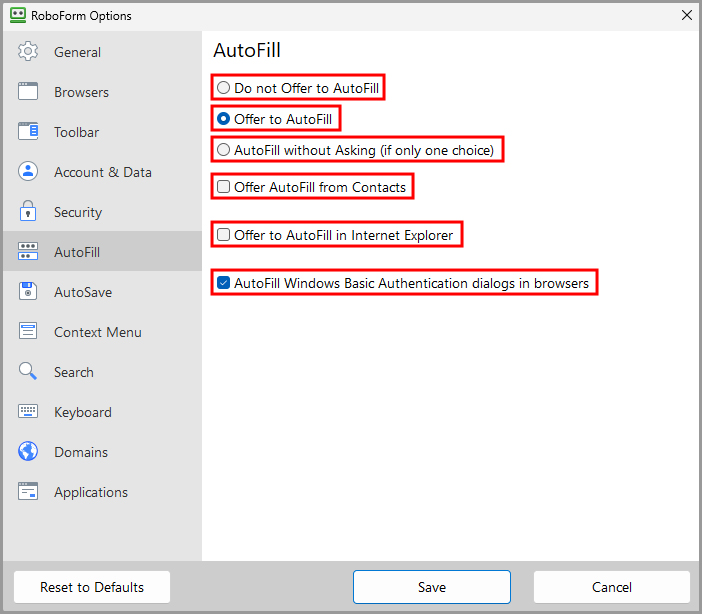
AutoSave
This page provides AutoSave options. Read more about AutoSave in Chapter 4: Logins.
- Do not Offer to AutoSave - When checked, means RoboForm will not offer to automatically save Logins.
- Offer to AutoSave (require user confirmation) - When checked, means that when you submit a Login, RoboForm will offer to save it.
- AutoSave without Asking - When checked, means that when you submit a Login, RoboForm will save it automatically.
- Offer to Save Logins from Windows dialogs in browsers (Basic Auth) - When checked, will open the AutoSave dialog when you submit (login to) a Windows Dialog or Basic Authentication form. Read more about Basic Authentication in Chapter 4: Logins.
- Check the option for ALT + click of Login button forces AutoSave for a simple alternative to AutoSave. Type in your login details and select ALT + click the login button for the AutoSave Dialog to appear.
-
For SHIFT + ENTER in text field forces AutoSave, clicking Shift and then Enter will open AutoSave for any text field.
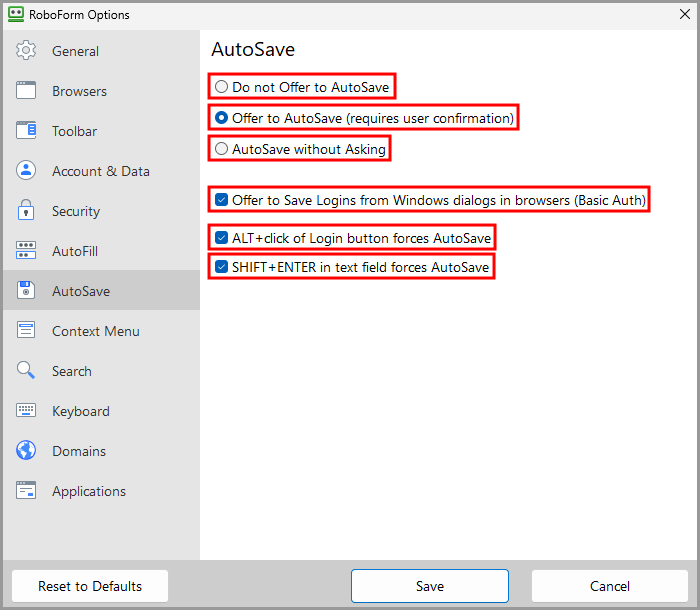
Context Menu (IE Only)
This page provides Context Menu options for Internet Explorer. The context menu opens when you right click in IE.
This page consists of a checkbox list of items that can appear in your Context Menu and in your RoboForm Toolbar. Simply check what you would like to see and uncheck what you would like to be removed in the Context Menu. There's a Select All and a Remove All button below both the Toolbar and the Web Context Menu.
Here are the possible Commands that can be visible in the Toolbar and Context Menu:
- Show RoboForm Toolbar - Changes the visibility of the RoboForm Toolbar.
- Fill Forms - Completes the form on the page with the Matching Login or Identity.
- Save Forms - Creates a Login or a Bookmark for the Web Page you are on.
- RoboForm Editor - Opens the RoboForm Editor in a new window.
- RoboForm Options - Opens the RoboForm Options in a new window.
- Sync RoboForm Data - Does a manual synchronization of your RoboForm Data.
- Customize Menu - Gives you options of how to organize your IE toolbar.
- Password Generator - Opens the RoboForm password generator.
- RoboForm Taskbar Icon - Opens the RoboForm Taskbar Icon.
- Set Fields - Completes any check box fields.
- Reset Fields - Puts the original values into the fields.
- Clear Fields - Removes any text from the fields.
-
Logoff - Signs you out of RoboForm.
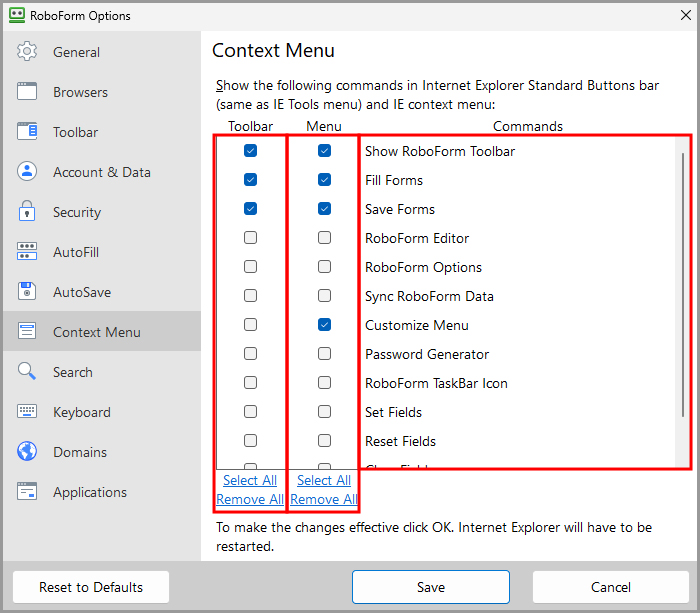
Search
This page provides Search options for the Search Box in the RoboForm Extension and RoboForm Taskbar Icon.
Search List Actions shows which websites you can use for the RoboForm Search Box. Check the ones you want and Uncheck the ones you want to hide.
The options for the Search List Actions are located to the right of the list:
- Move Up - Will move up the item in the list, placing it higher in the Search Box.
- Move Down - Will move down the item in the list, placing it lower in the Search Box.
- The Hot Key dropdown - Allows you to select which hotkey (E.g. F1, F2) will be connected to the action. After typing your search query, pressing the hotkey will submit the search.
Search History includes these options:
- Save Search History - Will save your most recent search terms.
- Clear - Will delete your search history.
-
Max number of Items in Search History - Allows you to change the maximum amount of search terms you have in your Search History. Simply type an amount or click the up and down arrows to change the amount.
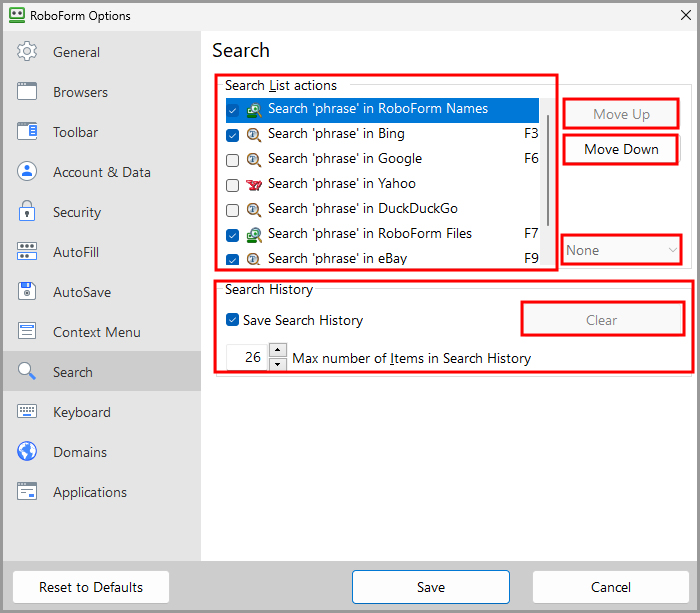
Keyboard
Internet Explorer has RoboForm Shortcuts that you can use to get quick access to RoboForm commands
Enable RoboForm Shortcuts in Browser means that Keyboard shortcuts will be available when this option is checked. Unchecking it will disable shortcuts.
To use a shortcut, hold Alt and the Key command to trigger the shortcut.
List of default commands:
| Key | Action |
|---|---|
| Alt + X | Opens Login |
| Alt + N | Opens Identities |
| Alt + C | Opens Safenotes |
| Alt + U | Opens the RoboForm Button |
| Alt + I | Opens RoboForm Taskbar |
| Alt + L | Log offs RoboForm |
| Alt + M | Opens Matching Logins |
| Alt + O | Opens RoboForm Options |
| Alt + P | Opens Password Generator |
| Alt + R | Show and Hide RoboForm Toolbar |
| Alt + S | Opens Search Box |
| Alt + Z | Fill and Submit the web page you are on |
| Alt + - | Resets Fields to their original values. |
| Alt + = | Set Fields with check marks. |
| Alt + 0 | Clears the Fields that are filled. |
| Alt + , | Opens Identities Editor |
| Alt + . | Opens Logins Editor |
| Alt + / | Opens Safenotes Editor |
| Alt + ] | Offers to fills forms on website |
| Alt + [ | Opens dialog to save Login or Bookmark |
| Alt + 1-9 | Fills in your Identity according to the order, 1 being the first identity. |
At the bottom of the page, there are options to use Ctrl or Shift instead of Alt, and an option to use the Right Alt key for shortcuts in addition to the left.
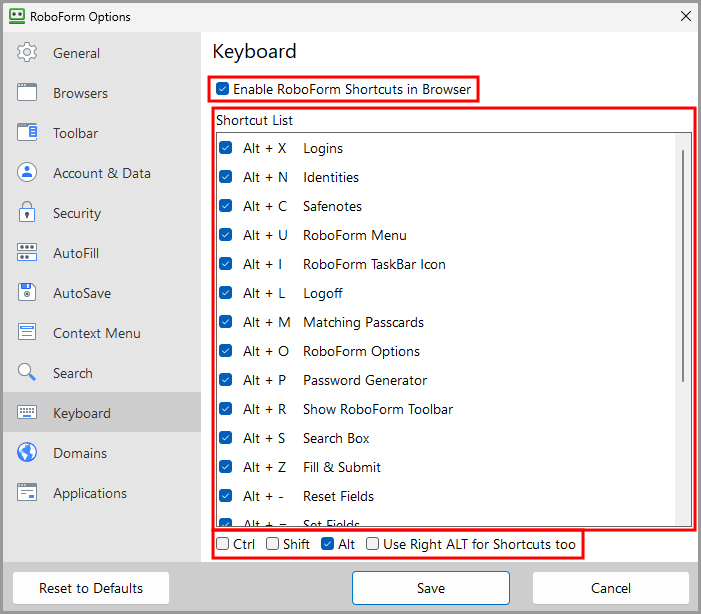
Domains
Equivalent Domains
Some websites are under the same organizations and utilize the same Logins or Accounts, but have different URLs. These are called Mirrors (for example, Bank of America uses mbna.com, bankofamerica.com, bofa.com, and usecfo.com).
Domain Equivalencies simplifies this problem by creating a single Login for multiple sites.
For this list, add Domains that share the same Login. Use " = " to mark the domains equal each other, e.g. “mbna.com = bankofamerica.com”. These settings will then apply in Matching Logins.
Edit As Text allows you to edit this list as text.
At the bottom of the page, the checkbox marked Warn about submitting a Login with a domain that doesn’t match the page. This option will warn you if you are submitting a Login on a domain which does not match the page.
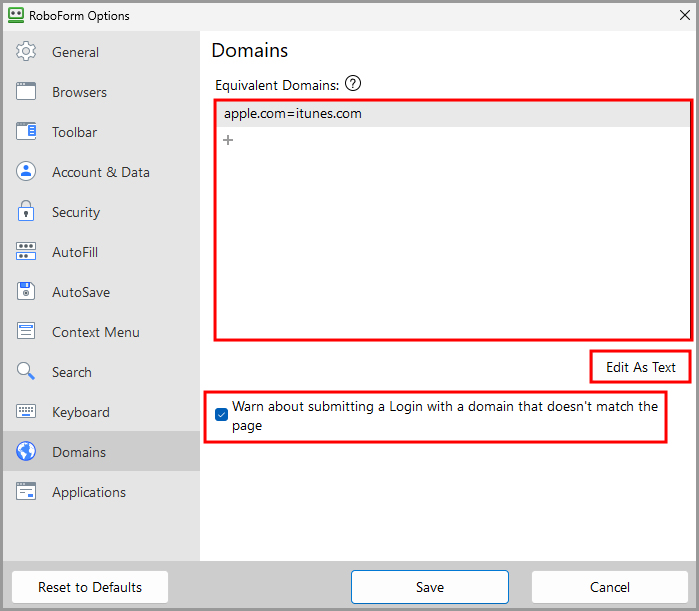
Applications
-
Attach to Windows Applications enables RoboForm to attach to your applications and save Login information for them (E.g. Skype, Itunes).
-
Below, there is an Application Black List. Add applications that you would not like RoboForm to attach to.
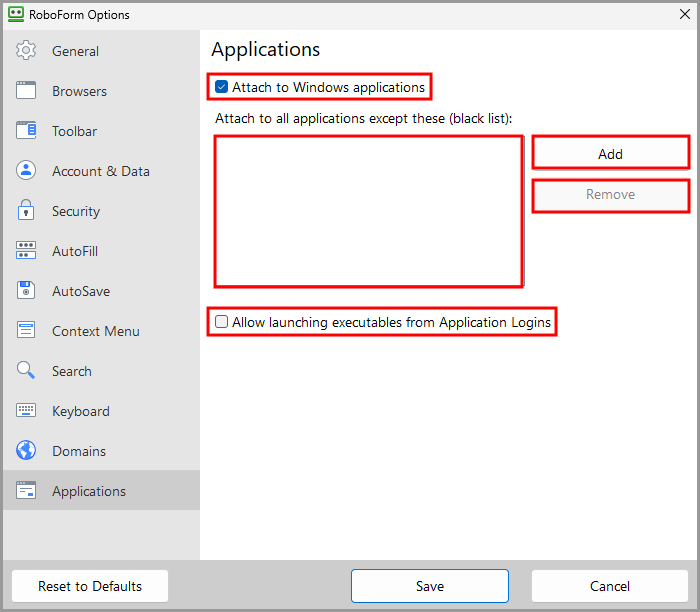
-
Below, there is an Application Black List. Add applications that you would not like RoboForm to attach to.
Extension Settings
Settings hosts all the settings and preferences for the RoboForm Extension.
You can open Settings by one of the following ways:
-
In the RoboForm Extension, click the 3 dots in the upper right corner and select Settings.
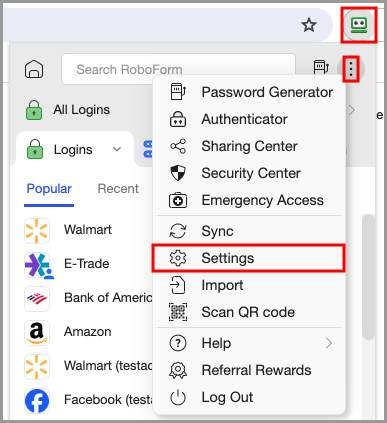
-
On the RoboForm Start Page, click the account dropdown and select Settings.
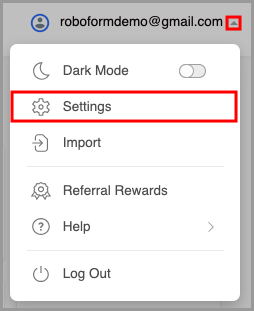
The Settings window is split into two sections:
- The Left Panel shows navigation tabs such as Language, Browsers & Apps, etc.
-
The Details Pane shows the options available in the selected navigation tab.
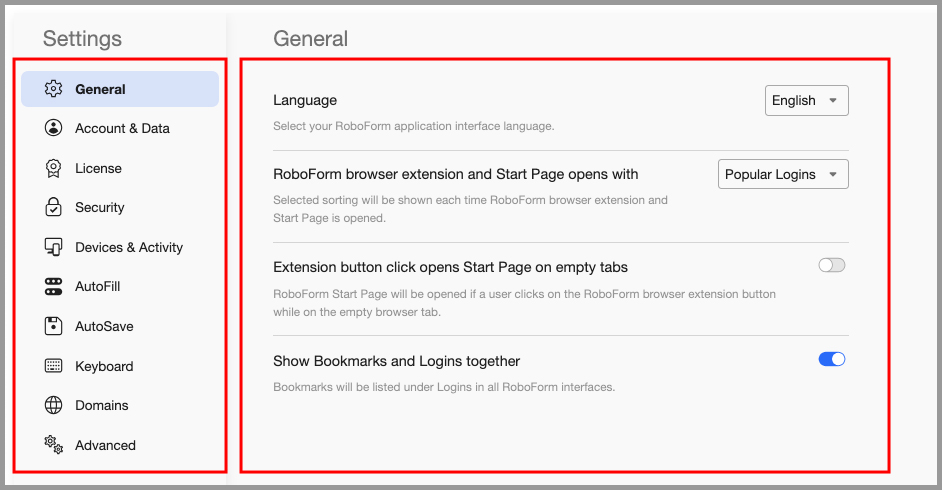
General
- The first option on the General page is to change the Language for your RoboForm interface. Simply select the language in the drop-down menu.
- RoboForm Browser Extension and Start Page opens with - Allows you to select from the dropdown how your RoboForm data is sorted in the RoboForm Extension and Start Page.
- Extension button click opens Start Page on empty tabs - Allows you to select that the RoboForm Start Page will be opened if a user clicks on the RoboForm browser extension button while on an empty browser ta
-
Show Bookmarks and Logins together - Allows you to select that Bookmarks will be listed under Logins in all RoboForm interfaces
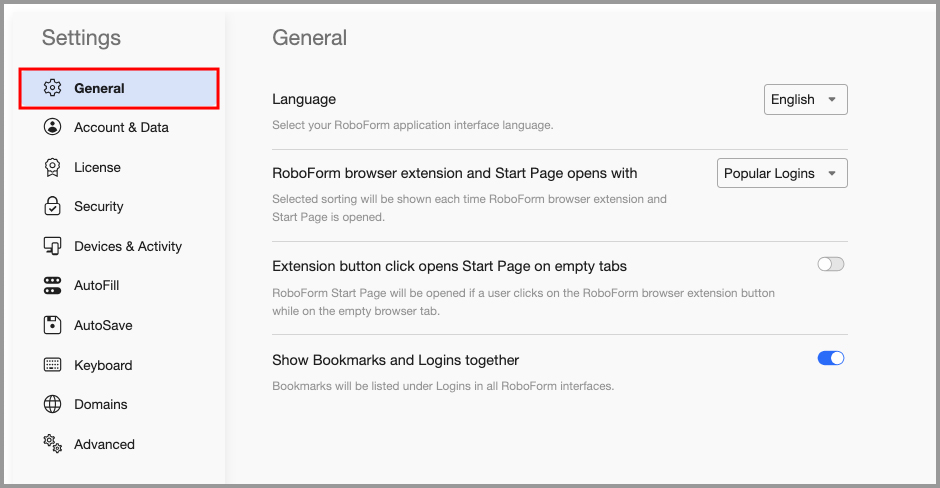
Account & Data
- First and Last Name - The first and last name associated with your account.
- Email - The email you used to sign up for the account.
- Import & Export your existing passwords - Allows you to import or export passwords to or from RoboForm.
- Change Master Password - Allows you to change your Master Password.
- Clear Usage Logs - Allows you to clear your Popular and Recent lists.
- Backup & Restore - Allows you to backup or restore your RoboForm data.
-
Delete My RoboForm Account - Allows you to delete your RoboForm account
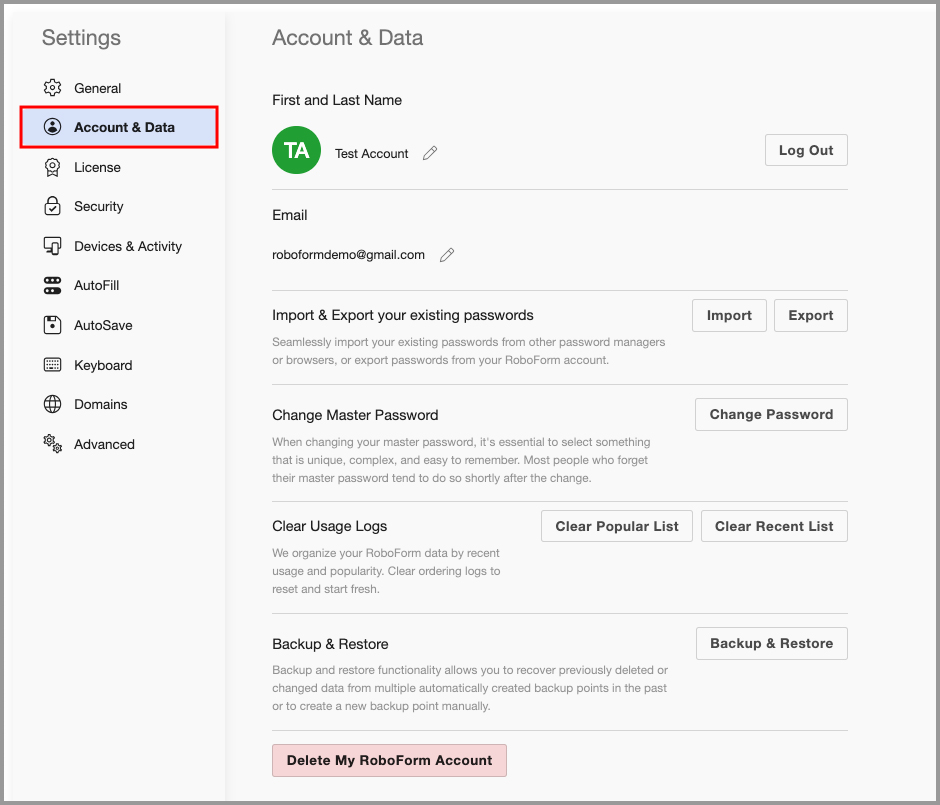
License
- License type - Lists the type of license you have for RoboForm.
- License status - Displays whether your license is active or inactive and the expiration date of the license.
- Auto Renewal Status - Allows you to toggle your Auto Renewal status on/off, lists the next billing date, and lists the price the license will renew at.
- Payment Info - Displays the payment method you have on file for your account.
-
Activated Accounts - Shows other licenses you have available under your account (if applicable).
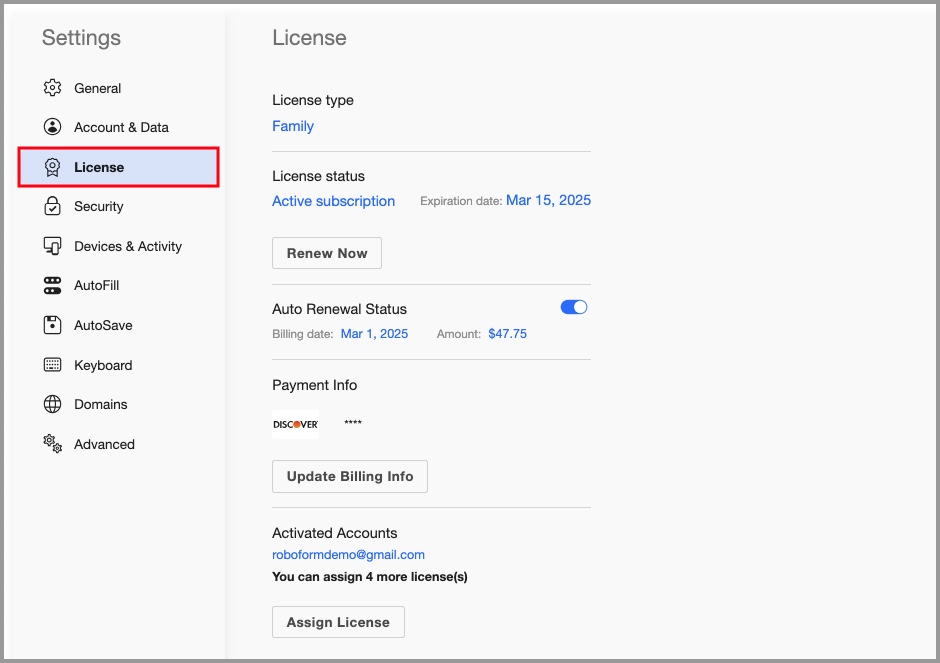
Security
This page allows you to view some of your security information.
-
Authentication Method provides the following options:
- Always ask for Master Password - When checked, means you can only log in by typing your Master Password.
- Use Touch ID - Allows you to use Touch ID to log in instead of your Master Password.
- Don’t ask for Master Password - When checked, turns off the prompt requesting the Master Password. For security reasons, we recommend against this.
- Auto-Logout after this many minutes - The time period before RoboForm automatically logs you off. You can turn off Auto-Logout by checking the box. The number at the bottom shows the amount of minutes before Automatic Logout. To change the time period, simply type in a number or click the up and down arrows to select a number of minutes.
- Two-factor authentication -
- Warn me before Login data is filled on a non-matching domain -
- Warn me before my credit card or bank account data is filled -
- Show compromised passwords indicator -
-
Encryption iteration count -

Devices & Activity
This page shows which devices you have authorized, and recent activity on your account. You can use this page to help verify the security of your account.
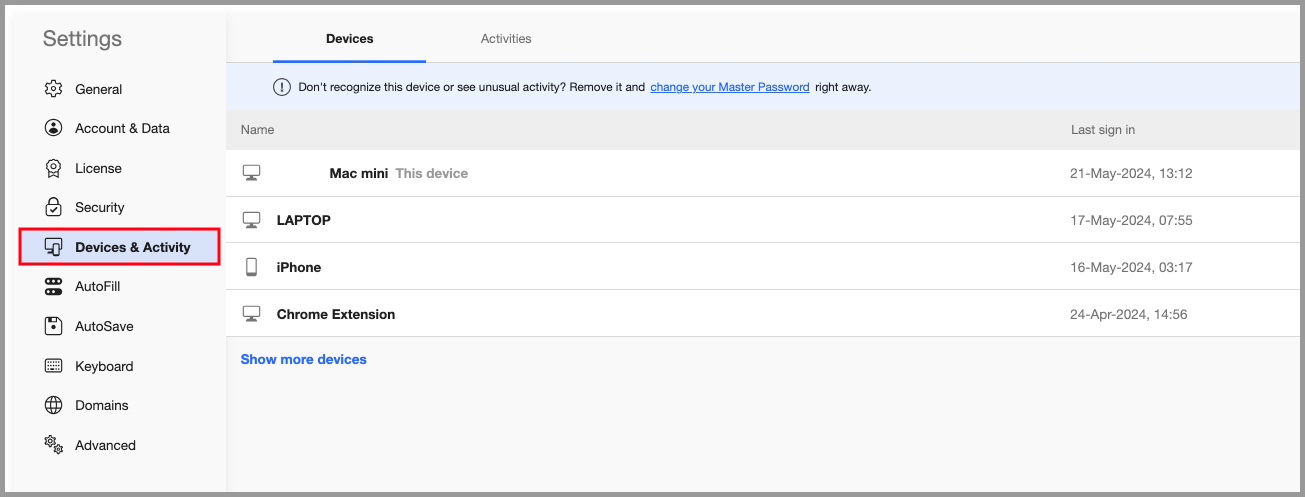
If you see a device that you do not recognize, select it and click "Remove this device" in the bottom left.
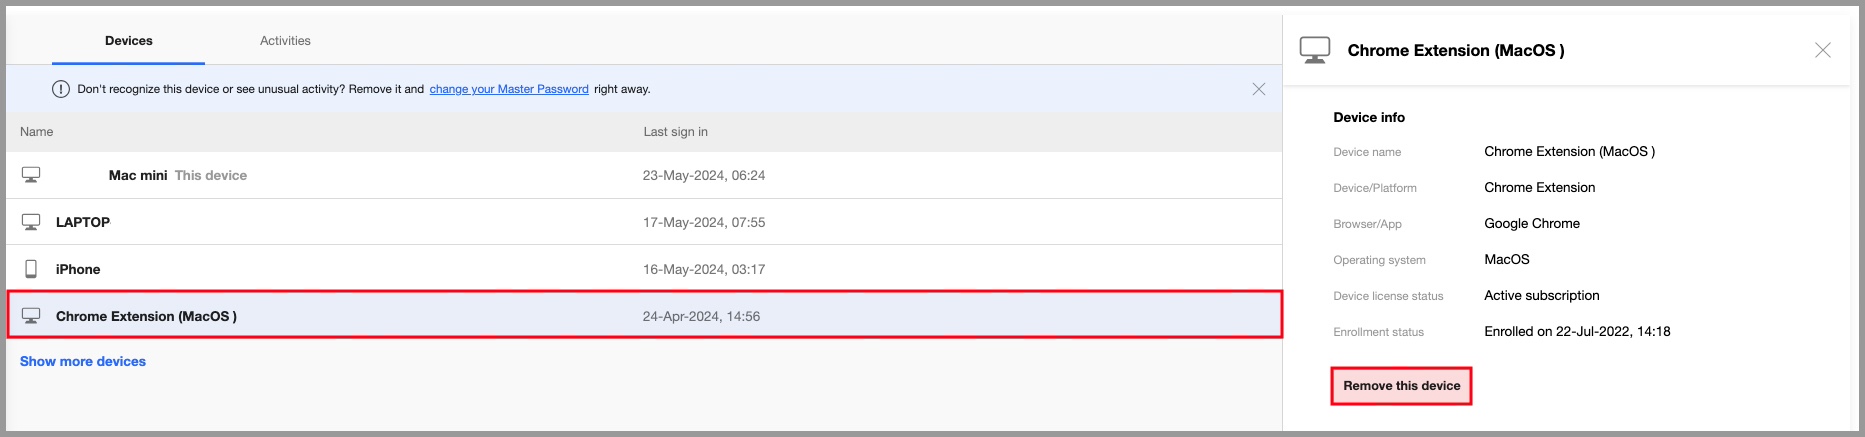
AutoFill
This page provides AutoFill options. Read more in Chapter 10: AutoFill Dialog.
-
AutoFill
- Do not Offer to AutoFill - When checked, means RoboForm will not offer to automatically fill forms.
- Offer to AutoFill - When checked, means that when RoboForm encounters a form that can be filled from a Matching Login or an Identity, the in-page AutoFill icon will offer to AutoFill the form.
- AutoFill Without Asking (if only one choice) - When checked, will automatically fill all forms when you visit a web page with the Matching Login or Identity. If there are multiple matching Logins, the AutoFill dialog will pop up. Read more about AutoFill in Chapter 10: AutoFill Dialog.
- Offer to AutoFill from Contacts - Offers to fill from Contacts in addition to Identities.
-
Offer to AutoFill Basic Authentication dialogs in Browsers - When checked, means that when RoboForm encounters a Basic Authentication, AutoFill will offer to fill the Matching Login.
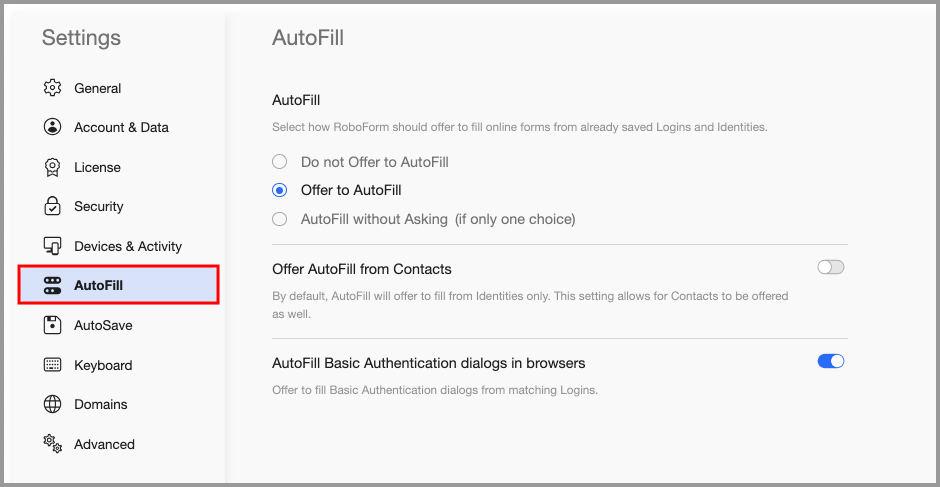
AutoSave
This page provides AutoSave options. Read more about AutoSave in Chapter 4: Logins.
-
AutoSave
- Do not Offer to AutoSave - When checked, means RoboForm will not offer to automatically save Logins
- Offer to AutoSave (require user confirmation) - When checked, means that when you submit a Login, RoboForm will offer to save it.
- AutoSave without Asking - When checked, means that when you submit a Login, RoboForm will save it automatically.
- AutoSave from Basic Authentication dialogs in browsers - Open the AutoSave dialog when you submit (login to) a Windows Dialog or Basic Authentication form. Read more about Basic Authentication in Chapter 4: Logins.
- Enable keyboard shortcut: ALT + click on sign-in button forces AutoSave - This is a method to force AutoSave a Login. Type in your login details and hold the ALT key + click the login button for the AutoSave Dialog to appear.
-
Enable keyboard shortcut: SHIFT + ENTER in text field forces AutoSave - This is a method to force AutoSave a Login. Type in your login details and hold Shift + for the AutoSave Dialog to appear.
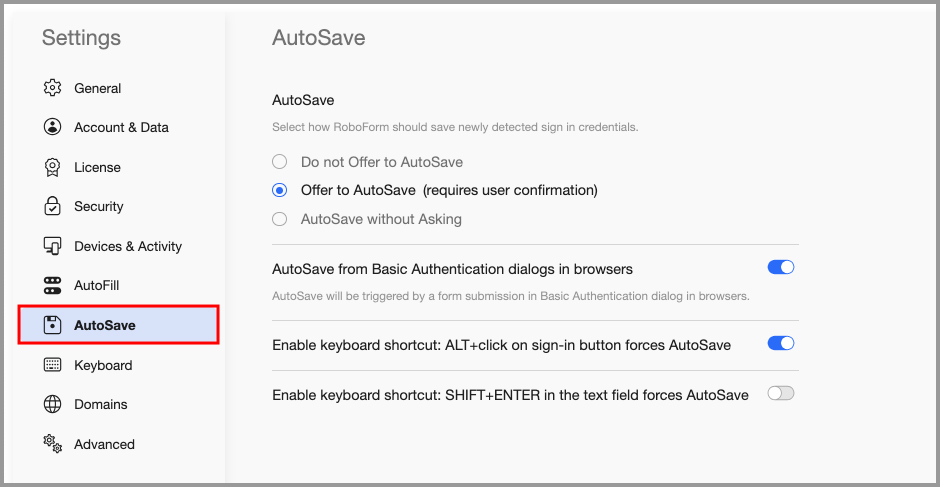
Keyboard
Enable RoboForm Shortcuts in Browser means that Keyboard shortcuts will be available when this option is checked. Unchecking it will disable shortcuts.
To use a shortcut, hold Alt and the Key command to trigger the shortcut.
List of default commands:
| Key | Action |
|---|---|
| Alt + X | Opens Login |
| Alt + N | Opens Identities |
| Alt + C | Opens Safenotes |
| Alt + U | Opens the RoboForm Button |
| Alt + I | Opens RoboForm Taskbar |
| Alt + L | Log offs RoboForm |
| Alt + M | Opens Matching Logins |
| Alt + O | Opens RoboForm Options |
| Alt + P | Opens Password Generator |
| Alt + R | Show and Hide RoboForm Toolbar |
| Alt + S | Opens Search Box |
| Alt + Z | Fill and Submit the web page you are on |
| Alt + - | Resets Fields to their original values. |
| Alt + = | Set Fields with check marks. |
| Alt + 0 | Clears the Fields that are filled. |
| Alt + , | Opens Identities Editor |
| Alt + . | Opens Logins Editor |
| Alt + / | Opens Safenotes Editor |
| Alt + ] | Offers to fills forms on website |
| Alt + [ | Opens dialog to save forms on a website |
| Alt + 1-9 | Fills in your Identity according to the order, 1 being the first identity. |
At the bottom of the page, there are options to use Ctrl or Shift instead of Alt, and an option to use the Right Alt key for shortcuts in addition to the left.
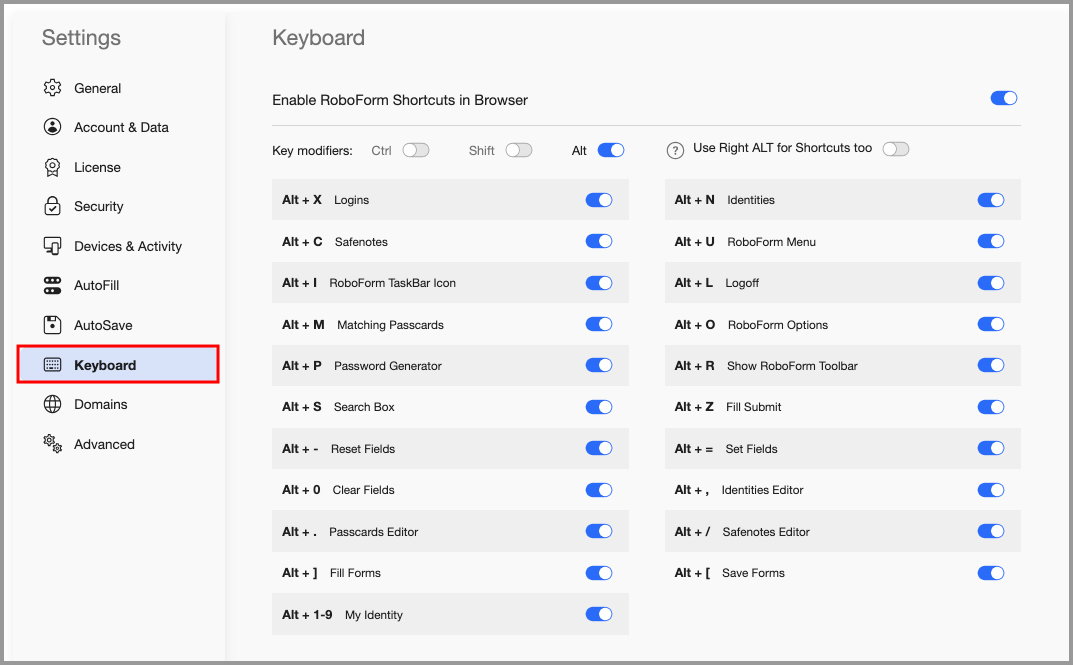
Domains
Equivalent Domains
Some websites are under the same organizations and utilize the same Logins or Accounts, but have different URLs. These are called Mirrors.
Domain Equivalencies simplifies this problem by creating a single Login for multiple URLs.
For this list, add Domains that share the same Login. Use " = " to mark the domains equal to each other, e.g. “apple.com=itunes.com”. These settings will then apply in Matching Logins.
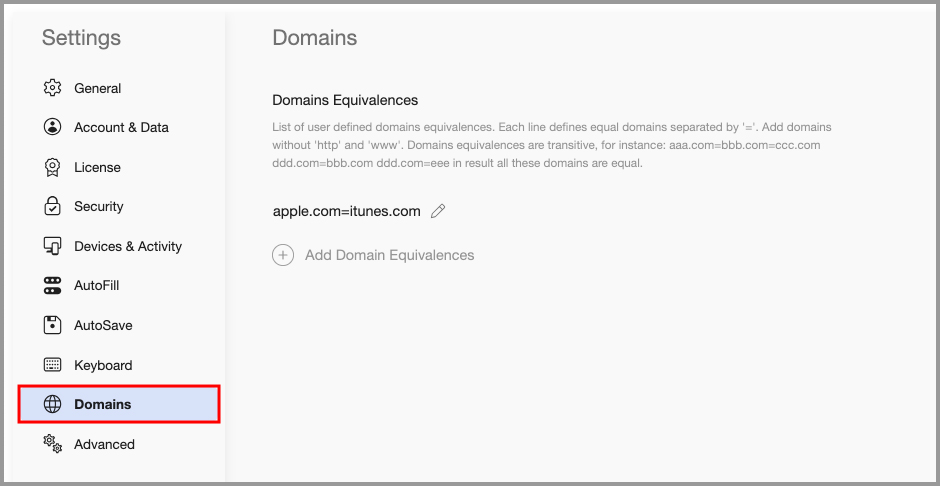
Advanced
- Enable integration with installed RoboForm application - Toggles on and off integration between the RoboForm browser extension and the RoboForm desktop application
- Use Desktop Editor for View and Edit - Allows you to choose to use the Desktop Editor instead of the Start Page to view and edit your data.
- Enable RoboForm Desktop Menu - Allows you to choose to have the RoboForm Desktop menu included in the browser extension.
- Disable browser built - in password manager when RoboForm extension is installed - Allows you to automatically disable your browser’s built in password manager when the RoboForm extension is installed.
- How to calculate data popularity - Allows you to choose the algorithm RoboForm uses to calculate data popularity.
- How fast does used data become popular - Allows you to choose the speed at which used data becomes labeled as Popular.
-
Open Options in installed RoboForm - Allows you to open the RoboForm Desktop Application’s options.
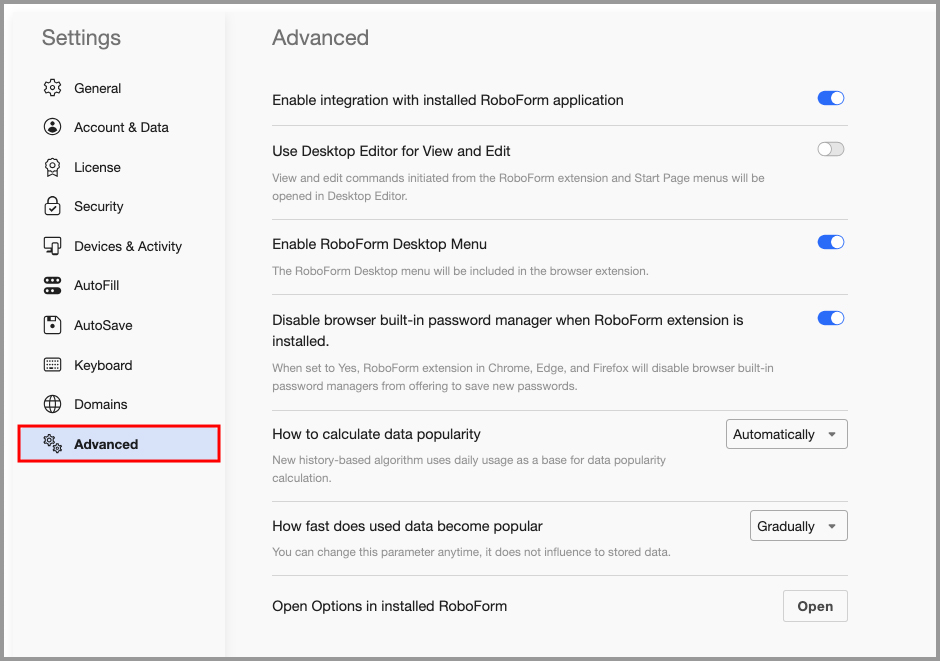
Chapter 19: RoboForm Security
The security of our users’ data is of the utmost importance to us.
The next few sections outline the different layers of protection that RoboForm employs.
Encryption
All RoboForm data is packed into a single file encrypted using AES encryption with 256-bit keys. To protect against dictionary, brute force, or other attacks, we generate encryption keys using the PBKDF2 password hashing algorithm with a random salt and SHA-256 as a hash function.
All decryption of your RoboForm data happens on your device and not on our servers. The encryption key is derived from the Master Password and never leaves the client device. This applies for both installed versions of RoboForm as well as web access.
No RoboForm data can be accessed without the Master Password. We have no way of knowing what your Master Password is because RoboForm does not transmit it to our servers.
Authentication
As part of our RoboForm Premium subscription, we offer secure sync and backup of encrypted RoboForm data (sync can be turned off on Windows and Mac).
All RoboForm data that leaves your device is encrypted both in transit and when stored on our servers.
To enable the sync process, our server has to authenticate your RoboForm account credentials. To do this, we use an authentication hash. The authentication hash is generated from your Master Password. However, we use a different algorithm than that for deriving the local encryption key. This is how we securely sync without being able to decrypt your underlying data, nor know what your Master Password is.
To further ensure the security of your account, we offer options for OTP (One Time Password) and 2FA (Two-Factor Authentication). Read more about how to set up OTP/2FA in Chapter 12: Authenticator.
Secure Sharing and Sending
We use public-private key encryption for our Secure Sharing feature as well as for individual item Sending. This allows you to provide access to your RoboForm data to trusted recipients with different permission levels without sharing your Master Password.